
VLS9200 user guide (BW402-10009, August 2012)
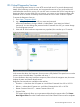


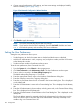

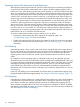

Figure 8 VLS discovery utility — main window
3. To visually identify a device listed, select the device from the list and click Beacon. This will
illuminate an LED on the device for the specified length of time.
In the case of the VLS, the UID LED button on the VLS node illuminates.
4. Select the VLS from the list of devices and click Configure.
The Device Configuration window opens.
5. Leave the default host name or enter a new host name in the Host Name box.
The default VLS host name is VLS<VLS serial number>.
The host name cannot contain spaces.
6. Enter an IP address in the IP Address box.
7. Enter the subnet mask in the Subnet Mask box.
NOTE: To display the correct subnet mask, gateway, DNS server, and domain name settings
for the VLS, open a DOS window on the computer running the VLS discovery utility and type
ipconfig /all
8. Enter the gateway in the Gateway box.
9. Enter the DNS server IP address in the DNS IP Address box.
10. Enter the domain name in the Domain Name box.
11. Click Configure to save the network settings to the VLS.
12. Click Exit to close the VLS discovery utility.
Setting the Network Settings using the CLI Command Set
To set the network settings using the CLI command set, set either the:
• DHCP usage and host name, or
• Fully qualified host name (or host name and DNS domain name separately), DNS server
address, IP address, gateway, and netmask
To set the network settings using the CLI command set:
1. Open a serial session and log in to the administrator account. See “Opening a Serial
Session” (page 100).
104 Configuration