
VLS9200 user guide (BW402-10009, August 2012)


2. To see the current configuration settings, at the prompt enter:
showConfig
3. Set each desired configuration value by entering:
setConfigValue <-tag> [value]
where <-tag> can be any of the following:
DescriptionTag
Host name (such as vlsexamp) (unqualified)-host
DNS domain name (such as xyz.com)-domain
Fully qualified name (such as vlsexamp.xyz.com)-fullhost
DNS server address (replaces all addresses with one line)-dnsaddr
First DNS server address (cannot use with dnsaddr)-dnsaddr1
Second DNS server address (cannot use with dnsaddr)-dnsaddr2
Has no value, indicates you want to configure the public Ethernet connection using
DHCP (reset is -dhcp=false)
-dhcp
IP address of public Ethernet connection-ipaddr
Gateway to network (xx.xx.xx.x)-gate
Netmask. Default is 255.255.255.0-mask
First NTP Server Address–ntpPrimary
Second NTP Server Address—ntpSecondary
NOTE: More than one network value can be set at a time or you can set them individually.
To reset a value, enter “ “ (quoted space) as the value.
NOTE: If you need to clear the DNS completely, set the DHCP to false and enter 0.0.0.0
for both the first and second DNS server addresses.
4. When all the network parameters are set to your desired values, save the settings by entering:
commitConfig
NOTE: The system automatically reboots after any change.
5. Verify the network settings have been changed by entering:
showConfig
Setting the Network Settings using Command View VLS
To set the network settings using Command View VLS, set either the:
• DHCP usage and host name, or
• Fully qualified host name (or host name and DNS domain name separately), DNS server
address, IP address, gateway, and netmask
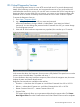
To set the network settings using Command View VLS:
1. Click the System tab.
2. Select Chassis in the navigation tree.
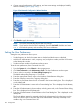
3. Select Set Network Configuration under Maintenance Tasks.
Setting the Network Settings 105