
VLS9200 user guide (BW402-10009, August 2012)

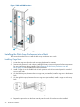


7. On the rear vertical posts, starting at the same rack positions as in the front, install a cage nut
in the middle hole of each position for each 2U enclosure to be installed.
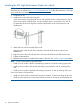
Attaching Side Brackets to Enclosures
NOTE: The right and left enclosure side brackets are identical. Install the brackets with the beveled
slots facing away from the disk array enclosures.
To attach enclosure side brackets to each side of a disk array enclosure, use two #8-32 x 3/16-inch
flathead screws on each side.
1. Locate the enclosure side brackets and screws from the rack mounting hardware kit contents.
2. Position the enclosure side bracket with the long edge down and the arms flush with the top
of the enclosure.
3. Line up the outermost beveled slots of the enclosure side bracket with the rear holes in the
enclosure. The rear arm extends slightly past the back of the enclosure.
4. Install two #8-32 x 3/16-inch flathead screws into the slots. Tighten both screws.
NOTE: Using screws longer than #8-32 x 3/16-inch may result in interference with the
power supply.
5. Repeat this procedure for the other side bracket, and for each enclosure to be added.
Attaching the Front to the Rear Rail Pieces
To attach the front and rear rail pieces, use three #8-32 x 3/8-inch flathead screws for each
complete rail.
Installing the Disk Array Enclosures into a Rack 23