HP X9000 File Serving Software File System User Guide Abstract This guide describes how to configure and manage X9000 Software file systems and how to use NFS, CIFS, FTP, and HTTP to access file system data. The guide also describes the following file system features: quotas, remote replication, snapshots, data tiering, and file allocation. The guide is intended for system administrators managing X9300 Network Storage Gateway systems, X9320 Network Storage Systems, and X9720 Network Storage Systems.
© Copyright 2009, 2011 Hewlett-Packard Development Company, L.P. Confidential computer software. Valid license from HP required for possession, use or copying. Consistent with FAR 12.211 and 12.212, Commercial Computer Software, Computer Software Documentation, and Technical Data for Commercial Items are licensed to the U.S. Government under vendor's standard commercial license. The information contained herein is subject to change without notice.
Contents 1 Using X9000 Software file systems...............................................................9 File system organization and access............................................................................................9 File system building blocks.......................................................................................................10 Configuring file systems...........................................................................................................
Deleting file serving nodes and X9000 clients.......................................................................40 Checking and repairing file systems..........................................................................................40 Analyzing the integrity of a file system on all segments...........................................................41 Clearing the INFSCK flag on a file system.............................................................................
Managing FTP shares..............................................................................................................77 Adding an FTP share..........................................................................................................77 Modifying an FTP share......................................................................................................80 Viewing FTP shares...........................................................................................................
Starting a run-once directory replication task.......................................................................109 Stopping a remote replication task.....................................................................................109 Pausing a remote replication task.......................................................................................109 Resuming a remote replication task....................................................................................
Other automated snapshot procedures................................................................................141 Managing block snapshots....................................................................................................142 Creating an on-demand snapshot......................................................................................142 Mounting or unmounting a snapshot..................................................................................
Subscription service..............................................................................................................159 Glossary..................................................................................................160 Index.......................................................................................................
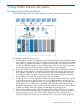
1 Using X9000 Software file systems File system organization and access The following diagram shows how data is organized on a file system and how it is accessed. The diagram includes the following items: 1. The file system is a collection of segments (logical volumes) that organize data for faster access. Each segment is a repository for files and directories with no implicit namespace relationships among them. (A segment need not be a complete, rooted directory tree.
5. protocols must mount the file system from a file serving node. All requests are sent to the mounting server, which performs the required routing. A client request can be made for a file on a segment that is either owned by the server, owned by another server but accessible by this server over the SAN, or owned by another server and not accessible by this server over the SAN.
deletion. Users can access the filesystem or directory as it appeared at the instant of the snapshot. See “Creating X9000 software snapshots” (page 126). • Block Snapshots. This feature uses the array capabilities to capture a point-in-time copy of a file system for online backup purposes and to simplify recovery of files from accidental deletion. The snapshot replicates all file system entities at the time of capture and is managed exactly like any other file system.
2 Creating and mounting file systems This chapter describes how to create file systems and mount or unmount them. Creating a file system You can create a file system using the New Filesystem Wizard provided with the management console GUI, or you can use CLI commands. The New Filesystem Wizard also allows you to create an NFS export or a CIFS share for the file system. Using 32-bit or 64-bit mode A file system can be created to use either 32-bit or 64-bit mode.
On the Configure Options dialog box, supply a name for the file system, and specify the appropriate configuration options. If data retention will be used on the file system, enable it and set the retention policy. See “Managing data retention and validation” (page 112) for more information.
The default retention period determines whether you can manage WORM (non-retained) files as well as WORM-retained files. (WORM (non-retained) files can be deleted at any time; WORM-retained files can be deleted only after the file's retention period has expired.) To manage only WORM-retained files, set the default retention period to a non-zero value. WORM-retained files then use this period by default; however, you can assign a different retention period if desired.
If the file system will be exported through NFS, configure an NFS export record on the NFS Export dialog box. See “Using NFS” (page 44) for more information. If the file system will be made available to Windows clients through a CIFS share, create a share on the CIFS Share dialog box. For more information, see “Using CIFS” (page 57).
If clients will access the file system using HTTP or HTTPS, create an HTTP share on the HTTP Export dialog box. An HTTP configuration profile and an HTTP Vhost must already exist. If the Directory Path includes a subdirectory, be sure to create the subdirectory on the file system and assign read/write/execute permissions to it. (X9000 Software does not create the subdirectory if it does not exist, and instead adds a /pub/ directory to the share path.) For more information, see “Using HTTP” (page 83).
If clients will access the share using FTP or FTPS, create an FTP share on the FTP Share dialog box. An FTP configuration profile and an SSL certificate, if used, must already exist. If the Directory Path includes a subdirectory, be sure to create the subdirectory on the file system and assign read/write/execute permissions to it. (X9000 Software does not create the subdirectory if it does not exist, and instead adds a /pub/ directory to the share path.) For more information, see “Using FTP” (page 75).
For example: ibrix_fs -o "retenMode=Enterprise,retenDefPeriod=5m,retenMinPeriod=2,retenMaxPeriod=30y" -c -f ifs1 -s ilv_[1-4] -a Creating a file system manually from physical volumes This procedure is equivalent to using ibrix_fs to create a file system from physical volumes in a single step. Instead of a single command, you build the file system components individually: 1. Discover the physical volumes in the system. Use the ibrix_pv command. 2. Create volume groups from the discovered physical volumes.
You can also view mountpoint information for a particular server. Select that server on the Servers top panel, and then select Mountpoints from the lower Navigator. To delete a mountpoint, select that mountpoint and click Delete. CLI procedures The CLI commands are executed immediately on file serving nodes. For X9000 clients, the command intention is stored in the management console. When X9000 Software services start on a client, the client queries the management console for any commands.
NOTE: A file system must be mounted on the file serving node that owns the root segment (that is, segment 1) before it can be mounted on any other host. X9000 Software automatically mounts a file system on the root segment when you mount it on all file serving nodes in the cluster. The mountpoints must already exist.
To remove a client access entry, select the affected file system on the GUI, and then select Client Exports from the lower Navigator. Select the access entry from the Client Exports display, and click Delete. On the CLI, use the ibrix_exportfs command to create an access entry: ibrix_exportfs –c –f FSNAME –p CLIENT:/PATHNAME,CLIENT2:/PATHNAME,...
3 Setting up quotas Quotas can be assigned to individual users or groups, or to a directory tree. Individual quotas limit the amount of storage or the number of files that a user or group can use in a file system. Directory tree quotas limit the amount of storage and the number of files that can be created on a file system located at a specific directory tree. Although it is best to set up quotas when you create a file system, you can configure them at any time.
On the management console, select the file system and then select Quotas from the lower Navigator. On the Quota Summary bottom panel, click Modify. To enable quotas from the CLI, run the following command: ibrix_fs -q -E -f FSNAME Setting user and group quotas Before configuring quotas, the quota feature must be enabled on the file system and the file system must be mounted. NOTE: For the purpose of setting quotas, no UID or GID can exceed 2,147,483,647. Setting user quotas to zero removes the quotas.
To configure a group quota, select the file system where the quotas will be configured. Next, select Quotas > Group Quotas from the lower Navigator, and then, on the Group Quota Usage Limits bottom panel, click Set. Group quotas can be identified by either the group name or GID. Specifying quota limits is optional. To change user or group quotas, select the appropriate user or group on the Quota Usage Limits bottom panel, and then select Modify.
CLI procedure Use the following commands to set quotas for users and groups: • Set a quota for a single user: ibrix_edquota -s -u “USER” -f FSNAME [-M SOFT_MEGABYTES] [-m HARD_MEGABYTES] [-I SOFT_FILES] [-i HARD_FILES] • Set a quota for a single group: ibrix_edquota -s -g “GROUP” -f FSNAME [-M SOFT_MEGABYTES] [-m HARD_MEGABYTES] [-I SOFT_FILES] [-i HARD_FILES] Enclose the user or group name in single or double quotation marks.
To change a directory tree quota, select the directory tree on the Quota Usage Limits bottom panel, and then click Modify. CLI procedure To create a directory tree quota and assign usage limits, use the following command: ibrix_edquota -s -d NAME -p PATH -f FSNAME -M SOFT_MEGABYTES -m HARD_MEGABYTES -I SOFT_FILES -i HARD_FILES The -f FSNAME option specifies the name of the file system. The -p PATH option specifies the pathname of the directory tree.
Using a quotas file Quota limits can be imported into the cluster from the quotas file, and existing quotas can be exported to the file. See “Format of the quotas file” (page 27) for the format of the file. Importing quotas from a file From the management console, select the file system, select Quotas from the lower Navigator, and then click Import.
name. The “C” format specifies a directory tree, where the path exists, but the identifier name for the directory tree will not be created until the quotas are imported.
On the Task Summary panel, select Start to open the Start Online quota check dialog box and select the appropriate mode. The Task Summary panel displays the progress of the scan. If necessary, select Stop to stop the scan.
Troubleshooting quotas Recreated directory does not appear in directory tree quota If you create a directory tree quota on a specific directory and delete the directory (for example, with rmdir/rm -rf) and then recreate it on the same path, the directory does not count as part of the directory tree, even though the path is the same. Consequently, the ibrix_onlinequotacheck command does not report on the directory.
4 Maintaining file systems This chapter describes how to extend a file system, rebalance segments, delete a file system or file system component, and check or repair a file system. The chapter also includes file system troubleshooting information. Best practices for file system performance It is important to monitor the space used in the segments making up the file system.
Viewing physical volume information Use the following command to view information about physical volumes: ibrix_pv -l The following table lists the output fields for ibrix_pv -l. Field Description PV_Name Physical volume name. Regular physical volume names begin with the letter d. The names of physical volumes that are part of a mirror device begin with the letter m. Both are numbered sequentially. Size (MB) Physical volume size, in MB.
Viewing logical volume information To view information about logical volumes, use the ibrix_lv -l command. The following table lists the output fields for this command. Field Description LV_NAME Logical volume name. LV_SIZE Logical volume size, in MB. FS_NAME File system to which this logical volume belongs. SEG_NUM Number of this segment (logical volume) in the file system. VG_NAME Name of the volume group created on this physical volume, if any.
Field Description EXPORT_CONTROL_ENABLED Yes if enabled; No if not. QUOTA_ENABLED Yes if enabled; No if not. RETENTION If data retention is enabled, the retention policy is displayed. DEFAULT_BLOCKSIZE Default block size, in KB. CAPACITY Capacity of the file system. FREE Amount of free space on the file system. AVAIL Space available for user files. USED PERCENT Percentage of total storage occupied by user files. FILES Number of files that can be created in this file system.
Field Description BACKUP Backup host name. TYPE Segment type. MIXED means the segment can contain both files and directories. TIER Tier to which the segment was assigned. LAST_REPORTED Last time the segment state was reported. HOST_NAME Host on which the file system is mounted. MOUNTPOINT Host mountpoint. PERMISSION File system access privileges: RO or RW. Root_RO Specifies whether the root user is limited to read-only access, regardless of the access setting.
On the CLI, use the ibrix_fs command to extend a file system. Segments are added to the file serving nodes in a round-robin manner. If tiering rules are defined for the file system, the -t option is required. Avoid expanding a file system while a tiering job is running. The expansion takes priority and the tiering job is terminated.
sources or destinations for a rebalance task, candidate segments are sorted into sources and destinations and then rebalanced as evenly as possible. If you specify sources, all other candidate segments in the file system are tagged as destinations, and vice versa if you specify destinations.
Rebalancing segments from the CLI To rebalance all segments, use the following command. Include the -a option to run the rebalance operation in analytical mode.
ibrix_rebalance -l [-f FSLIST] ibrix_rebalance -i [-f FSLIST] The first command reports summary information. The second command lists jobs by task ID and file system and indicates whether the job is running or stopped. Jobs that are in the analysis (Coordinator) phase are listed separately from those in the implementation (Worker) phase. Stopping rebalance tasks You can stop running or stalled rebalance tasks. If the management console cannot stop the task for some reason, you can force the task to stop.
ibrix_fs -d -f ifs1,ifs2 If data retention is enabled on the file system, include the -R option in the command. For example: ibrix_fs -d -R -f ifs2 Deleting segments, volume groups, and physical volumes When deleting segments, volume groups, or physical volumes, you should be aware of the following: • A segment cannot be deleted until the file system to which it belongs is deleted. • A volume group cannot be deleted until all segments that were created on it are deleted.
The command runs in four phases and has two running modes: analytical and corrective. You must run the phases in order and you must run all of them: • Phase 0 checks host connectivity and the consistency of segment byte blocks and repairs them in corrective mode. • Phase 1 checks segments and repairs them in corrective mode. Results are stored locally. • Phase 2 checks the file system and repairs it in corrective mode. Results are stored locally.
Cannot mount on an X9000 client Verify the following: • The file system is mounted and functioning on the file serving nodes. • The mountpoint exists on the X9000 client. If not, create the mountpoint locally on the client. • Software management services have been started on the X9000 client (see “Starting and stopping processes” in the administrator guide for your system).
ref_counter .................... 1038 state_flags .................... SEGMENT_LOCAL SEGMENT_PREFERED SEGMENT_DHB
5 Using NFS This section describes how to export file systems for NFS, how to autoconnect NFS clients, and how to set up NFS clients. Exporting a file system Exporting a file system makes local directories available for NFS clients to mount. The management console manages the table of exported file systems and distributes the information to the /etc/ exports files on the file serving nodes.
From the CLI To export a file system from the CLI, use the ibrix_exportfs command: ibrix_exportfs -f FSNAME -h HOSTNAME -p CLIENT1:PATHNAME1,CLIENT2:PATHNAME2,.. [-o "OPTIONS"] [-b] The options are as follows: Option Description –f FSNAME The file system to be exported. -h HOSTNAME The file serving node containing the file system to be exported. -p CLIENT1:PATHNAME1, CLIENT2:PATHNAME2,..
To provide world read-only access to file system ifs1 located at /usr/src on file serving node s1.hp.com: ibrix_exportfs -f ifs1 -h s1.hp.com -p :/usr/src -o "ro" Unexporting a file system A file system should be unexported before it is unmounted. On the management console, select the file system, select NFS Exports from the lower Navigator, and then select Unexport.
Every client must have two files placed in its /etc directory. The necessary files are on the management console; edit the files there and copy them to each client. Complete the following steps on each client: 1. Copy the appropriate script (auto.curl, auto.wget) located in /examples/autoconnect. Edit the copy to set fusionmanager to the IP address of your management console, and verify that the port is set to 9009.
Select the file system on the GUI, expand Active Tasks in the lower Navigator, and select Case Insensitivity On the Task Summary bottom panel, click New to open the New Case Insensitivity Task dialog box. Select the appropriate action to change case insensitivity. NOTE: When specifying a directory path, the best practice is to change case insensitivity at the root of a CIFS share and to avoid mixed case insensitivity in a given share.
NOTE: To verify the coordinating server, select File System > Inactive Tasks. Then select the task ID from the display and select Details. The log file names have the format IDtask.log, such as ID26.log.
The case-insensitive setting of the source directories is not retained on the destination directories. Instead, the setting for the destination file system is applied. However, if you use a command such as the Linux mv command, a Windows drag and drop operation, or a Mac uncompress operation, a new directory is not created, and the affected directory retains its original case-insensitive setting.
6 Configuring authentication for CIFS, FTP, and HTTP Users accessing CIFS, FTP, or HTTP shares can be authenticated through either Active Directory or Local Users. If you select Active Directory, you can specify the share administrators and enable or disable Linux static user mapping. If you select Local Users, you can create the appropriate local user and local group accounts.
NOTE: When you successfully configure Active Directory authentication, the machine is part of the domain until you remove it from the domain, either with the ibrix_auth -n command or with Windows tools. Because Active Directory authentication is a one-time event, it is not necessary to update authentication if you change the proxy user information.
To configure Local Users authentication from the CLI, use the following command: ibrix_auth -N [-h HOSTLIST] To configure Active Directory authentication, use the following command: ibrix_auth -n DOMAIN_NAME –A AUTH_PROXY_USER_NAME@domain_name [-P AUTH_PROXY_PASSWORD] [-S SETTINGLIST] [-h HOSTLIST] RFC2307 is the protocol that enables Linux static user mapping with Active Directory.
On the CLI, use the following command to view information about all local group accounts: ibrix_localgroups -L To see information for a specific local group account, use the following command: ibrix_localgroups -l -g GROUPNAME Adding a local group To add a new local group, click Add on the Local Groups panel. Then enter the information for the group on the Add Local Group dialog box. The GID and RID will be generated automatically if you do not enter values for them.
Modifying a local group To change the information for a local group account, select the account on the Local Groups panel and click Modify. You can then make the necessary changes on the Modify Local Group dialog box. If you are changing the GID or RID for the group, it cannot be the primary group for any local users.
To add a local user account from the CLI, use this command: ibrix_localusers -a -u USERNAME -g DEFAULTGROUP -p PASSWORD [-h HOMEDIR] [-s SHELL] [-i USERINFO] [-U USERID] [-S RID] [-G GROUPLIST] Modifying a local user To change the information for a local user account, select the account on the Local Users panel and click Modify. You can then make the necessary changes on the Modify Local User dialog box. You cannot change the UID or RID for the account.
7 Using CIFS The X9000 Software CIFS server implementation allows you to create file shares for data stored on the cluster. The CIFS server provides a true Windows experience for Windows clients. A user accessing a file share on an X9000 system will see the same behavior as on a Windows server. IMPORTANT: Before configuring CIFS, select an authentication method (either Local Users or Active Directory). See “Configuring authentication for CIFS, FTP, and HTTP” (page 51) for more information.
To start, stop, or restart the service from the CLI, use the following command: ibrix_server –s –t cifs –c {start|stop|restart} CIFS shares Windows clients access file systems through CIFS shares. You can use the X9000 management console GUI or CLI to manage shares, or you can use the Microsoft Management Console interface. The CIFS service must be running when you add shares. X9000 Software supports 5000 shares per server and 3000 connections.
You can add, modify, or delete shares from this panel, but you cannot configure CIFS settings, as those settings apply to all CIFS shares configured in the cluster. To view CIFS shares using the CLI, execute the following command: ibrix_cifs -i [-h HOSTLIST] Configuring SMB signing Use the SMB signing feature to specify whether clients must support SMB signing to access CIFS shares. You can configure SMB signing as follows: • Disabled. SMB signing is not in effect. This option applies only to SMB1.
To view the current setting for SMB signing, use the following command: ibrix_cifsconfig -i To configure SMB signing from the command line, use the following command: ibrix_cifsconfig -t -S SETTINGLIST You can specify the following values in the SETTINGLIST: smb signing enabled smb signing required Use commas to separate the settings, and enclose the list in quotation marks.
The Add a CIFS Share dialog box allows you to share the entire filesystem or a specific subdirectory. Enter a name and description for the share, select the appropriate permissions, and select the servers on which the share will be created. Note the following: • Do not include any of the following special characters in a share name. If the name contains any of these special characters, the share might not be set up properly on all nodes in the cluster.
To modify a share using the CLI, execute the following command: ibrix_cifs -m -s SHARENAME [-S SETTINGLIST] [-h HOSTLIST] Deleting a CIFS share To delete a CIFS share, select the share from either CIFS Shares panel, click Delete, and confirm the operation. To delete a CIFS share using the CLI, execute the following command: ibrix_cifs –d -s SHARENAME [-h HOSTLIST] Managing CIFS shares with Microsoft Management Console The Microsoft Management Console (MMC) can be used to add, view, or delete CIFS shares.
6. 7. 8. Click Close > OK to exit the dialogs. Expand Shared Folders (\\
). Select Shares and manage the shares as needed. Windows Vista, Windows 2008, Windows 7: Complete the following steps: 1. Open the Start menu and enter mmc in the Start Search box. You can also enter mmc in a DOS cmd window. 2. On the User Account Control window, click Continue. 3. On the Console 1 window, select File > Add/Remove Snap-in. 4. On the Add or Remove Snap-ins window, select Shared Folders and click Add. 5.6. 7. 8. Click OK to exit the Add or Remove Snap-ins window. Expand Shared Folders (\\
). Select Shares and manage the shares as needed. Saving MMC settings You can save your MMC settings to use when managing shares on this server in later sessions. Complete these steps: 1. On the MMC, select File > Save As. 2. Enter a name for the file. The name must have the suffix .msc. 3. Select Desktop as the location to save the file, and click Save. 4. Select File > Exit.NOTE: The Browse button cannot be used to locate the file system. • The directory to be shared will be created if it does not already exist. • The permissions on the shared directory will be set to 777. It is not possible to change the permissions on the share. • Do not include any of the following special characters in a share name. If the name contains any of these special characters, the share might not be set up properly on all nodes in the cluster.
To add a new share, select Shares > New Share and run the Create A Shared Folder Wizard. On the Folder Path panel, enter the path to the share, being sure to include the file system name. When you complete the wizard, the new share appears on the Computer Management window. Deleting CIFS shares To delete a CIFS share, select the share on the Computer Management window, right-click, and select Delete.
To use Linux static user mapping, complete these steps: • Configure Active Directory. • Assign POSIX attributes to users and groups in Active Directory. NOTE: Mapping UID 0 and GID 0 to any AD user or group is not compatible with CIFS static mapping. Configuring Active Directory Your Windows Domain Controller machines must be running Windows Server 2003 R2 or Windows Server 2008 R2. Configure the Active Directory domain as follows: • Install Identity Management for UNIX.
The next dialog box shows the properties for the gidNumber attribute. The following article provides more information about modifying attributes in the Active Directory global catalog: http://support.microsoft.com/kb/248717 Assigning attributes To set POSIX attributes for users and groups, start the Active Directory Users and Computers GUI on the Domain Controller.
Attributes tab. For users, you can set the UID, login shell, home directory, and primary group. For groups, set the GID. Consolidating SMB servers with common share names If your SMB servers previously used the same share names, you can consolidate the servers without changing the share name requested on the client side. For example, you might have three SMB servers, SRV1, SRV2, and SRV3, that each have a share named DATA.
When this configuration is in place, a client request to access share \\srv1/data will be translated to share srv1-DATA at /srv1/data on the filesystem. Client requests for \\srv3/data will also be translated to /srv1/data, but the clients will have different permissions. The client requests for \\srv2/data will be translated to share srv2-DATA at /srv2/data. Client utilities such as net use will report the requested share name, not the new share name.
Differences in locking behavior When CIFS clients access a share from different servers, as in the X9000 Software environment, the behavior of byte-range locks differs from the standard Windows behavior, where clients access a share from the same server. You should be aware of the following: • Zero-length byte-range locks acquired on one file serving node are not observed on other file serving nodes.
and honors ACLS. The UID/GIDs and permission bits for files on a directory tree are peripheral to this activity, and are used only as much as necessary to obtain access to files on behalf of a Windows client. The various cases the CIFS server can encounter while accessing files and directories, and what it does with UID/GID and permission bits in that access, are considered in the following sections. Pre-existing directories and files A pre-existing Linux directory will not have ACLs associated with it.
Changing the way CIFS inherits permissions on files accessed from Linux applications To avoid the CIFS server modifying file permissions on directory trees that a user wants to access from Linux applications (so keeping permissions other than 700 on a file in the directory tree), a user can set the setgid bit in the Linux permissions mask on the directory tree.
xcopy: include the option /C; in general, /S /I /Y /C are good baseline options. robocopy: include the option /ZB; in general, /S /E /COPYALL /ZB are good baseline options. Copy operations interrupted by node failback If a node failback occurs while xcopy or robocopy is copying files to a CIFS share, the copy operation might be interrupted and need to be restarted.
8 Using FTP The FTP feature allows you to create FTP file shares for data stored on the cluster. Clients access the FTP shares using standard FTP and FTPS protocol services. IMPORTANT: Before configuring FTP, select an authentication method (either Local Users or Active Directory). See “Configuring authentication for CIFS, FTP, and HTTP” (page 51) for more information. To configure FTP, first create one or more configuration profiles.
• If the directory path to the share includes a subdirectory, be sure to create the subdirectory on the file system and assign read/write/execute permissions to it. (X9000 Software does not create the subdirectory if it does not exist, and instead adds a /pub/ directory to the share path.) • For High Availability, when specifying IP addresses for accessing a share, use IP addresses for VIFs having VIF backups. See the administrator guide for your system for information about creating VIFs.
Modifying a configuration profile To modify a configuration profile, select the profile on the FTP Config Profiles panel, and click Modify Profile. You can then make the necessary changes on the Modify FTP Profile dialog box. To modify a configuration profile from the command line, use the following command: ibrix_ftpconfig –m PROFILENAME [-h HOSTLIST] [-S SETTINGLIST] Viewing configuration profiles The Modify FTP Profile dialog box shows details for a specific configuration profile.
The Users tab lists the users allowed read access, write access, or both on a share directory. You can add or delete users as necessary.
To assign share permissions to specific users, click Add and complete the Add Users to Share dialog box. To add an FTP share from the command line, use the following command: ibrix_ftpshare -a SHARENAME –c PROFILENAME -f FSNAME -p dirpath -I IP-Address:Port [–u USERLIST] [-S SETTINGLIST] For the -S option, use a comma to separate the settings, and enclose the settings in quotation marks, such as “browseable=true,readonly=true”.
Modifying an FTP share To change the properties for an FTP share, select the share on the Shares panel, click Modify Share, and make the necessary changes on the Modify FTP Share dialog box. To modify a share from the CLI, use the following command: ibrix_ftpshare -m SHARENAME –c PROFILENAME [-f FSNAME -p dirpath] -I IP-Address:Port [–u USERLIST] [-S SETTINGLIST] Viewing FTP shares The Modify FTP Share dialog box shows the configuration of an FTP share.
Accessing shares Clients can access an FTP share by specifying a URL in their browser (Internet Explorer or Mozilla Firefox). In the following URLs, IP_address:port is the IP (or virtual IP) and port configured for the share.
For Active Directory users (specify the user as in this example: ASM2k3.
9 Using HTTP The HTTP feature allows you to create HTTP file shares for data stored on the cluster. Clients access the HTTP shares using standard HTTP and HTTPS protocol services. IMPORTANT: Before configuring HTTP, select an authentication method (either Local Users or Active Directory). See “Configuring authentication for CIFS, FTP, and HTTP” (page 51) for more information. The HTTP configuration consists of a configuration profile, a virtual host, and an HTTP share.
not create the subdirectory if it does not exist, and instead adds a /pub/ directory to the share path.) • For High Availability, when specifying IP addresses for accessing a share, use IP addresses for VIFs having VIF backups. See the administrator guide for your system for information about creating VIFs. Configuring HTTP with the HTTP Wizard The New HTTP Wizard creates a configuration profile, a virtual host, and an HTTP share. To begin, click Add Profile on the HTTP Config Profiles panel.
On the Add HTTP Share dialog box, click Add HTTP Share and set the appropriate parameters. Note the following: • The file system selected for the share must be mounted. If the directory path includes a subdirectory, be sure to create the subdirectory on the file system and assign read/write/execute permissions to it. (X9000 Software does not create the subdirectory if it does not already exist, and instead adds a /pub/ directory to the share path.
To allow specific users read access, write access, or both, click Add. On the Add Users to Share dialog box, assign the appropriate permissions to the user. When you complete the dialog, the user is added to the list on the Add HTTP Share dialog box. The Summary panel presents an overview of the HTTP configuration. You can go back and modify any part of the configuration if necessary.
When the wizard is complete, users can access the share from a browser. For example, if you configured the share with the anonymous user, specified 99.226.50.92 as the IP address on the Create Vhost dialog box, and specified /reports/ as the URL path on the Add HTTP Share dialog box, users can access the share using the following URL: http://99.226.50.92/reports/ The users will see an index of the share (if the browseable property of the share is set to true), and can open and save files.
To modify a configuration profile from the command line, use the following command: ibrix_httpconfig -m PROFILENAME [-h HOSTLIST] [-S SETTINGLIST] Viewing configuration profiles The Modify HTTP Profile dialog box shows details for a specific configuration profile.
ibrix_httpvhost -a VHOSTNAME -c PROFILENAME -I IP-Address:Port [-S SETTINGLIST] Modifying a virtual host To change the properties for a virtual host, select the virtual host on the VHosts bottom panel, click Modify Vhost, and make the necessary changes on the Modify VHost Properties dialog box.
Adding an HTTP share To add an HTTP share, click Add Share on the Shares bottom panel. The HTTP Wizard opens at the Create Share dialog box. To add an HTTP share from the command line, use the following command: ibrix_httpshare -a SHARENAME -c PROFILENAME -t VHOSTNAME -f FSNAME -p dirpath -P urlpath [-u USERLIST] [-S SETTINGLIST] For the -S option, use a comma to separate the settings, and enclose the settings in quotation marks, such as “davmethods=true,browseable=true,readonly=true”.
Deleting an HTTP share To remove an HTTP share, select the share on the Shares bottom panel, click Delete Share, and then confirm the operation. To remove the share from the command line, use the following command: ibrix_httpshare -d SHARENAME -c PROFILENAME -t VHOSTNAME Starting or stopping the HTTP service manually Use the following command to start the HTTP service manually: /usr/local/ibrix/httpd/bin/apachectl -k start -f /usr/local/ibrix/httpd/conf/httpd.
For anonymous users: • Upload a file using HTTP protocol: curl -T http://IP_address:port/urlpath/ • Upload a file using HTTPS protocol: curl --cacert -T https://IP_address:port/urlpath// • Download a file using HTTP protocol: curl http://IP_address:port/urlpath/ -o // • Download a file using HTTPS protocol: curl --cacert https://IP_address:port/urlpath/ -o // For Ac
• Update the Windows registry. When using WebDAV shares in Windows Explorer, you must edit the Windows registry if there are many files in the WebDAV shares or the files are large. Launch the windows registry editor using the regedit command. Go to: Computer\HKEY_LOCAL_MACHINE\SYSTEM\ControlSet001\services\WebClient\Parameters Change the value of FileSizeLimitInBytes from the default value of 50000000 to 2147483648 (which is the value of 2 GB in bytes).
storage.hp.com/ cannot be mapped. Also, you cannot map https:// because of limitations with Windows 2003. • Delete read-only files through Windows Explorer. If you map a network drive for a share that includes files designated as read-only on the server, and you then attempt to delete one of those files, the file appears to be deleted. However, when you refresh the folder (using the REFRESH command), the folder containing the deleted file in Windows Explorer reappears.
Mapping HTTP WebDAV share as AD or local user through Windows Explorer fails if the HTTP Vhost IP address is used Mapping the HTTP WebDAV share to a network drive as Active Directory or local user through Windows Explorer fails on Windows 2008 if the HTTP Vhost IP address is used. To resolve this condition, add the Vhost names and IP addresses in the hosts file on the Windows clients.
10 Managing SSL certificates Servers accepting FTPS and HTTPS connections typically provide an SSL certificate that verifies the identity and owner of the web site being accessed. You can add your existing certificates to the cluster, enabling file serving nodes to present the appropriate certificate to FTPS and HTTPS clients. X9000 Software supports PEM certificates. When you configure the FTP share or the HTTP vhost, select the appropriate certificate.
1. Generate a private key: openssl genrsa -des3 -out server.key 1024 You will be prompted to enter a passphrase. Be sure to remember the passphrase. 2. Remove the passphrase from the private key file (server.key). When you are prompted for a passphrase, enter the passphrase you specified in step 1. cp server.key server.key.org openssl rsa -in server.key.org -out server.key rm -f server.key.org 3. Generate a Certificate Signing Request (CSR): openssl req -new -key server.key -out server.csr 4.
Adding a certificate to the cluster To add an existing certificate to the cluster, click Add on the Certificates panel. On the Add Certificate dialog box, enter a name for the certificate. Use a Linux command such as cat to display your concatenated certificate file. For example: cat server.pem Copy the contents of the file to the Certificate Content section of the dialog box. The copied text must include the certificate contents and the private key in PEM encoding.
Exporting a certificate If necessary, you can display a certificate and then copy and save the contents for future use. This step is called exporting. Select the certificate on the Certificates panel and click Export. To export a certificate from the CLI, use this command: ibrix_certificate -e -c CERTNAME Deleting a certificate To delete a certificate from the GUI, select the certificate on the Certificates panel, click Delete, and confirm the operation.
11 Using remote replication This chapter describes how to configure and manage the Continuous Remote Replication (CRR) service. Overview The CRR service provides a method to replicate changes in a source file system on one cluster to a target file system on either the same cluster (intra-cluster replication) or a second cluster (inter-cluster replication). Both files and directories are replicated with remote replication, and no special configuration of segments is needed.
NOTE: Run-once can also be used to replicate a single software snapshot. This must be done on the GUI. Remote cluster or intracluster replications You can replicate to a remote cluster or the same cluster (an intracluster replication). Remote cluster. Configure either continuous or run-once replication. When configuring replication to a remote cluster, you must first configure a target export that enables the source cluster to replicate to the appropriate file system and directory on the remote cluster.
File system snapshot replication You can use the run-once replication mode to replicate a single file system snapshot. If a snapshot replication is not explicitly configured, snapshots and all related metadata are ignored/filtered out during remote replications. Replication is not supported for block snapshots. Configuring the target export for replication to a remote cluster Use the following procedure to configure a target export for remote replication.
The Server Assignments section allows you to specify server assignments for the export. Check the box adjacent to Server to use the default assignments. If you choose to assign particular servers to handle replication requests, select those servers and then, optionally, select the appropriate NICs. If the remote cluster does not appear in the selection list for Export To (Cluster), you will need to register the cluster.
Creating the target export To create a mapping between the source cluster and the target export that receives the replicated data, execute the following command on the target cluster: ibrix_crr_export –f FSNAME [-p DIRECTORY] –C SOURCE_CLUSTER [–P] FSNAME is the target file system to be exported. The –p option exports a directory located under the root of the specified file system (the default is the root of the file system).
Viewing replication tasks To view replication tasks for a particular file system, select that file system on the GUI and then select Active Tasks > Remote Replication in the lower Navigator. The Remote Replication Tasks bottom panel lists any replication tasks currently running or paused on the file system. Additional reports are available for the active replication tasks. In the lower Navigator, expand Active Tasks > Remote Replication to see a list of active tasks (crr-25 in the following example).
Remote cluster replications Remote cluster replications can be configured for continuous or run-once mode. For a run-once replication, either specify the source directory or click Use a snapshot and then select the appropriate Snap Tree and snapshot. For both continuous and run-once replications, supply the target side information. Select the target cluster and target export, which must already be configured.
For a run-once replication, either specify the source directory or click Use a snapshot and then select the appropriate Snap Tree and snapshot. For both continuous and run-once replications, supply the target side information. Select the appropriate target file system and optionally enter a target directory in that file system. IMPORTANT: If you specify a target directory, be sure that it does not overlap with a previous replication using the same target export.
Pausing or resuming a replication task To pause a task, select it on the Remote Replication Tasks panel and click Pause. When you pause a task, the status changes to PAUSED. Pausing a task that involves continuous data capture does not stop the data capture. You must allocate space on the disk to avoid running out of space because the data is captured but not moved. To resume a paused replication task, select the task and click Resume.
option, the replication starts at the root of the file system. The run-once job terminates after the replication is complete; however, the job can be stopped manually, if necessary. Use -P to specify an optional target directory under the target export.
Querying remote replication tasks Use the following command to list all active replication tasks in the cluster, optionally restricted by the specified file system and servers. ibrix_crr -l [-f SRC_FSNAME] [-h HOSTNAME] [-C SRC_CLUSTERNAME] To see more detailed information, run ibrix_crr with the -i option. The display shows the status of tasks on each node, as well as task summary statistics (number of files in the queue, number of files processed).
1. 2. 3. 4. Stop write traffic to the remote site. Set up Run-Once remote replication, with the remote site acting as the source and the local site acting as the destination. When the Run-Once replication is complete, restore shares to their original configuration on the local site, and verify that clients can access the shares. Redirect write traffic to the local site.
12 Managing data retention and validation The data retention and validation feature is intended for sites that need to archive read-only files for business purposes. Data retention ensures that files cannot be modified or deleted for a specific retention period. Data validation scans can be used to ensure that files remain unchanged. IMPORTANT: The data retention and validation feature requires that the agile management console be configured on all file serving nodes in the cluster.
• File access permissions • File modification time Also, no new hard links can be made to the file and the extended attributes cannot be added, modified, or removed. The following restrictions apply to directories in a file system enabled for data retention: • A directory cannot be moved or renamed unless it is empty (even if it contains only normal files). • You can delete directories containing only WORM and normal files, but you cannot delete directories containing retained files.
New file systems The New Filesystem Wizard includes a WORM/Retention dialog box that allows you to enable data retention and define a retention profile for the file system. The default retention period determines whether you can manage WORM (non-retained) files as well as WORM-retained files. To manage only WORM-retained files, set the default retention period. WORM-retained files then use this period by default; however, you can assign a different retention period if desired.
Check Enable Data Validation to schedule periodic scans on the file system. Click Next to accept the default schedule, or select Modify to open the Data Validation Scan Schedule dialog box and configure your own schedule. You can also enable data retention when creating a new file system from the CLI.
–o "retenMode=,retenDefPeriod=,retenMinPeriod=, retenMaxPeriod=" The retenMode option is required and is either enterprise or relaxed. You can specify any, all, or none of the period options. retenDefPeriod is the default retention period, retenMinPeriod is the minimum retention period, and retenMaxPeriod is the maximum retention period.
To enable data retention on an existing file system using the CLI, run this command: ibrix_fs -W -f FSNAME -o "retenMode=,retenDefPeriod=,retenMinPeriod=, retenMaxPeriod=" Viewing the retention profile for a file system To view the retention profile for a file system, select the file system on the GUI, and then select WORM/Data Retention from the lower navigator. The WORM/Data retention panel shows the retention profile.
To view the retention profile from the CLI, use the ibrix_fs -i command, as in the following example: ibrix_fs -i -f ifs1 FileSystem: ifs1 ========================= { … } RETENTION : Enterprise [default=15d,mininum=1d,maximum=5y] Changing the retention profile for a file system The file system must be unmounted when you make changes to the retention profile.
NOTE: For CIFS users setting the access time manually for a file, the maximum retention period is100 years from the date the file was retained. For NFS users setting the access time manually for a file, the retention expiration date must be before February 5, 2106. The access time has the following effect on the retention period: • If the access time is set to a future date, the retention period of the file is set so that retention expires at that date.
IMPORTANT: Do not use the ibrix_reten_adm command on a file system that is not enabled for data retention. Setting or removing a legal hold When a legal hold is set on a retained or WORM file, the file cannot be deleted until the hold is released, even if the retention period has expired. On the WORM/Data Retention – File Administration dialog box, select Set a Legal Hold and specify the appropriate file. To remove a legal hold from a file, Remove a Legal Hold and specify the appropriate file.
See the Linux date(1) man page for a description of the valid date/time formats for the expire_time parameter. Removing the retention period When you remove the retention period from a retained file, the file becomes a WORM file. On the WORM/Data Retention – File Administration dialog box, select Remove Retention Period and specify the appropriate file.
Go to the Schedule tab to specify when you want to run the scan. Starting an on-demand validation scan You can run a validation scan at any time. Select the file system on the GUI, and then select Active Tasks from the lower navigator. Click New to open the Starting a New Task dialog box. Select Data Validation as the Task Type. When you click OK, the Start a new Validation Scan dialog box appears. Change the path to be scanned if necessary and click OK.
To start an on-demand validation scan from the CLI, use the following command: ibrix_datavalidation -c -f FSNAME [-d PATH] Viewing, stopping, or pausing a scan Scans in progress are listed on the Active Tasks panel on the GUI. If you need to halt the scan, click Stop or Pause on the Active Tasks panel. Click Resume to resume the scan. To view the progress of a scan from the CLI, use the ibrix_task command. The -s option lists scheduled tasks.
Meta hash: 80f68a53bb4a49d0ca19af1dec18e2ff0cf965da Data hash: d64492d19786dddf50b5a7c3bebd3fc8930fc493 The showvms command displays the hash sums stored for the file. For example: # /usr/local/ibrix/sbin/showvms rhnplugin.
Also note the following: • Multiple hard links on retained files on the replication source are not replicated. Only the first hard link encountered by remote replication is replicated, and any additional hard links are not replicated. (The retainability attributes on the file on the target prevent the creation of any additional hard links). For this reason, HP strongly recommends that you do not create hard links on retained files.
13 Creating X9000 software snapshots The X9000 software snapshot feature allows you to capture a point-in-time copy of a file system or directory for online backup purposes and to simplify recovery of files from accidental deletion. Software snapshots can be taken of the entire file system or selected directories. Users can access the filesystem or directory as it appeared at the instant of the snapshot. NOTE: You can take snapshots of files created on X9000 File Serving Software 6.0 or later.
You can create a snapshot directory tree for an entire file system or a directory in that file system. When entering the directory path, do not specify a directory that is a parent or child of another snapshot directory tree. For example, if directory /dir1/dir2 is a snapshot directory tree, you cannot create another snapshot directory tree at /dir1 or /dir1/dir2/dir3. The snapshot schedule can include any combination of hourly, daily, weekly, and monthly snapshots.
Modifying a snapshot schedule You can change the snapshot schedule at any time. On the Snap Trees panel, select the appropriate snap tree, select Modify, and make your changes on the Modify Snap Tree dialog box. Managing software snapshots To view the snapshots for a specific directory tree, select the appropriate directory tree on the Snap Trees panel, and then select Snapshots from the lower Navigator.
To take a snapshot from the CLI, use the following command: ibrix_snap -c -f FSNAME -P SNAPTREEPATH -n NAMEPATTERN SNAPTREEPATH is the full directory path starting from the root of the file system. The name that you specify is appended to the date of the snapshot. The following words cannot be used in the name, as they are reserved for scheduled snapshots: Hourly Daily Weekly Monthly You will need to manually delete on-demand snapshots when they are no longer needed.
2011-06-01T140000_hourly 2011-06-01T150000_hourly 2011-06-01T160000_hourly 2011-06-01T170000_hourly 2011-06-01T180000_hourly 2011-06-01T220000_hourly 2011-06-01T230000_hourly 2011-06-02T000000_hourly 2011-06-02T010000_hourly 2011-06-02T020000_hourly 2011-06-02T060000_hourly 2011-06-02T070000_hourly 2011-06-02T080000_hourly 2011-06-02T090000_hourly Users having access to the root of the snapshot directory tree (in this example, /ibfs1/users/) can navigate the /ibfs1/users/.
to copy files from the snapshot directory to a local or remote directory (see “Starting a replication task” (page 105)). Deleting snapshots Scheduled snapshots are deleted automatically according to the retention schedule specified for the snapshot tree; however you can delete a snapshot manually if necessary. You also need to delete on-demand snapshots manually. Deleting a snapshot does not free the file system space that was used by the snapshot; you will need to reclaim the space.
On the General tab, select a reclamation strategy: • Maximum Space Reclaimed. The reclamation task recovers all snapped space eligible for recovery. It takes longer and uses more system resources than Maximum Speed. This is the default. • Maximum Speed of Task. The reclamation task reclaims only the most easily recoverable snapped space.
To stop a running reclamation task, click Stop on the Task Summary panel. Managing reclamation tasks from the CLI To start a reclamation task from the CLI, use the following command: ibrix_snapreclamation -r -f FSNAME [-s {maxspeed | maxspace}] [-v] The reclamation task runs immediately; you cannot create a recurring schedule for it.
1. 2. 3. 4. Disable any schedules on the snap tree. Select the snap tree on the Snap Trees panel, select Modify, and remove the Frequency settings on the Modify Snap Tree dialog box. Delete the existing snapshots of the snap tree. See “Deleting snapshots” (page 131) Reclaim the space used by the snapshots. See “Reclaiming file system space previously used for snapshots” (page 131). Delete the snap tree. On the Snap Trees panel, select the appropriate snap tree, click Delete, and confirm the operation.
14 Creating block snapshots The block snapshot feature allows you to capture a point-in-time copy of a file system for online backup purposes and to simplify recovery of files from accidental deletion. The snapshot replicates all file system entities at the time of capture and is managed exactly like any other file system. NOTE: You can use either the software method or the block method to take snapshots on a file system. Using both snapshot methods simultaneously on the same file system is not supported.
NOTE: If the snapshot store is too small, the snapshot will eventually exceed the available space (unless you detect this and manually increase storage). If this situation occurs, the array software deletes the snapshot resources and the X9000 Software snapshot feature invalidates the snapshot file system. Although you can monitor the snapshot and manually increase the snapshot store as needed, the safest policy is to initially provision enough space to last for the expected lifetime of the snapshot.
The type of storage array determines the maximum number of snapshots you can keep and mount per file system.
Under Snapshot Configuration, select New to create a new snapshot scheme. The Create Snapshot Scheme dialog box appears.
On the General tab, enter a name for the strategy and then specify the number of snapshots to keep and mount on a daily, weekly, and monthly basis. Keep in mind the maximums allowed for your array type. Daily means that one snapshot is kept per day for the specified number of days. For example, if you enter 6 as the daily count, the snapshot feature keeps 1 snapshot per day through the 6th day. On the 7th day, the oldest snapshot is deleted.
For either template, enter one or more of the following variables. The variables must be enclosed in braces ({ }) and separated by underscores (_). The template can also include text strings. When a snapshot is created using the templates, the variables are replaced with the following values. Variable Value fsname File system name shortdate yyyy_mm_dd fulldate yyyy_mm_dd_HHmmz + GMT When you have completed the scheme, it appears in the list of snapshot schemes on the Create Snapshot dialog box.
Creating an automated snapshot scheme from the CLI You can create an automated snapshot scheme with the ibrix_vs_snap_strategy command. However, you will need to use the GUI to create a snapshot schedule. To define a snapshot scheme, execute the ibrix_vs_snap_strategy command with the -c option: ibrix_vs_snap_strategy -c -n NAME -k KEEP -m MOUNT [-N NAMESPEC] [-M MOUNTSPEC] The options are: -n NAME The name for the snapshot scheme. -k KEEP The number of snapshots to keep per file system.
Viewing automated snapshot schemes On the GUI, you can view snapshot schemes on the Create Snapshot dialog box. Select Recurring as the Snapshot Type, and then select a snapshot scheme. A description of that scheme will be displayed.
Deleting snapshots Delete snapshots to free up resources when the snapshot is no longer needed or to create a new snapshot when you have already created the maximum allowed for your storage system. On the GUI, select the snapshot on the Block Snapshots panel and click Delete.
0.00 4 0.00 5 0.00 6 0.00 0.00 ib50-243 0.00 ib50-243 0.00 ib50-243 0.00 0 0 0 ilv14_msa_snap9__snap 0 0 0 ilv15_msa_snap9__snap 0 0 0 ilv16_msa_snap9__snap 0 0 0 MIXED OK, SnapUsed=8% MIXED OK, SnapUsed=6% MIXED OK, SnapUsed=5% MIXED 7 Hrs 56 4,096 7 Hrs 56 4,096 7 Hrs 56 4,096 7 Hrs 56 Mins 46 Secs ago 0.00 Mins 46 Secs ago 0.00 Mins 46 Secs ago 0.00 Mins 46 Secs ago NOTE: For P4000 G2 storage systems, the state is reported as OK, but the SnapUsed field always reports 0%.
The next window shows a CIFS client accessing the snapshot file system .fs1_snap1. The original file system is mapped to drive X.
Troubleshooting block snapshots Snapshot reserve is full and the MSA2000 is deleting snapshot volumes When the snapshot reserve is full, the MSA2000 will delete snapshot volumes on the storage array, leaving the device entries on the file serving nodes. To correct this situation, take the following steps: 1. Stop I/O or any applications that are reading or writing to the snapshot file systems. 2. Log on to the active management console. 3. Unmount all snapshot file systems. 4.
15 Using data tiering This chapter describes how to configure and manage data tiering. Overview Use the data tiering feature to set a preferred tier where newly created files will be stored. Once files are created, you can use a tiering job to move them from initial storage, based on file attributes. When you start the tiering job, you can specify a desired number of file replicas to add (default is 0). • You can use any naming convention you choose to identify each tier grouping.
Note the following: • A tiering policy can contain multiple rules. • Tiering rules are based on individual file attributes. • All rules are executed when the tiering policy is applied during execution of the ibrix_migrator command. • It is important that different rules do not target the same files, especially if different destination tiers are specified. If tiering rules are ambiguous, the final destination for a file is not predictable. See “Ambiguous rules” (page 153), for more information.
Expanding a file system You can make tier assignments for new segments as you add them. NOTE: Verify that no tiering job is running before executing the file system expansion commands. The expansion takes priority and the tiering job is terminated. To including tiering at the time you expand a file system, use the following command: ibrix_fs -e -f FSNAME -s LVLIST -t TIERNAME This command extends the file system FSNAME with the segments in LVLIST and assigns the segments to TIERNAME.
You can perform these management activities from either the management console GUI or the CLI. This section provides instructions for managing via the CLI. Assigning segments to tiers Segments can be assigned to tiers when a file system is created or expanded, or at any time when a tiering policy job is not running. Similarly, tier assignments can be changed or removed at any time using the ibrix_tier command, provided there are no tiering jobs running.
The second column in the output lists the ID number assigned to the rule. In the example above, the ID number is 2. Deleting a tiering policy rule Before deleting a rule, view the policy information, as described in “Listing tiering policy information” (page 150), and obtain the rule’s ID number. The ID number is required in the delete command. To delete a rule, use the following command: ibrix_migrator -d -f FSNAME -r RULE_ID RULE_ID is the rule’s ID number (2 in the example).
Use the following qualifiers for relative times and dates: • Relative time: Enter in rules as year or years, month or months,week or weeks, day or days, hour or hours. • Relative date: Use older than or younger than. The rules engine uses the time the ibrix_migrator command starts execution as the start time for the rule. It then computes the required time for the rule based on this start time. For example, ctime older than 4 weeks refers to that time period more that 4 weeks before the start time.
The rule in the following example is based on the file’s last modification time, using a relative time period. All files whose last modification date is more than one month in the past are moved. # ibrix_migrator -A -f ifs2 -r 'mtime older than 1 month' -S T1 -D T2 In the next example, the rule is modified to limit the files being migrated to two types of graphic files. The or expression is enclosed in parentheses, and the * wildcard is used to match filename patterns.
files will be encountered at the beginning of the job, causing space on tier 2 to be consumed faster than on tier 1. Once a destination tier is full, obviously no further movement in that direction is possible. These rules in these two examples are ambiguous because they give rise to possible conflicting file movement. It is the user’s responsibility to write unambiguous rules for the data tiering policy for their file systems.
16 Using file allocation This chapter describes how to configure and manage file allocation. Overview X9000 Software allocates new files and directories to segments according to the allocation policy and segment preferences that are in effect for a client. An allocation policy is an algorithm that determines the segments that are selected when clients write to a file system. File allocation policies Different allocation policies can be set for files and directories.
How file allocation settings are evaluated X9000 clients and NFS/CIFS clients use the following precedence rules to evaluate the file allocation settings that are in effect for them: • If the host uses the default file and directory allocation policies and segment preferences: The RANDOM policy is applied, and a segment is chosen from among all segments.
Setting a file allocation policy To set a file allocation policy, use the following command: ibrix_fs_tune -f FSNAME {-h HOSTLIST|-g GROUPLIST} –s LVNAMELIST –p POLICY [-S STARTSEGNUM] For example, to set the ROUNDROBIN policy for files only on NFS-exported file system ifs1 on file serving node s1.hp.com, starting at segment ilv1: ibrix_fs_tune -f ifs1 -h s1.hp.com -p ROUNDROBIN -s ilv1 Setting a directory allocation policy To set a directory allocation policy, use the following command.
Tuning allocation policy settings To optimize system performance, you can globally change the following allocation policy settings for a file system: • File allocation policy (see “File allocation policies” (page 155) for a list of available policies). • Starting segment number for applying changes. • Preallocation: Number of KB to preallocate for files. The default is a preallocated file size of 256 KB. • Readahead: Number of KB in a file to pre-fetch. The default is 128 KB.
17 Support and other resources Contacting HP For worldwide technical support information, see the HP support website: http://www.hp.
Glossary ACE Access control entry. ACL Access control list. ADS Active Directory Service. ALB Advanced load balancing. BMC Baseboard Management Configuration. CIFS Common Internet File System. The protocol used in Windows environments for shared folders. CLI Command-line interface. An interface comprised of various commands which are used to control operating system responses. CSR Customer self repair. DAS Direct attach storage.
SELinux Security-Enhanced Linux. SFU Microsoft Services for UNIX. SID Secondary controller identifier number. SNMP Simple Network Management Protocol. TCP/IP Transmission Control Protocol/Internet Protocol. UDP User Datagram Protocol. UID Unit identification. VACM SNMP View Access Control Model. VC HP Virtual Connect. VIF Virtual interface. WINS Windows Internet Naming Service. WWN World Wide Name. A unique identifier assigned to a Fibre Channel device. WWNN World wide node name.
Index Symbols /etc/likewise/vhostmap file, 70 32-bit mode, disable, 39 64-bit mode, enable, 12 A authentication methods Active Directory, 51 Local Users, 51 automated block snapshots create from CLI, 141 create on GUI, 137 delete snapshot scheme, 142 modify snapshot scheme, 141 snapshot scheme, 136 view snapshot scheme from CLI, 142 B backups snapshots, software, 134 C case-insensitive filenames, 47 CIFS Active Directory domain, configure, 67 activity statistics per node, 57 authentication methods, 51 co
document related documentation, 159 E Export Control, enable, 21 F file allocation defined, 155 list policies, 158 policies, defined, 155 precedence rules, 156 set file and directory policies, 156 set segment preferences, 157 tune policy settings, 158 file serving nodes add a CIFS share, 60 delete, 40 modify a CIFS share, 61, 62 SAN I/O, 10 segment management, 9 unmount a file system, 20 view CIFS shares, 58 file system data retention and validation, 112 file systems 32-bit mode, disable, 39 64-bit mode,
L Linux static user mapping with Active Directory, 66 Linux X9000 clients disk space information, 35 Local users and groups, 53 logical volumes view information, 33 lost+found directory, 35 M Microsoft Management Console manage CIFS shares, 62 mounting, file system, 18, 19 mountpoints create from CLI, 19 delete, 19 view, 18, 19 N NFS clients autoconnect, 46 set up, 46 NFS file systems autoconnect NFS clients, 46 configure NFS server threads, 44 export, 44 set up NFS clients, 46 unexport, 46 P physical vo
defined, 9 delete, 40 rebalance, 36 stop tasks, 39 track job progress, 38 view job status, 38 SMB server consolidation, 69 SMB signing, 59 snapshots, block access snapshot file systems, 144 automated, 136 create from CLI, 141 create on GUI, 137 delete snapshot scheme, 142 modify snapshot scheme, 141 view snapshot scheme from CLI, 142 clear invalid snapshot, 142 create, 142 defined, 135 delete, 143 discover LUNs, 136 list storage allocation, 136 mount, 142 register the snapshot partition, 136 set up the snap