
5.6 HP StorageWorks X9000 File Serving Software User Guide (TA768-96035, June 2011)

<installdirectory>/bin/ibrix_umount -f FSNAME [-h HOSTLIST | -g GROUPLIST]
To unmount a file system from a specific mountpoint on a file serving node, X9000 client, or
hostgroup:
<installdirectory>/bin/ibrix_umount -m MOUNTPOINT [-h HOSTLIST | -g GROUPLIST]
Mounting and unmounting file systems locally on Linux/Windows X9000 clients
On both Linux and Windows X9000 clients, you can locally override a mount done on the
management console. For example, if the configuration database on the management console has
a file system marked as mounted for a particular client, that client can locally unmount the file
system, thus overriding the management console.
Linux X9000 clients
To mount a file system locally, use the following command on the Linux X9000 client. A management
console name (fmname) is required only if this X9000 client is registered with multiple management
consoles.
ibrix_lwmount -f [fmname:]fsname -m mountpoint [-o options]
To unmount a file system locally, use one of the following commands on the Linux X9000 client.
The first command detaches the specified file system from the client. The second command detaches
the file system that is mounted on the specified mountpoint.
<installdirectory>/bin/ibrix_lwumount -f [fmname:]FSNAME
<installdirectory>/bin/ibrix_lwumount -m MOUNTPOINT
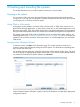
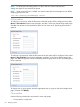
Windows X9000 clients
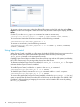
Use the Windows X9000 client GUI to mount file systems locally. Click the Mount tab on the GUI
and select the cluster name from the list (the cluster name is the management console name). Then,
enter the name of the file system, select a drive, and click Mount.
If you are using Remote Desktop to access the client and the drive letter is not displayed, log out
and log back in. This is a known limitation of Windows Terminal Services when exposing new
drives.
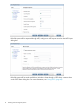
To unmount a file system on the Windows X9000 client GUI, click the Umount tab, select the file
system, and then click Umount.
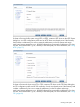
Limiting file system access for X9000 clients
By default, all X9000 clients can mount a file system after a mountpoint has been created. To limit
access to specific X9000 clients, create an access entry. When an access entry is in place for a
file system (or a subdirectory of the file system), it enters secure mode, and mount access is restricted
to clients specified in the access entry. All other clients are denied mount access.
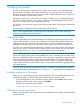
Select the file system on the Filesystems page, and then select Client Exports in the lower navigator.
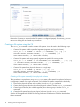
On the Create Client Export(s) dialog box, select the clients or hostgroups that will be allowed
access to the file system or a subdirectory of the file system.
Limiting file system access for X9000 clients 17