
5.6 HP StorageWorks X9000 File Serving Software User Guide (TA768-96035, June 2011)


<installdirectory>/bin/ibrix_edquota -s -u “USER” -f FSNAME
[-M SOFT_MEGABYTES] [-m HARD_MEGABYTES] [-I SOFT_FILES] [-i HARD_FILES]
• Set a quota for a single group:
<installdirectory>/bin/ibrix_edquota -s -g “GROUP” -f FSNAME [-M SOFT_MEGABYTES]
[-m HARD_MEGABYTES] [-I SOFT_FILES] [-i HARD_FILES]
Enclose the user or group name in single or double quotation marks.
Setting directory tree quotas
Directory tree quotas limit the amount of storage and the number of files that can be created on a
file system located at a specific directory tree. Before configuring directory tree quotas, the quota
feature must be enabled on the file system and the file system must be mounted.
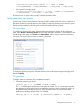
GUI procedure
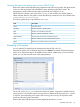
To configure a directory tree quota, select the file system where the quotas will be configured.
Next, select Quotas > Directory Quotas from the lower Navigator, and then, on the Directory Tree
Quota Usage Limits page, click Create. For Name (Alias), enter a unique name for the directory
tree quota. The name cannot contain a comma (,) character.
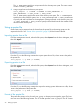
To change a directory tree quota, select the directory tree on the Quota Usage Limits page, and
then click Modify.
CLI procedure
To assign quotas to a directory tree, complete these steps:
1. Create the directory tree quota:
ibrix_fs_ops -D -c -f FSNAME -p PATH -n NAME
The -f FSNAME option specifies the name of the file system. The -p PATH option specifies
the pathname of the directory tree. If the pathname includes a space, enclose the portion of
the pathname that includes the space in single quotation marks, and enclose the entire
pathname in double quotation marks. For example:
ibrix_fs_ops -D -c -f fs48 -p "/fs48/data/'QUOTA 4'" -n QUOTA_4
Setting directory tree quotas 21