
5.6 HP StorageWorks X9000 File Serving Software User Guide (TA768-96035, June 2011)


The -n NAME option specifies a unique name for the directory tree quota. The name cannot
contain a comma (,) character.
2. Assign usage limits to the directory tree quota:
ibrix_edquota -s -d NAME -f FSNAME -M SOFT_MEGABYTES -m
HARD_MEGABYTES -I SOFT_FILES -i HARD_FILES
The -d NAME option specifies the name of the directory tree quota. The -f FSNAME option
specifies the name of the file system. Use -M SOFT_MEGABYTES and -m HARD_MEGABYTES
to specify soft and hard limits for the megabytes of storage allowed on the directory tree. Use
-I SOFT_FILES and -i HARD_FILES to specify soft and hard limits for the number of files
allowed on the directory tree.
Using a quotas file
Quota limits can be imported into the cluster from the quotas file, and existing quotas can be
exported to the file. See “Format of the quotas file” (page 22) for the format of the file.
Importing quotas from a file
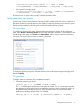
From the management console, select the file system, select Quotas from the lower Navigator, and
then click Import.
From the CLI, use the following command to import quotas from a file, where PATH is the path to
the quotas file:
ibrix_edquota -t -p PATH [-f FSNAME]
Exporting quotas to a file
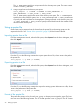
From the management console, select the file system, select Quotas from the lower Navigator, and
then click Export.
From the CLI, use the following command to export the existing quotas information to a file, where
PATH is the pathname of the quotas file:
ibrix_edquota -e -p PATH [-f FSNAME]
Format of the quotas file
The quotas file contains a line for each user, group, or directory tree assigned a quota. The lines
must use one of the following formats. The “A” format specifies a user or group ID. The “B” format
22 Setting up quotas