
6.1 HP IBRIX X9000 Network Storage System File System User Guide (TA768-96061, June 2012)

ConditionHealth Status
Monitoring is disabledNot Monitored
The active Fusion Manager could not communicate with other file serving nodes in the clusterN/A
Disable monitoring and stop the CIFS monitoring daemon:
ibrix_cifsmonitor –u [–h HOSTLIST]
Restart CIFS service monitoring:
ibrix_cifsmonitor –c [–h HOSTLIST]
CIFS shares
Windows clients access file systems through CIFS shares. You can use the X9000 GUI or CLI to
manage shares, or you can use the Microsoft Management Console interface. The CIFS service
must be running when you add shares.
IMPORTANT: When working with CIFS shares, you should be aware of the following:
• The permissions on the directory exporting a CIFS share govern the access rights that are
given to the Everyone user as well as to the owner and group of the share. Consequently, the
Everyone user may have more access rights than necessary. The administrator should set ACLs
on the CIFS share to ensure that users have only the appropriate access rights. Alternatively,
permissions can be set more restrictively on the directory exporting the CIFS share.
• When the cluster and Windows clients are not joined in a domain, local users are not visible
when you attempt to add ACLs on files and folders in a CIFS share.
• A directory tree on a CIFS share cannot be copied if there are more than 50 ACLs on the
share. Also, because of technical constraints in the CIFS service, you cannot create subfolders
in a directory on a CIFS share having more than 50 ACLs.
• When configuring a CIFS share, you can specify IP addresses or ranges that should be allowed
or denied access to the share. However, if your network includes packet filters, a NAT gateway,
or routers, this feature cannot be used because the client IP addresses are modified while in
transit.
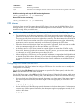
Configuring CIFS shares with the GUI
Use the Add New File Share Wizard to configure CIFS shares. You can then view or modify the
configuration as necessary.
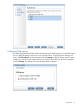
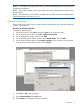
On the GUI, select File Shares from the Navigator to open the File Shares panel, and then click
Add to start the Add New File Share Wizard.
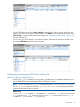
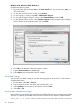
On the File Share page, select CIFS as the File Sharing Protocol. Select the file system, which must
be mounted, and enter a name, directory path, and description for the share. Note the following:
• Do not include any of the following special characters in a share name. If the name contains
any of these special characters, the share might not be set up properly on all nodes in the
cluster.
' & ( [ { $ ` , / \
• Do not include any of the following special characters in the share description. If a description
contains any of these special characters, the description might not propagate correctly to all
nodes in the cluster.
* % + & `
CIFS shares 71