
6.5 HP StoreAll OS User Guide


3 Configuring quotas
Quotas can be assigned to individual users or groups, or to a directory tree. Individual quotas
limit the amount of storage or the number of files that a user or group can use in a file system.
Directory tree quotas limit the amount of storage and the number of files that can be created on a
file system located at a specific directory tree. Note the following:
• By default, quotas are enabled when you create and mount a file system using the GUI. If you
use the CLI to create and mount a file system, quotas are not enabled by default. If you do
not enable quotas when using the CLI to create and mount the file system and choose to enable
quotas at a later time, be aware this requires the file system to be unmounted first, which
impacts system availability.
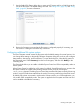
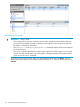
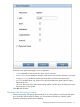
• You can assign quotas to a user, group, or directory on the GUI or from the CLI. You can also
import quota information from a file.
• If a user has a user quota and a group quota for the same file system, the first quota reached
takes precedence.
• Nested directory quotas are not supported. You cannot configure quotas on a subdirectory
differently than the parent directory.
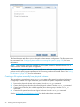
• The existing quota configuration can be exported to a file at any time.
NOTE: HP recommends that you export the quota configuration and save the resulting file
whenever you update quotas on your cluster.
How quotas work
Quotas can be set for users, groups, or directories in a file system. A quota is specified by hard
and soft storage limits for both the megabytes of storage and the number of files allotted to the
user, group, or directory. The hard limit is the maximum storage (in terms of file size and number
of files) allotted to the user, group, or directory. The soft limit specifies the number of megabytes
or files that, when reached, starts a countdown timer.
If the megabytes of storage or number of files are not reduced below the soft limit, the timer runs
until either the hard storage limit is reached or the grace period for the timer elapses. (The default
grace period is seven days.) When the timer stops, the user, group, or directory for which the
quota was set cannot store any more data, and the system issues quota exceeded messages at
each write attempt.
NOTE: Quota statistics are updated on a regular basis (at one-minute intervals). At each update,
the file and storage usage for each quota-enabled user, group, or directory tree is queried, and
the result is distributed to all file serving nodes. Users or groups can temporarily exceed their quota
if the allocation policy in effect for a file system causes their data to be written to different file
serving nodes during the statistics update interval. In this situation, it is possible for the storage
usage visible to each file serving node to be below or at the quota limit while the aggregate storage
use exceeds the limit.
There is a delay of several minutes between the time a command to update quotas is executed
and when the results are displayed by the ibrix_edquota -l command. This is normal behavior.
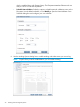
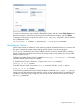
Enabling quotas on a file system and setting grace periods
Before you can set quota limits, quotas must be enabled on the file system. By default, quotas are
enabled when you create and mount a file system using the GUI. When using the CLI, you must
manually enable quotas during file system creation. If you choose to enable quotas after file system
creation, be aware that this requires the file system to be unmounted first, which affects system
availability.
30 Configuring quotas