
HP StorageWorks ExDS9100c/X9720 Storage System Controller (496785-002, December 2009)
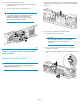
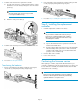
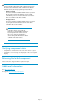
Table Of Contents
- ExDS9100c/X9720 Storage System Controller
- Customer self repair (CSR)
- Before you begin
- Verifying component failure
- Preparation
- Step 1: Removing the failed controller
- Step 2: Transferring the cache module and batteries
- Step 3: Installing the replacement controller
- Confirming the firmware version
- Verifying component status
- Returning the failed component
- Additional information

3. Install the cache module in the replacement controller:
a. Insert the cache module (1), verifying that the module is seated
and that the connector release/locking levers are in the locked
position (2).
NOTE:
The cache module edge connector is keyed so that
it can only be installed one way.
b. Attach the cache power cable (3).
4. Install the cache module power-connector hold-down bracket.
5. Proceed to Transferring the batteries.
Transferring the batteries
1. Remove each battery from the failed controller by squeezing the
release tabs (1) and pulling the battery straight out (2).
2. Insert each battery in the replacement controller, making sure that
it seats properly by clicking and locking into place.
3. Proceed to Step 3: Installing the replacement controller.
Step 3: Installing the replacement
controller
1. Install the replacement controller in the chassis:
IMPORTANT:
As you insert the controller in the enclosure, keep it
level until it is completely installed. If the controller is
tilted, it may catch a component on the chassis edge
and damage the controller.
a. Squeeze the thumb latch on the replacement controller and
rotate the latch handle down.
b. Slide the controller all the way into the chassis. The latch handle
will automatically rotate up and click. To make sure that the
controller is fully seated, push up on the latch handle while
pushing in on the controller body.
2. Connect cables to the controller.
3. Power on the enclosure.
Confirming the firmware version
After replacing a controller, verify that the latest firmware for your
controller is installed. Go to the HP support website for your device, and
if newer firmware is available, download the firmware from the Web
and install it on the controller(s).
IMPORTANT:
See the storage system administration guide for additional
instructions. The management software may automatically
update the firmware to a required version.
Page 4