
HP P9000 Provisioning for Mainframe Systems User Guide (AV400-96369, October 2011)
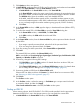
11. Click Options to show more options.
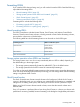
12. In Initial LDEV ID, make sure that an LDEV ID is set. To confirm the used number and unavailable
number, click View LDEV IDs to open the View LDEV IDs window.
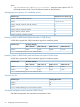
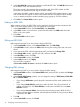
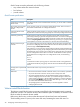
1. In Initial LDEV ID in the Create LDEVs window, click View LDEV IDs.
In the View LDEV IDs window, the matrix vertical scale represents the second-to-last digit
of the LDEV number, and the horizontal scale represents the last digit of the LDEV number.
The LDEV IDs table shows the available, used, and disabled LDEV IDs.
In the table, used LDEV numbers appear in blue, unavailable numbers appear in gray,
and unused numbers appear in white. LDEV numbers that are unavailable may be already
in use, or already assigned to another emulation group (group by 32 LDEV numbers).
2. Click Close.
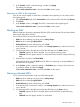
13. In the Create LDEVs window, in SSID, type four digits, in hexadecimal format (0004 to FEFF),
for the SSID.
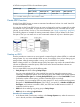
14. To confirm the created SSID, click View SSIDs to open the View SSIDs dialog box.
1. In the Create LDEVs window, in Initial SSID, click View SSIDs.
In the SSIDs window, the SSIDs table shows the used SSIDs.
2. Click Close.
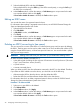
15. In the Create LDEVs window, from the Processor Blade list, select a processor blade to be used
by the LDEVs.
• If you assign a specific processor blade, select the ID of the processor blade.
• If you can assign any processor blade, click Auto.
16. If you are creating one more system disks, select Create LDEVs as System Disk.
17. Click Add.
The created LDEVs are added to the Selected LDEVs table.
Add is unavailable until Provisioning Type, System Type, Emulation Type, Pool Selection, LDEV
Capacity and Number of LDEVs are all set.
18. If necessary, change the following LDEV settings:
• Click Edit SSIDs to open the SSIDs window. For details about how to edit an SSID, see
“Editing an LDEV SSID ” (page 36).
• Click Change LDEV Settings to open the Change LDEV Settings window. For details about
how to change the LDEV settings, see “Changing LDEV settings” (page 36).
19. If necessary, delete an LDEV from the Selected LDEVs table.
Select an LDEV to delete, and then click Remove. For details about how to remove an LDEV,
see “Removing an LDEV to be registered” (page 37).
20. Click Finish.
The Confirm window opens.
21. In the Confirm window, confirm the settings, in Task Name type a unique name for this task
or accept the default, and then click Apply.
If Go to tasks window for status is checked, the Tasks window opens.
Finding an LDEV ID
When creating volumes, the LDEV ID (LDKC: CU: LDEV) must be specified. Use this procedure to
determine the LDEV IDs in use in the storage system so you can specify the correct LDEV.
1. In Initial LDEV ID in the Create LDEVs window, click View LDEV IDs.
Create LDEV function 35