
HP P9000 Provisioning for Mainframe Systems User Guide (AV400-96369, October 2011)

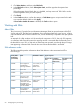

SIM code*ExplanationStatus
622XXX or 623XXXThe pool is full or an error occured in the pool,
therefore the pool is blocked.
Blocked
*XXX in the SIM code indicates the pool number.
Creating a pool
The following procedure tells how to create a pool using Remote Web Console. This procedure is
for setting up Thin Provisioning Z.
Before creating a pool, you must install the proper amount of shared memory, and you must have
a V-VOL management area in shared memory. When shared memory is added, the V-VOL
management area is automatically created. To add shared memory, contact your HP representative.
1. In the Remote Web Console main window, in the Storage Systems tree, select Pool.
2. In the Pool window, click Create Pools.
3. In the Create Pools window, from the Pool Type list, select Thin Provisioning Z.
4. In System Type, select Mainframe.
5. If you will be using Smart Tiers on your storage system, in Smart Pool, select Enable. This
option is unavailable if the storage system has only RAID 1 volumes or external volumes whose
Cache Mode is disabled.
6. If you will not be using Smart Tiers on your storage system, in Smart Pool, select Disable.
7. Select the pool-VOLs to be used in this pool. Up to 1,024 volumes can be added to a pool.
1. From the Drive Type/RPM list:
- For Thin Provisioning Z, select the desired drive type and RPM.
Specify one RAID Level in the same pool.
Up to three different drive types are allowed for Drive Type/RPM for the volume to be
added.
2. From the RAID Level list:
- For Thin Provisioning Z, select the desired RAID level. If you selected External Storage
from the Drive Type/RPM list, a hyphen appears and you cannot select the RAID level.
3. Click Select Pool VOLs.
4. In the Select Pool Volumes window, in the Available Pool Volumes table, select the
pool-VOL to be associated with a pool, and then click Add. The selected pool-VOL is
registered into the Selected Pool Volumes table.
NOTE: The top pool-VOL cannot be deleted from the pool in the future.
When adding external volumes, note the following:
- Cache Mode of the external volumes to be added must all be enabled, or all disabled.
- An internal volume and an external volume whose Cache Mode is set to Disable cannot
coexist.
- An external volume whose Cache Mode is set to Enable and an external volume whose
Cache Mode is set to Disable cannot coexist.
5. Filter the appearance of the list, if desired.
- Click Filter to open the menu, specify the filtering, and then click Apply.
- Click Select All Pages to select all pool-VOLs in the table.
- Click Options to specify the unit of volumes or the number of rows to display.
54 Configuring thin provisioning