
HP P9000 Provisioning for Mainframe Systems User Guide (AV400-96369, October 2011)

Procedure 8 To create a THP V-VOL
1. Click Create LDEVs.
2. In the Create LDEVs window, in Provisioning Type, confirm Thin Provisioning is selected.
3. In System Type select Mainframe.
4. In Emulation Type, confirm 3390-A is selected.
5. Select the pool.
1. From the Drive Type/RPM list in Pool Selection, select the drive type and RPM.
2. From the RAID level list, select the RAID level.
3. Click Select Pool.
The Select Pool window opens.
4. In the Available Pools table, select a pool.
You can select only one pool. You cannot specify a pool when creating THP V-VOLs
unless the pool is in any of the following states:
- Normal status
- Exceeded Threshold status
- The pool is being shrunk.
Do the following if necessary.
- Click Filter to open the menu, specify the filtering, and then click Apply.
- Click Options to specify the units of pools or the number of rows to display.
5. Click OK.
The Select Pool window closes. The selected pool name appears in Selected Pool Name,
and the total capacity of the selected pool appears in Selected Pool Capacity.
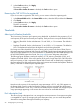
6. In LDEV Capacity, specify the THP V-VOL capacity to be created.
You can enter the capacity within a range of the figures displayed below the text box, which
can be entered to decimal places. The capacity unit default is Cyl.
7. In Number of LDEVs, type the number of LDEVs to be created within the range of the values
indicated below the text box.
8. In LDEV Name, specify a name for this THP V-VOL.
1. In Prefix, type the characters that will become the fixed characters for the beginning of
the THP V-VOL name. The characters are case-sensitive.
2. In Initial Number, type the initial number that will follow the prefix name.
9. Click Option.
10. In Initial LDEV ID, make sure that LDEV ID is set.
To confirm the used number and unavailable number, click View LDEV IDs to open the View
LDEV IDs window.
11. In Initial SSID, type the 4-digit SSID in hexadecimal format (0004 to FEFF).
To confirm the created SSID, click View SSID to open the View SSID window.
12. From the Cache Partition list, select CLPR.
For detailed information about CLPRs, see the HP P9000 Cache Partition User Guide.
13. From the Processor Blade list, select a processor blade to be used by the LDEVs.
To assign a specific processor blade, select the ID of the processor blade. To assign any
processor blade, click Auto.
56 Configuring thin provisioning