
HP P9000 Provisioning for Mainframe Systems User Guide (AV400-96369, October 2011)
If Mixable is set to Disable, note the following when adding the pool-VOL to the pool:
• Pool-VOLs of different RAID levels cannot coexist.
• Internal and external volumes cannot coexist.
Procedure 9 To increase pool capacity
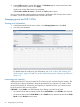
1. In the Remote Web Console main window, in the Storage Systems tree, select Pool.
2. From the Pools table, select the pool for which you want to increase the capacity. You cannot
increase pool capacity for multiple pools.
3. Click Expand Pool.
4. In the Expand Pool window, select the pool-VOL.
1. Click Select Pool VOLs.
2. In the Select Pool Volumes window, from the Available Pool Volumes table, select the
pool-VOL you want to assign, and then click Add.
The selected pool-VOLs are registered in the Selected Pool Volumes table.
Up to 1024 volumes can be added including the volumes already in the pool.
Do the following if necessary.
- From Filter option, select ON to filter the rows.
- Click Select All Pages to select all pool-VOL in the table.
- Click Options to specify the unit of volumes or the number of rows to be viewed.
3. Click OK.
The Select Pool Volumes window closes. The number of the selected pool volumes appears
in Total Selected Pool Volumes, and the total capacity of the selected pool-VOL appears
in Total Selected Capacity.
5. Click Finish.
6. In the Confirm window, confirm the settings, in Task Name type a unique name for this task
or accept the default, and then click Apply.
If Go to tasks window for status is checked, the Tasks window opens.
Changing a pool name
1. In the Remote Web Console main window, in the Storage Systems tree, select Pool.
2. From the Pools table, select the pool for which you want to change the name.
Select multiple pools using the Shift key (if the pools are adjacent), or using the Ctrl key (if the
pools are not adjacent).
3. Click More Actions, and then select Edit Pools.
4. In the Edit Pools window, in Pool Name, specify a name for this pool.
1. In Prefix, type the characters that will become the fixed characters for the beginning of
the pool name. The characters are case-sensitive.
2. In Initial Number, type the initial number that will follow the prefix name.
5. Click Finish.
6. In the Confirm window, confirm the settings, in Task Name type a unique name for this task
or accept the default, and then click Apply.
If Go to tasks window for status is checked, the Tasks window opens.
Recovering a blocked pool
This procedure is for failure recovery of a blocked pool. Ordinarily you should not need to use this
procedure. A recovered pool can be used but the former data is lost.
Managing pools and THP V-VOLs 63