HP P9000 Snapshot User Guide Abstract This guide explains how to use HP P9000 Snapshot Software to create space-efficient point-in-time copies of data volumes on an HP P9000 disk array. Topics include creating, monitoring, and troubleshooting snapshot pools, virtual volumes, and copy pairs. The intended audience is a storage system administrator or authorized service provider with independent knowledge of HP P9000 disk arrays and the HP Remote Web Console.
© Copyright 2010, 2011 Hewlett-Packard Development Company, L.P. Confidential computer software. Valid license from HP required for possession, use or copying. Consistent with FAR 12.211 and 12.212, Commercial Computer Software, Computer Software Documentation, and Technical Data for Commercial Items are licensed to the U.S. Government under vendor's standard commercial license. The information contained herein is subject to change without notice.
Contents 1 Overview..................................................................................................6 Snapshot software....................................................................................................................6 How Snapshot works................................................................................................................6 Volume pairs — P-VOLs and V-VOLs.......................................................................................
6 Monitoring and maintenance.....................................................................32 Monitoring the system.............................................................................................................32 Monitoring pair status........................................................................................................32 Pair status definitions.....................................................................................................
Top window when selecting a pool volume group under Pool.......................................................72 Create Pools wizard................................................................................................................74 Create Pools window..........................................................................................................74 Confirm window ...............................................................................................................
1 Overview Unless otherwise specified, the term P9000 in this guide refers to the following disk array: • P9500 Disk Array The GUI illustrations in this guide were created using a Windows computer with the Internet Explorer browser. Actual windows may differ depending on the operating system and browser used. GUI contents also vary with licensed program products, storage system models, and firmware versions. With Snapshot, you create virtual copies of a data volume in the P9500.
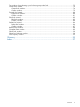
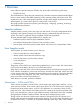
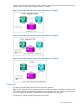
to data in the data pool and P-VOL actually reside in cache memory. Because of this, part of your system’s cache is reserved for Snapshot when it is enabled. Figure 1 How V-VOL maintains point-in-time data when pair is split (1) Figure 2 How V-VOL maintains point-in-time data when pair is split (2) Figure 3 How V-VOL maintains point-in-time data when pair is split (3) Data pools The data pool holds data from the P-VOL that is being replaced.
Components A Snapshot system usually consists of the following components. • Snapshot program product • Business Copy program product • A pair of volumes (primary and secondary) • A data pool • A consistency group • Remote Web Console • RAID Manager Licenses and capacity Snapshot requires P9500 Business Copy to be installed on the same system. Sufficient licensed capacity for Snapshot and Business Copy is required. Snapshot uses a V-VOL management area for managing V-VOLs and data pools.
• PAIR: When initial copy is completed. The V-VOL is a virtual mirror image of the P-VOL. • PSUS: When a pair is split by the user. • PSUE: When the system cannot keep the P-VOL and the V-VOL synchronized due to an error condition. • SMPL(PD): When the pair relationship between the pair volumes is deleted (released). After all internal processing is completed, the status changes to SMPL.
2 Planning and design This chapter describes requirements for setting up and using Snapshot, as well as data pool sizing information. System requirements Many of the requirements here are augmented with recommendations and restrictions later in this chapter. Table 1 System Requirements Item Requirement Software Business Copy is required to operate Snapshot. All P9500 hardware, microcode, and software required for Business Copy operations must be installed and enabled.
Table 1 System Requirements (continued) Item Requirement Maximum number of pool volumes • P-VOL: 16,384 • V-VOL: 16,384 • Data pool: 8,192 Maximum number of data pools 128 Pool-VOL capacity 8 GB to 4 TB Maximum number of pool-VOLs in a data pool 1,024 Expansion of data pool capacity Allowed, even if Snapshots are using the pool Deletion of data pool Allowed. Pairs using the pool the must be deleted first. Use of external volumes in pool Allowed.
• Volumes with Protect or Read Only attribute, or the “S-VOL Disable” setting (Data Retention) • Also, observe the following • External and internal volume pool-VOLs cannot be used in the same data pool. • The same pool must be used for all pairs sharing the same P-VOL. For example, if a P-VOL is paired with three V-VOLs, all three pairs must use the same data pool. • Volumes that are in the different resource groups cannot be used in the same data pool.
Figure 5 Basic Factors for Data Pool Sizing In addition, when finalizing a data pool’s capacity, it is advisable to factor in the following: • A safety factor of 20-percent. Having a safety factor calculated in minimizes the chances of over-filling the data pool. To factor in a safety factor of 20-percent, multiply the base data pool size times 1.2. • Annual increase in data transactions. Your business data is likely to grow. Multiply the base pool size times the percentage of expected annual growth.
Table 2 Shared memory and number of differential tables Shared Memory number of differential tables Base (without shared memory) 26,176 Extension 1 104,768 Extension 2 209,600 Besides Snapshot, differential tables are used by these other program products: • Business Copy • Business Copy Z • Compatible FlashCopy • Auto LUN Calculate the number of differential tables these products use and subtract the amount from the total number of differential tables.
Calculating maximum pairs based on V-VOL management area shared memory This section helps you calculate the number of pairs allowed based on the amount of additional shared memory in the V-VOL management area. The V-VOL management area consists of the following: • Pool association information • Pool management block Shared memory capacity for the V-VOL management area depends on additional shared memory.
NOTE: You can check the capacity of the shared memory of pool association and pool management block information in Remote Web Console's Snapshot window. For example: S2 = ceil[{(4,282,451,296 ÷ 256) × 32} ÷ 8,736] × 8,736 + ceil[{(4,282,451,296 ÷ 256) ÷ 270} ÷ 2,048 ] × 8,736 = ceil[61,275.917...] × 8,736 + ceil[30.252...] × 8,736 = 61,276 × 8,736 + 31 × 8,736 = 535,577,952 3.
= 535,577,952 S1 = 751,619,276 – 535,577,952 = 216,041,324 Total capacity of P-VOLs (kB) = ceil[(216,041,324 ÷ 8,736)] × 2,048 × 256 = ceil[24,731.005...] × 2,048 × 256 = 24,731 × 2,048 × 256 = 12,966,166,528 Max. num. Snapshot pairs = 12,966,166,528 ÷ ceil[[{(10 × 1,024 × 1,024) ÷ 524,288}] × 524,288] = 12,966,166,528 ÷ 10,485,760 = 1,236 Using the these examples, the maximum number supported based on additional shared memory in the V-VOL management area is 1,236 pairs.
You can minimize the effects of the external-volume failure by adhering to the following recommendation: • • Specify external volumes from only one external system, not from multiple external systems. For details about external systems and the solutions for the errors related to external volumes, see the HP P9000 External Storage for Open and Mainframe Systems User Guide.
3 Sharing Snapshot volumes This chapter discusses other program product volumes that can be shared with a Snapshot P-VOL.
• If the S-VOL Disable attribute is currently set on a volume, the volume cannot be used as a V-VOL in a subsequent paircreate operation. • If the S-VOL Disable attribute is set on a P-VOL, the pair cannot be restored. Use the Remote Web Console Data Retention window to check whether a volume has the Read Only, Protect, S-VOL Disable, Zero Read Capacity, or Invisible attribute.
Copy pair status changes from PSUS while splitting pairs in a consistency group, the Snapshot data cannot keep consistency.
with these systems, according to the status of the shared pair, and vice versa. The following tables show the relationship between pair operations and status.
Table 13 Cnt Ac-S/Cnt Ac-J Operations when P-VOL shared with SS S-VOL (continued) Continuous Access Synchronous / Continuous Access Journal Operations Snapshot Pair Status COPY PAIR PSUS SMPL(PD) COPY(RS) COPY(RS-R) PSUE Switch to remote site (horctakeover) Yes Yes Yes Yes Yes No Yes * If you want to use a Cnt Ac-S or Cnt Ac-J S-VOL as a Snapshot P-VOL, the Snapshot pair must be created after the Cnt Ac-S or Cnt Ac-J pair is created.
Thin Provisioning When sharing Snapshot, Thin Provisioning, and Thin Provisioning Z volumes, note the following: • Thin Provisioning pools (including Smart Tiers pools) and Thin Provisioning Z pools cannot be used as Snapshot pools. • The number of available pools for Snapshot decreases according to the number of Thin Provisioning pools (including Smart Tiers pools) and Thin Provisioning Z pools existing in the storage system. A system can have a total of 128 pools.
4 Installation and configuration This chapter provides instructions and information for installing and configuring Snapshot. Installing and uninstalling Snapshot In Remote Web Console, make sure Business Copy is installed, then install the Snapshot license key. To uninstall, delete any Snapshot pairs, pools, and V-VOLs, then uninstall Snapshot using Remote Web Console.
a. b. In the Drive Type/RPM list, select your system’s hard disk drive type and rpm. In the RAID Level list, select the system’s RAID level. If you selected External Storage for Drive Type/RPM, “-” appears in RAID Level, which indicates that the RAID level cannot be selected. c. d. Click Select Pool VOLs. In the Select Pool Volumes window>Available Pool Volumes table, select the pool-VOLs you want in the table and click Add. To select all pool-VOLs in the list, click Select All Pages.
To create a V-VOL: 1. 2. 3. 4. 5. 6. 7. 8. Tab window to make LDEVs. • LDEV tab when selecting Logical devices. • Pools tab when selecting Pools. Click Create LDEVs. In the Create LDEVs wizard, in the Provisioning Type list, make sure snapshot is selected. In the System Type option, confirm that OPEN is selected. In the Emulation Type list, confirm OPEN-V is selected. In the LDEV Capacity text box, enter the capacity of the V-VOL to be created. A capacity range is shown below the text box.
5 Pair operations This chapter provides instructions for performing pair operations. All other Snapshot pair operations are performed using RAID Manager. Pair operations workflow The operations workflow consists of the following: • Check pair status. Each operation requires a pair to have a specific status. You also check status to insure than an operation completed successfully. • Create the pair, in which the V-VOL becomes a virtual duplicate of the P-VOL.
To create Snapshot pair, run the RAID Manager paircreate command. See the HP P9000 RAID Manager Installation and Configuration User Guide for instructions. When the paircreate completes, pair status changes to PAIR. Creating pairs in a consistency group This section provides a summary of the steps needed to create pairs in a consistency group. For the full information, see the HP P9000 RAID Manager Installation and Configuration User Guide.
Resynchronizing a pair When a pair is resynchronized, the data in the data pool is deleted, and the V-VOL again mirrors the current data in the P-VOL. A pairresync results in increased capacity in the data pool. Prerequisite information • Pair status must be in PSUS status. • If the Snapshot data in the data pool is also used by a related pair, then only the Snapshot ID is deleted for the resynchronized pair; the data is not deleted from the pool.
3. 4. In the Pair Operation window tree, select the port or host group that contains the pairs you want to delete. In the volume list, select the Snapshot pairs you want to delete, right-click, and select the Pairsplit-S command from the menu. Figure 7 Pairsplit-S Dialog Box 5. In the Pairsplit-S dialog box, review the pairs you have selected and click OK. The Pairsplit-S dialog box closes and the list of the pairs to be deleted displays in the Preview list. 6.
6 Monitoring and maintenance This chapter provides information and instructions for monitoring and maintaining the Snapshot system. Monitoring the system Monitoring helps you to keep track of your pairs and volumes in their current and past conditions. Monitoring is an ongoing activity. There are several Snapshot elements you can monitor: • “Monitoring pair status” (page 32) (status definitions included) • “Monitoring pair, volume details” (page 33) • “Monitoring S-VOL path information” (page 35).
Table 15 Pair Status Definitions Status Description P-VOL access V-VOL access SMPL The volume is not assigned to a pair. Yes No R/W COPY The initial copy is in progress. If the P-VOL is already paired with another V-VOL, status does not change to COPY. Yes No R/W PAIR (PFUL) The initial copy operation is complete and the volumes are paired. If pool capacity exceeds the threshold when a pair is in PAIR status, the status changes to PFUL in RAID Manager.
To check pair and volume details: 1. 2. In the Remote Web Console, click Actions > Local Copy > Business Copy/Snapshot > Pair Operation. In the Pair Operation window, select the desired Snapshot pair on the volume list, right-click, and select the Detail command from the menu. Figure 8 Detail dialog box 3. In the Detail dialog box, check pair and volume details as desired. Fields are described below.
Table 17 Fields in the Detail dialog box (continued) Items Descriptions Refresh button Updates the information in the Detail dialog box. Close button Closes the Detail dialog box. Monitoring S-VOL path information You can view path information for the S-VOL. To monitor S-VOL path information: 1. 2. In Remote Web Console, click Actions > Local Copy > Business Copy/Snapshot > Pair Operation.
Table 18 Fields in S-VOL Path dialog box (continued) Items Descriptions • CCC: LU number • XX:YY:ZZ: LDKC number:CU number: LDEV number S-VOL Path Information box Path information for the S-VOLs selected in the Pair Information box. • Port: The port ID • GID: The group number of host group • LUN: LU number Close button Closes the S-VOL Path dialog box. Monitoring number of pairs, license information You can review information related to pairs and license capacity using the Information dialog box.
Table 19 Items of Information dialog box (continued) Items Descriptions Reserved volume(s) The number of reserved volumes of Business Copy will be displayed in the format of XXXX/YYYY. XXXX indicates the number of reserved volumes of Business Copy. YYYY indicates the total number of reserved volumes of Business Copy and Business Copy Z.Reserved volumes include S-VOLs of Business Copy and Business Copy Z.
5. If there are many records of operations, click the scroll button. The list will scroll and you will be able to see the operation history that has not been displayed. If you click and drag down the frame border that divides the History window into upper and lower panes, you can expand the display area of the list. 6. If there are more than 16,384 records of operations, click Next. The list displays subsequent records of operations. • If you click Previous, the list switches to the previous page.
Maintaining the system Some maintenance tasks are a response to behavior discovered during system monitoring. Other tasks are performed to change settings for your changing requirements. The following sections provide instructions for managing the storage system, data pools and V-VOLs. • “Heavy-workload option” (page 39) • “Managing pools” (page 39) • “Managing V-VOLs” (page 41) Heavy-workload option When the workload on the storage system increases, host I/O performance may be degraded.
4. In the Select Pool Volumes window>Available Pool Volumes table, select the pool-VOLs you want in the table. - To select all pool-VOLs in the list, click Select All Pages. - To filter the line, click ON in the Filter field. - To specify the number of lines to be displayed, click Options and make the selection. 5. Click OK. The Select Pool Volumes window closes.
6. 7. 8. Click Finish. In the Confirm window’s Task Name text box, enter the task name. Click Apply. Deleting pools 1. 2. 3. 4. 5. 6. In the Remote Web Console tree, select Pool. From the names that appear below Pool, click the pool, select one or more pools that you want to delete. Click More Actions to select Delete Pools. In the Delete Pools window, click Finish. In the Confirm window’s Task Name text box, enter the task name. Click Apply.
Deleting V-VOLs Prerequisite information • 1. To be deleted, a V-VOL cannot be part of a Snapshot pair. The pair must first be deleted before the V-VOL can be deleted. In the Remote Web Console tree, select Logical Devices. • 2. 3. 4. 5. In the Remote Web Console tree, select Logical Devices. In the list, click one or more V-VOLs that you want to delete. • To select all pool-VOLs in the list, click Select All Pages. • - To filter the rows, click ON in the Filter field.
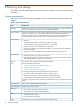
7 Troubleshooting This chapter provides troubleshooting information. General troubleshooting Table 20 Troubleshooting for Snapshot Problem Causes and Solutions Cannot install Snapshot. Causes: • Shared memory for the V-VOL management area is not installed. • Shared memory is not set for the V-VOL management area. • Shared memory for the differential tables is not installed.
Table 20 Troubleshooting for Snapshot (continued) Problem Causes and Solutions Cannot create Snapshot pairs. Causes: • There are not enough differential tables to create the pairs. • The conditions to create the pair are not fulfilled. • The volumes specified to create the pair is in SMPL(PD) status because the pair is being deleted. Solutions: • Secure enough differential tables to create the Snapshot pairs. • Fulfill the conditions to create the pair and try the pair creation again.
Table 20 Troubleshooting for Snapshot (continued) Problem Causes and Solutions Pairsplit on a consistency group Causes: terminates abnormally • All pairs in the consistency group are not in PAIR status. This may result in rejection of the command rejection, Timeout (Error code: EX_EWSTOT), or suspension of the pair (Error code: EX_EWSUSE). • During the operation, a pairresync or pairsplit-S operation is begun on another pair or pairs in the consistency group.
Recovering a blocked pool When a pool is blocked, recovery must be performed in this order: pool-VOLs, pool, pairs, V-VOLs. 1. To recover a blocked pool-VOL, contact HP Technical Support. 2. To recover the pool, performing one of the following: 3. 4. • Add additional pool-VOLs to the pool. • Delete Snapshot data from the pool to increase unused capacity. • Delete pairs to lower the pool’s usage. To recover the pair, delete the pair.
Figure 11 Example of a Log Displayed on the RAID Manager Window 2. 3. Locate the SSB1 and SSB2 codes. In the example above, the error codes appear on the right of "SSB=". • The last four digits on the left of the comma (,) indicates the SSB1 code (B9E1) • The last four digits on the right of the comma (,) indicates the SSB2 code (B901) Locate the description of the SSB1/SSB2 error code combination in the following table. For error codes not described in this table, contact HP Technical Support.
Table 21 RAID Manager error codes for SSB1: B901, B9A8, B9A9, B9AD, B9AE (continued) SSB2 RAID Manager Command Cause of Error 9707 paircreate Since the capacity of the pair exceeds the licensed capacity, the pair cannot be created. 9718 All commands The command ended abnormally because the command other than the paircreate command was issued for the volume in the pair other than the Snapshot pair. This error also may be reported when the command is executed with specifying an unsupported parameter.
Table 21 RAID Manager error codes for SSB1: B901, B9A8, B9A9, B9AD, B9AE (continued) SSB2 RAID Manager Command Cause of Error 972a paircreate Since the volume you specified as the Snapshot P-VOL has the command device setting, the pair cannot be created. 972c paircreate Since the capacity of the volume you specified as the Snapshot P-VOL exceeds the supported size (4TB), the pair cannot be created.
Table 21 RAID Manager error codes for SSB1: B901, B9A8, B9A9, B9AD, B9AE (continued) SSB2 RAID Manager Command Cause of Error 9747 paircreate Since you specified Continuous Access Synchronous P-VOL as the Snapshot S-VOL, the pair cannot be created. 9748 paircreate Since you specified Continuous Access Synchronous S-VOL as the Snapshot S-VOL, the pair cannot be created.
Table 21 RAID Manager error codes for SSB1: B901, B9A8, B9A9, B9AD, B9AE (continued) SSB2 RAID Manager Command Cause of Error 975e All commands Since you specified the Auto LUN target volume as the Snapshot S-VOL, the command ends abnormally. For information about using Auto LUN, contact HP Technical Support. 975f All commands Since you specified the Auto LUN reserved volume as the Snapshot S-VOL, the command ends abnormally. For information about using Auto LUN, contact HP Technical Support.
Table 21 RAID Manager error codes for SSB1: B901, B9A8, B9A9, B9AD, B9AE (continued) SSB2 RAID Manager Command Cause of Error 9786 paircreate, pairsplit, pairresync, pairresync -restore Since quorum disks are specified as P-VOLs of Snapshot pairs, the command ends abnormally. 9787 paircreate, pairsplit, pairresync, pairresync -restore Since quorum disks are specified as S-VOLs of Snapshot pairs, the command ends abnormally.
8 Support and other resources Contacting HP For worldwide technical support information, see the HP support website: http://www.hp.
• http://www.hp.com/service_locator • http://www.hp.com/support/manuals • http://www.hp.com/support/downloads • http://www.hp.
Table 22 Document conventions (continued) Convention Element Monospace text • File and directory names • System output • Code • Commands, their arguments, and argument values Monospace, italic text • Code variables • Command variables Monospace, bold text WARNING! CAUTION: IMPORTANT: NOTE: TIP: Emphasized monospace text Indicates that failure to follow directions could result in bodily harm or death. Indicates that failure to follow directions could result in damage to equipment or data.
A RAID Manager command reference This chapter describes RAID Manager commands corresponding to Actions in GUI. Action names and RAID Manager commands list The following lists Actions in Remote Web Console and the corresponding RAID Manager commands.
B Snapshot GUI reference This appendix describes Snapshot windows and dialog boxes in Remote Web Console. NOTE: P-VOL and S-VOLs listed in the Remote Web Console may end in special symbols. An LDEV number that ends with a pound or gate symbol (#) indicates an external volume (for example, 00:00:01#). An LDEV number that ends with a letter “X” indicates that a virtual volume used by Thin Provisioning (for example, 00:00:01X).
Item Description : host group : LUN or SMPL volume : Snapshot pair Preview Shows the operation(s) you have specified but not yet applied to the system. You can change or delete the operations when you right-click the item in the Preview list. Apply Applies the operations displayed in the Preview list to the storage system. If the specified operations are applied successfully, the Preview list will be cleared.
Item Description CTG The pair’s consistency group number. When the consistency group is not specified, dotted lines (---) display. SvolMode Displays the status of the S-VOL. When data is not written in the S-VOL, dotted lines (---) will display. When the data is written in the S-VOL, W displays. Copy Pace Not for Snapshot, displays dotted lines (---). Sync. Percentage of pair synchronization, if applicable. Changes according to the pair status. • SMPL: --- is displayed.
Table 23 Preview list (continued) Field Description S-VOL S-VOL information displays in AAA-BB-CCC(XX:YY:ZZ)XX:YY:ZZ format. • AAA is the port ID (cluster and channel number) • BB is the group number of host group • CCC is the LU number • XX:YY:ZZ is the LDKC number:CU number:LDEV number Copy Pace Indicates the speed that data is copied according to the pair status. CLPR(P) The P-VOL’s cache logical partition displays. CLPR(S) The S-VOL’s cache logical partition displays.
Items Descriptions CLPR Displays volumes for the selected cache logical partition (CLPR). If you select All, the volumes in all the CLPRs are displayed. Volume Type Displays internal or external volumes. Attribute Displays volumes according the check boxes selected. • Reserved: Business Copy only. • Pair: Displays pair volumes. • Non-Pair: Displays volumes in SMPL status. • Cascade (L1 / L2 radio buttons): Business Copy only. Pair Status box Displays volumes according the check boxes selected.
Items Descriptions P-VOL P-VOL LDKC number, CU number, and LDEV number Emulation P-VOL emulation type Capacity(MB) P-VOL capacity in megabytes (MB). Capacity(blocks) P-VOL’s number of blocks (blocks).
See the following for complete instructions: • “Deleting multiple pairs related to a port or host group” (page 30) • “Deleting multiple pairs related to a pool” (page 31) Items Descriptions P-VOL P-VOL information in AAA-BB-CCC(XX:YY:ZZ) format. • AAA: Port ID (cluster and channel number) • BB: Group number of host group • CCC: LU number • XX:YY:ZZ: LDKC number:CU number:LDEV number A device ID ending in # (e.g., 00:00:3C #), indicates the LDEV is an external volume.
Items Descriptions OK Closes the Pairsplit-S dialog box and displays the list of the Snapshot pairs in the Preview list. Cancel Cancels the operation and closes the Pairsplit-S dialog box. History window This window lets you view the history of operations and associated data. • The upper pane shows Business Copy history. • The lower pane shows Snapshot history. For details about Business Copy history, see the HP P9000 Business Copy User Guide.
item Description S-VOL The operation’s S-VOL (V-VOL), identified by LDKC:CU:LDEV. A device ID ending in V(e.g., 00:00:01 V) indicates the LDEV is a virtual volume. MU Snapshot ID. Pool ID ID of the related data pool. Code Snapshot reference code, which indicates the kind of operation that was performed. See “Reference codes” (page 65). Message Describes the operation. Related to the reference code.
Item Description Tree The pools in the storage system display with the following icons: • Pool/volume list : disk subsystem (storage system) • Pool:X : pool in normal status (X indicates pool ID) • Pool:X : pool whose usage rate exceeds the threshold (X indicates pool ID) • Pool:X : blocked pool (X indicates pool ID) The content of the main list is either data pools or pair volumes. This depends on whether Subsystem or a Pool is selected in the tree.
Item Description • S-VOL: port ID, the group number of host group, and LUN (LDKC number, CU number, and LDEV number of the volume) of the S-VOL For S-VOL LUs with more than one path, only one path is listed. The path is connected to the first port within the ports configured to a path that are shown in the tree view of the Pair Operation Window. When the volume is unmounted, dotted lines (---) will display. • Pool used(GB): capacity of the pool that is used by the S-VOL • Sync.
Item Description box. For details about the list of the error code of Snapshot, see the HP P9000 Remote Web Console Messages. Cancel Cancels all operations in the Preview list.
Item Description Shows the information about Thin Provisioning capacity. • Pool capacity (Usage/Total): Shows the pool capacity (Usage/Total) of Thin Provisioning. • Remaining Configurable Pool Capacity: Remaining configurable pool capacity of Thin Provisioning. The configurable value decreases when adding the V-VOL or pool-VOL. And increases when deleting them. • V-VOL Capacity (Total/Remaining Configurable): V-VOL capacity (total/remaining configurable) of Thin Provisioning.
Item Description Normal: The pool is in a normal status. Warning: The pool-VOL in the pool is blocked. Exceeded Threshold: The used capacity of the pool exceeds the pool threshold. Shrinking: Reducing the pool-VOL. Blocked: The pool is full, or an error occurred in the pool, therefore the pool is blocked. If the pool is in both Warning and Blocked status, only Blocked is displayed. Number of Pool VOLs Shows the number of pool-VOL. Number of V-VOLs Shows the number of V-VOLs associated with the pool.
Item Description CLPR Shows CLPR setting for the pool volumes. For THP pools, a hyphen (-) is displayed. Shrinkable Shows whether the pool-VOL can be deleted. For a Snapshot pool, a hyphen(-) is displayed because it is not shrinkable. Mixable11 For a pool made with the latest product (70–02–0x and higher), "Enable" is displayed. In a Thin Provisioning pool, volumes with RAID level 5 and volumes with RAID level 6 can be mixed. Also, internal volumes and external volumes can be mixed.
Top window when selecting a pool volume group under Pool Summary Item Description Status Shows the following information about the pool status. Normal: The pool is in a normal status. Warning: The pool-VOL in the pool is blocked. Exceeded Threshold: The used capacity of the pool exceeds the pool threshold. Shrinking: Reducing the pool-VOL. Blocked: The pool is full, or an error occurred in the pool, therefore the pool is blocked.
Item Description Pool Type Shows the pool type. • For Thin Provisioning or Smart Tiers: THP is displayed. • For Snapshot: Snapshot is displayed. RAID Level Shows the RAID level. If multiple RAID levels exist in a pool, this field indicates that RAID levels are mixed. Drive Type/RPM Shows the hard disk drive type and rpm of the pool. If multiple Drive Type/RPMs exist in a pool, this field indicates that Drive Type/RPMs are mixed. Pool Capacity (Used/Total) Shows the used and total pool capacity.
Item Description Parity Group ID Shows the parity group ID. Usable Capacity Shows available capacity of page boundaries in a pool-VOL by the specified unit. For the top pool-VOL of Thin Provisioning or Smart Tiers, the displayed capacity does not include the capacity of the management area. For a Thin Provisioning pool, Smart Tiers pool, and a Snapshot pool, a hyphen (-) is displayed when you change the unit of capacity to Cylinder using Option button. RAID Level Shows the RAID level.
Setting fields Item Description Pool Type* Select the pool type. For Thin Provisioning or Smart Tiers: Select Thin Provisioning. For Snapshot: Select Snapshot. System Type Select the system type. "Open" or "Mainframe" can be selected when you select Thin Provisioning in Pool Type. When you select "Open", you can perform Thin Provisioning operations. Only "Open" can be selected when you select Snapshot in Pool Type.
Item Description Pool Name* Set the pool name. • Prefix: Enter the alphanumeric characters, which are fixed characters of the head of the pool name. The characters are case-sensitive. • Initial Number: Enter the initial number following the prefix name, which can be entered up to nine digits. • You can enter up to the 32 characters including the initial number. Initial Pool ID The smallest available number is entered in the text box as a default.
Item Description Tier 3: Sets buffer space for new page assignment for tier 3 from 2% to 40%. The default value is 2%. This function can be set only when Multi-Tier Smart Pool is enabled. *The items with asterisks require configuration. Add button When you click Add, the configured information is added to the right Selected Pools table. Selected pools table The following table lists the details of items. Item Description Pool Name (ID) Nickname and ID of the pool.
Item Description If multiple types of drives exist in a pool, this field indicates that the drive types are mixed. Subscription Limit (%) Subscription limit of the pool. For Snapshot, a hyphen (-) is displayed. User-Defined Threshold (%) Information about pool threshold is displayed. • Warning: Warning threshold is displayed. • Depletion: Depletion threshold is displayed. For a snapshot pool, a hyphen (-) is displayed for Depletion. Number of Pool VOLs Shows the number of the pool-VOLs.
Confirm window Create Pools table Item Description Pool Name (ID) Shows the nickname and ID of the pool. RAID Level Shows the RAID level. Capacity Shows the pool capacity. Pool Type Shows the pool type. • For Thin Provisioning or Smart Tiers: THP is displayed. • For Snapshot: Snapshot is displayed. Drive Type/RPM Shows the hard disk drive type and rpm. Subscription Limit (%) Shows the subscription limit. For Snapshot, a hyphen (-) is displayed.
Item Description Smart Pool Shows the Smart Tiers information. If Smart Pool is not set to enable, a hyphen (-) is displayed. • Tier Management Shows Auto or Manual of performance monitoring and tier relocation. • Cycle Time Shows the cycle of performance monitoring and tier relocation. • Monitoring Period Shows the time zone of performance monitoring when 24 Hours is selected in the Cycle Time list. Buffer Space for New page assignment (%) Shows buffer space for new page assignment for each tier.
Pool Volume Selection: Item Description Drive Type/RPM “Any” or the drive type and rpm of the selected pool is displayed. RAID Level Unavailable. Select Pool VOLs Shows the Select Pool Volumes window. Total Selected Pool Volumes Shows the total number of the selected pool-VOLs. Total Selected Capacity Shows the total capacity of the selected pool-VOLs. Confirm window Selected table Item Description Pool Name (ID) Nickname and ID of the pool.
Item Description Capacity Shows the pool-VOL capacity. Total Shows the total number of the pool-VOLs. Edit Pools wizard Edit Pools window Setting fields Item Description Smart Pool Set to Enable or Disable Smart by selecting either of the check box. When Mixable is enabled, a pool that is comprised of volumes with RAID level 1 or a pool that is comprised of external volumes and whose cache mode is disabled cannot be changed from Disable to Enable.
Item Description Set to execute performance monitoring and tier relocation automatically or manually. • Cycle Time When selecting Auto from the Tier Management field, select the cycle of performance monitoring and tier relocation from the Cycle Time list. • Monitoring Period When selecting 24 Hours from the Cycle Time list, specify the time of starting and ending of performance monitoring in 00:00 to 23:59 (default value). Set the end time one hour or more later than the start time.
Item Description Warning Threshold • For Thin Provisioning and Smart Tiers: Check Warning Threshold and enter a threshold. The minimum threshold is the pool usage rate plus 1%. The maximum threshold is 100%. • For Snapshot: Check Warning Threshold and enter a threshold. The minimum threshold is the pool usage rate plus 1%. The maximum threshold is 95%. Depletion Threshold Check Depletion Threshold and enter a threshold. The minimum threshold is the pool usage rate plus 1 percent.
Item Description If multiple types of drives exist in a pool, this field indicates that the drive types are mixed. Subscription Limit (%) Shows the subscription limit. For Snapshot, a hyphen (-) is displayed. User-Defined Threshold (%) Information about pool threshold is displayed. • Warning: Warning threshold is displayed. • Depletion: Depletion threshold is displayed. For a snapshot pool, a hyphen (-) is displayed for Depletion. Number of Pool VOLs Shows the number of the pool-VOLs.
Delete Pool wizard Delete Pool window Selected Pools table Item Description Pool Name (ID) Shows the nickname and ID of the pool. RAID Level Shows the RAID level. If multiple RAID levels exist in a pool, this field indicates that RAID levels are mixed. Capacity Shows the pool capacity. Pool Type Shows the pool type. • For Thin Provisioning or Smart Tiers: THP is displayed. • For Snapshot: Snapshot is displayed. Drive Type/RPM Shows the hard disk drive type and rpm of the pool.
Item Description Number of Pool VOLs Shows the number of the pool-VOLs. Detail Shows the Pool Properties window when a line is selected, and shows the error window when a line is not selected or multiple lines are selected. Confirm window Selected Pools table Item Description Pool Name (ID) Shows the nickname and ID of the pool. RAID Level Shows the RAID level. If multiple RAID levels exist in a pool, this field indicates that RAID levels are mixed. Capacity Shows the pool capacity.
Item Description User-Defined Threshold (%) Information about pool threshold is displayed. • Warning: Warning threshold is displayed. • Depletion: Depletion threshold is displayed. For a snapshot pool, a hyphen (-) is displayed for Depletion. Number of Pool VOLs Shows the number of the pool-VOLs. Detail Shows the Pool Properties window when a line is selected, and shows the error window when a line is not selected or multiple lines are selected. Total Shows the total number of the pools.
Item Description User-Defined Threshold (%) Information about pool threshold is displayed. • Warning: Warning threshold is displayed. • Depletion: Depletion threshold is displayed. For a snapshot pool, a hyphen (-) is displayed for Depletion. Number of Pool VOLs Shows the number of the pool-VOLs. If the pool is blocked and the pool-VOLs that belong to the pool cannot be identified, 0 is displayed. Complete SIMs window Setting fields Item Description Task Name Enter the task name.
Select Pool window Available Pools table Item Description Pool Name (ID) Shows the nickname and ID of the pool. RAID Level Shows the RAID level. Capacity Used: Shows the used pool capacity. Total: Shows the total pool capacity. Drive Type/RPM Shows the hard disk drive type and rpm. User-Defined Threshold (%) Shows the threshold you configure. Tier Management Shows Auto or Manual according to the Tier Management setting. For pools other than Smart Tiers, a hyphen (-) is displayed.
Available Pool Volumes table Item Description LDEV ID Shows the LDEV ID. LDEV Name Shows the LDEV name. Capacity Shows the pool-VOL capacity. Parity Group ID Shows the parity group ID. RAID Level Shows the RAID level. Drive Type/RPM Shows the hard disk drive type and rpm. Emulation Type Shows the emulation type. Provisioning Type Shows the LDEV type. CLPR Shows CLPR. Cache Mode Shows whether the cache mode is enabled or disabled.
NOTE: After you remove the pool-VOL that is set as the top pool-VOL, the pool-VOL that is now displayed at the top of the Selected pool volumes table will be the new top pool-VOL. The top pool-VOL is not set when the pool is expanded. Up to 1024 volumes can be added, including volumes that already exist in the pool. When you add a volume to a pool for which Smart Pool is enabled, consider the following: • Drive Type/RPM for the volume to be added must be up to 3.
Item Description RAID Level Show the RAID level. Drive Type/RPM Shows the hard disk drive type and rpm. Emulation Type Shows the emulation type. Provisioning Type Shows the LDEV type. CLPR Shows CLPR. Cache Mode Shows the cache mode. Shows whether the cache mode is enabled or disabled. For a volume other than external volumes, a hyphen (-) is displayed. Location The pool-VOL that is indicated as Top will be the top pool-VOL.
Pool Properties table Item Description Pool Name (ID) Shows the pool name. Pool Type Shows the pool type. • For Thin Provisioning or Smart Tiers: THP is displayed. • For Snapshot: Snapshot is displayed. Capacity Shows the pool capacity by the specified unit. User-Defined Threshold (Warning/Depletion) Shows the user-defined threshold (warning/depletion). Subscription Limit Shows the subscription limit. For Snapshot, a hyphen (-) is displayed. RAID Level Shows the RAID level.
Glossary BC P9000 or XP Business Copy. An HP application that provides volume-level, point-in-time copies in the disk array. CLPR Cache logical partition. Cnt Ac-J P9000 or XP Continuous Access Journal software. Cnt Ac-S P9000 or XP Continuous Access Synchronous software. command device A volume in the disk array that accepts Continuous Access, Business Copy, or P9000 for Business Continuity Manager control operations, which are then executed by the array. CU Control Unit.
RAID1-level data storage A RAID that consists of at least two drives that use mirroring (100 percent duplication of the storage of data). There is no striping. Read performance is improved since either disk can be read at the same time. Write performance is the same as for single disk storage. RAID1/5 Specific RAID architectures. RAID5-level data storage A RAID that provides data striping at the byte level and also stripe error correction information.
Index A additional shared memory, 13 Auto LUN, 20 B Blocked pool recovering a, 46 Business Copy, 20 C Command device setting up a, 27 Command menu, 60 configuration workflow, 25 Consistency groups requirement, 11 contacting HP, 53 conventions document, 54 for storage capacity values, 54 text symbols, 55 Creating a pair, 28 Creating pairs in a consistency group, 29 D Data pools changing the name, 40 changing the threshold, 40 creating, 25 description, 7 maximum number of, 11 planning V-VOLs for, 12 recove
see also related documentation Restoring a pair, 30 Resynchronizing a pair, 30 S Shared memory requirement, 10 shared memory, V-VOL management area, 15 SIMs for pool problems, 46 Snapshot installing and uninstalling, 25 Snapshot software overview, 6 Snapshot volumes interoperablity with other products and functions, 19 Splitting pairs, 29 Storage system changing the microcode, 42 powering off , 42 Subscriber's Choice, HP, 53 symbols in text, 55 System requirements, 10 T technical support HP, 53 HP website