
HP XP P9000 Business Copy User Guide (AV400-96573, July 2013)
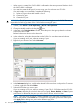
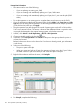
Table Of Contents
- HP XP P9000 Business Copy User Guide
- Contents
- 1 Business Copy overview
- 2 Requirements and planning
- 3 Sharing Business Copy volumes
- Cache Residency
- Fast Snap and Snapshot
- Data Retention
- Thin Provisioning and Smart Tiers
- External Storage Access Manager
- LUN Manager
- Open Volume Management
- Resource Partition
- Continuous Access Synchronous
- Continuous Access Journal
- External Storage
- Auto LUN
- 4 Performing configuration operations
- 5 Performing pair operations
- 6 Monitoring and maintaining the system
- 7 Troubleshooting
- 8 Support and other resources
- A Interface support for BC operations and options
- B Business Copy GUI reference
- Replications window
- Local Replications window
- View Pair Properties window
- View Pair Synchronous Rate window
- View Histories window
- Consistency Group Properties window
- Create Pairs wizard
- Split Pairs wizard
- Resync Pairs wizard
- Suspend Pairs window
- Delete Pairs window
- Edit Mirror Units dialog box
- Change Options dialog box
- Add Reserve Volumes Wizard
- Remove Reserve Volumes window
- Edit Local Replica Option wizard
- C Configuration operations (secondary window)
- D Pair operations (secondary window)
- E Monitoring and maintaining the system (secondary window)
- F Business Copy GUI reference (secondary window)
- Glossary
- Index
9. Select an MU number for the pair.
• An MU number can be assigned to only one pair.
• Use 0, 1, or 2 for an L1 pair.
• Use 1 or 2 for an L2 pair.
10. Show the volumes available for S-VOLs by selecting the following filters from the Select S-VOL
box:
• Select a Port to show associated volumes.
• Select a Volume Type to show internal or external volumes. You can select both if desired.
• Select an Attribute to show volumes previously reserved as S-VOLs, or volumes that are
not reserved. You can select both if desired.
• You can also filter by existing pairs that may be used for creating L2 pairs (select the Pair
check box).
11. Select the volume to be the S-VOL from the volume list in the Select S-VOL box.
12. Do one of the following:
• If creating an L1 pair, click Set. This places the volume as the S-VOL in the pair list.
- You can add a second or third S-VOL to the same L1 P-VOL by repeating steps 8-11.
- To create another pair with a new P-VOL, repeat steps 7-11.
• If creating an L2 pair, click Cascade. This places a new L2 pair in the pair list.
To add a second L2 pair, repeat steps 8-11.
13. If you need to change an S-VOL, highlight the pair then select the new volume in the S-VOL
list and click Change. The changed pair is shown in the pair list.
14. Click OK when finished creating pairs.
15. In the Pair Operation window, review the information in the Preview list. To change a selection,
right-click it, select Modify, and make your changes.
16. Click Apply to commit the pairs to the storage system.
Splitting pairs, creating and splitting pairs
Update copying continues until the pair is split. After the pair is split, updates continue to the P-VOL
but not to the S-VOL; data in the S-VOL is ensured at the time of the split. All update data are stored
in the differential bitmap for use when resynchronizing the pair.
You can use one of the following options to split a pair:
• Steady split, which is a typical pair split operation in which any remaining differential data
from the P-VOL is copied to the S-VOL and then the pair is split.
• Quick split, in which the pair is immediately split so that the S-VOL is immediately available
for read and write I/O. Any remaining differential data is copied to the S-VOL in the
background.
• consistency group pair-split, in which all pairs in a consistency group are split at the same
time. Split time indicates the time when you want to mirror P-VOL data in the S-VOLs. RAID
Manager is required.
• Create and simultaneously split an L1 or L2 pair. This allows you to access S-VOLs as soon
as possible
Splitting pairs, creating and splitting pairs 117