
HP StorageWorks Disk Array XP operating system configuration guide for Sun Solaris XP24000, XP12000, XP10000, SVS200, v01(A5951-96037, June 2007)


• Fabric zoning and LUN security for multiple operating systems
3. Connecting the disk array
• Defining the paths
• Adding the new device paths to the system
• Verifying host recognition of disk array devices
4. Configuring disk array devices
• Labeling and partitioning the devices
• Creating the file systems
5. Configuring for use with Veritas Volume Manager v3.2 and later
Installing and configuring the disk array
The HP service representative performs these tasks:
• Assembling hardware and installing software
• Loading the microcode updates
• Installing and formatting devices
After these tasks are finished, you will use XP Remote Web Console, XP Command View, Command
View XP Advanced Edition Software, or XP Array Manager to complete the remaining tasks listed
below. If you do not have these programs, your HP service representative can perform these tasks for
you.
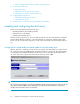
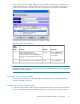
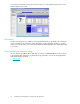
Setting the host mode and host group mode for the disk array ports
After the disk array is installed, you must set the host mode for each disk array port to match the host
OS. Set the host mode using LUN Manager in XP Remote Web Console (shown), XP Command View,
or Command View XP Advanced Edition Software. If these are not available, the HP representative
can set the host mode using the SVP. The host mode setting for Solaris is 09.
CAUTION:
The correct host mode must be set for all new installations (newly connected ports) to Solaris hosts. Do not
select a mode other than 09 for Solaris. Changing a host mode after the host has been connected is
disruptive and requires the server to be rebooted.
Installing and configuring Sun Solaris for the XP disk array14