
HP StorageWorks Disk Array XP operating system configuration guide for Sun Solaris XP24000, XP12000, XP10000, SVS200, v01(A5951-96037, June 2007)
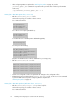
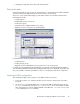

Creating the mount directories
1. Create a mount directory for each device using the mkdir command.
2. Enter each device into the mount table by editing /etc/vfstab.
3. Use the mount -a command to auto-mount devices.
4. Use a df -k command to verify the devices auto-mounted.
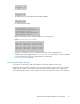
Configuring for use with Veritas Volume Manager v3.2 and
later
HP XP disk arrays are certified for VxVM support.
Be sure to set the driver parameters correctly when you install the HBA. Failure to do so may result in
a loss of path failover in Dynamic Multipathing (DMP). See
“Installing and configuring the HBAs ” on page 17 and the HBA manufacturer's instructions for setting
specific HBA parameters.
VxVM 3.2 and later use Array Support Libraries (ASL) to configure the Dynamic Multipathing (DMP)
feature and other parameters. The ASL is required for all arrays. To download and install the ASL
from the Symantec/Veritas support website: h
ttp://support.veritas.com:
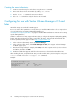
1. In the “Select Product Family” menu click Volume Manager.
2. In the “Select Product” menu, click Volume Manager for Unix; the “Support: Volume Manager
for UNIX” page opens.
3. Enter the XP array model (for example, XP12000) in the “Ask a question” block, select “Solaris”
as Platform, and then click GO.
4. Read the TechFile that appears and follow the instructions to download and install the ASL.
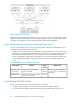
After installing the ASL, verify that the XP array is visible and the ASL is present using the vxdmpadm
listctlr all and vxddladm listsupport all commands.
Example
# vxddladm listsupport all
grep HPlibvxxp256.so HP All
libvxhpxp.so HP 0450, 0451
libhpxp12k.so HP 50, 51
Installing and configuring Sun Solaris for the XP disk array28