HP XP7 Cache Partition User Guide Abstract This document describes and provides instructions for using the Cache Partition software for HP XP7 Storage.
© Copyright 2014 Hewlett-Packard Development Company, L.P. Confidential computer software. Valid license from HP required for possession, use or copying. Consistent with FAR 12.211 and 12.212, Commercial Computer Software, Computer Software Documentation, and Technical Data for Commercial Items are licensed to the U.S. Government under vendor's standard commercial license. The information contained herein is subject to change without notice.
Contents 1 Cache Partition operations...........................................................................4 Overview of Cache Partition.......................................................................................................4 CLPR names........................................................................................................................4 Use case for cache logical partitioning........................................................................................
1 Cache Partition operations This chapter describes and provides instructions for performing cache partitioning operations using Cache Partition. Overview of Cache Partition The HP XP7 Storage system can connect to multiple hosts and can be shared by multiple users, which can result in conflicts among users. For example, if a host issues many I/O requests or reads or writes a large amount of data, the I/O performance of other hosts may be affected.
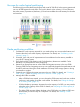
Use case for cache logical partitioning The following figure shows three branch offices and a total of 128 GB of cache memory partitioned into one 40 GB segment for each office. The host for branch A has a heavy I/O load. Because the cache memory is partitioned, that heavy I/O load cannot affect the cache memory for the other two branches. Cache partitioning workflow 1. 2. 3. 4. 5. 6.
Cautions and restrictions for Cache Partition • Increased cache memory requirements Install additional cache memory before partitioning cache. Adding cache memory after CLPRs have been created is difficult and can be problematic. For details, see “Calculating cache capacity” (page 7).
Application Behaviors Cache Residency ◦ A parity group containing LDEVs assigned to Cache Residency cache areas cannot be migrated to another CLPR. ◦ If Cache Residency cache area decreases the cache capacity of an existing CLPR, adjust the cache capacity of the CLPR. Continuous Access Journal Continuous Access Journal data volumes and journal volumes can belong to different CLPRs. All journal volumes in the same journal must belong to the same CLPR. If not, an error occurs.
Internal/external VOL for a CLPR (Total capacity) Number of MP blades 4 TB or more 16 TB or more 48 TB or more 96 TB or more 8 Cache Partition operations Recommended cache capacity for a CLPR 6 20 GB 8 28 GB 10 36 GB 12 44 GB 14 52 GB 16 60 GB 2 16 GB 4 16 GB 6 20 GB 8 28 GB 10 36 GB 12 44 GB 14 52 GB 16 60 GB 2 24 GB 4 24 GB 6 24 GB 8 28 GB 10 36 GB 12 44 GB 14 52 GB 16 60 GB 2 32 GB 4 32 GB 6 32 GB 8 32 GB 10 36 GB 12 44 GB 14 52 GB 16 60
Internal/external VOL for a CLPR (Total capacity) Number of MP blades 160 TB or more 240 TB or more 360 TB or more 600 TB or more Recommended cache capacity for a CLPR 14 52 GB 16 60 GB 2 48 GB 4 48 GB 6 48 GB 8 48 GB 10 48 GB 12 48 GB 14 52 GB 16 60 GB 2 56 GB 4 56 GB 6 56 GB 8 56 GB 10 56 GB 12 56 GB 14 56 GB 16 60 GB 2 64 GB 4 64 GB 6 64 GB 8 64 GB 10 64 GB 12 64 GB 14 64 GB 16 64 GB 2 72 GB 4 72 GB 6 72 GB 8 72 GB 10 72 GB 12 72 GB 14
Internal volume capacity = (number of (3D+1P) parity groups) × (capacity of one drive) × 3 + (number of (6D+2P) parity groups) × (capacity of one drive) × 6 + (number of (7D+1P) parity groups) × (capacity of one drive) × 7 + (number of (14D+2P) parity groups) × (capacity of one drive) × 14 + (number of (2D+2D) parity groups) × (capacity of one drive) × 2 Do not use this formula for an external volume or virtual volume.
Internal/external VOL for a CLPR (Total capacity) Number of MP blades 48 TB or more 96 TB or more 160 TB or more 240 TB or more Recommended cache capacity for a CLPR 6 28 GB 8 36 GB 10 44 GB 12 52 GB 14 60 GB 16 68 GB 2 32 GB 4 32 GB 6 32 GB 8 36 GB 10 44 GB 12 52 GB 14 60 GB 16 68 GB 2 40 GB 4 40 GB 6 40 GB 8 40 GB 10 44 GB 12 52 GB 14 60 GB 16 68 GB 2 48 GB 4 48 GB 6 48 GB 8 48 GB 10 48 GB 12 52 GB 14 60 GB 16 68 GB 2 56 GB 4 56 GB 6 5
Internal/external VOL for a CLPR (Total capacity) Number of MP blades 360 TB or more 600 TB or more Recommended cache capacity for a CLPR 14 60 GB 16 68 GB 2 64 GB 4 64 GB 6 64 GB 8 64 GB 10 64 GB 12 64 GB 14 64 GB 16 68 GB 2 72 GB 4 72 GB 6 72 GB 8 72 GB 10 72 GB 12 72 GB 14 72 GB 16 72 GB Cache capacity with Cache Residency When you use the Priority mode by using Cache Residency for a CLPR, you may want to add cache capacity depending on the number of areas in which
The next table lists the recommended cache when the total external volume capacity with External Storage is equal to or more than or less than 128,000 GB.
4. 5. In CLPR Name, enter the CLPR name (maximum 16 alphanumeric characters). Each CLPR name must be unique. You cannot use a CLPR name that is already reserved. In Total Cache Size, select the cache capacity. The default size is 8 GB, and you can select 8 GB or higher value in increments of 4 GB.
Prerequisites • Required role: Storage Administrator (System Resource Management) • You must enable the Remote Web Console secondary window. For details, see the HP XP7 Remote Web Console User Guide. Display the Remote Web Console main window. On the Administration tree click Cache Partitions, and then click the Cache Partitions tab. On the Cache Partitions tab, select the CLPR that contains the resources to be migrated, and then click Migrate CLPR Resources to open the Migrate CLPR Resources window.
remaining capacity in CLPR0 is at least 8 GB when selecting the total cache size or resident cache size. When you reduce the value of Total Cache Size, the resident cache size before change may not be applied in some cases. If so, ensure the value of the resident cache size and check the Resident Cache Size check box. 3. 4. 5. 6. 7. In Resident Cache Size, edit the resident cache capacity as needed. The minimum size is 0 GB, and the size can be changed in increments of 0.5 GB.
Troubleshooting Cache Partition Error Recommended action The CLPR name cannot be changed. You cannot assign the same name to more than one CLPR. The name you entered is already in use or is a reserved name. Enter another name. For more information, see “CLPR names” (page 4). The parity group in a CLPR cannot be migrated to another CLPR. • Only open-system parity groups can be migrated. • Make sure that all interleaved parity groups belong to the same CLPR. • Click Apply when creating a new CLPR.
2 Troubleshooting This topic provides troubleshooting information for the Cache Partition software. Troubleshooting Cache Partition Displaying an error message If the settings contain a discrepancy after you click Apply, an error message appears. Procedure 1 To display an error message: 1. 2. Right-click a CLPR on the Partition Definition tree, then select Error Detail to open the message. Review the message and click OK to close the message.
3 Support and other resources Contacting HP For worldwide technical support information, see the HP support website: http://www.hp.
HP websites For additional information, see the following HP websites: • http://www.hp.com • http://www.hp.com/go/storage • http://www.hp.com/service_locator • http://www.hp.com/support/manuals • http://www.hp.com/support/downloads • http://www.hp.
Table 2 Document conventions (continued) Convention Element Monospace text • File and directory names • System output • Code • Commands, their arguments, and argument values Monospace, italic text • Code variables • Command variables Monospace, bold text WARNING! CAUTION: IMPORTANT: NOTE: TIP: Emphasized monospace text Indicates that failure to follow directions could result in bodily harm or death. Indicates that failure to follow directions could result in damage to equipment or data.
A Cache Partition GUI reference This chapter provides detailed information about the Cache Partition GUI. Cache Partition window This is the top window that appears when Cache Partitions is selected in Administration. • “Summary” • “Cache Partitions tab” Summary Item Description Number of CLPRs Displays the number of CLPRs in the storage system. CLPR ID* Displays the ID of the CLPR.
Cache Partitions tab Item Description CLPR Name Displays the CLPR names. Click the CLPR name to open the top window in which the CLPR is selected.
Summary Item Description CLPR Displays the CLPR number and CLPR name.
Parity Groups tab Item Description Parity Group ID Displays the parity Group IDs. Click the CLPR ID to open the top window in which the parity group is selected. RAID Level Displays the RAID level. Base Emulation Type Displays the emulation type of parity groups. Capacity Displays the capacity. Migrate CLPR Resources Opens the Migrate CLPR Resources window. Export Opens the window for outputting the table information.
Virtual Volumes tab Item Description LDEV ID Displays the LDEV IDs. Click the LDEV ID to open the properties window of each LDEV. LDEV Name Displays the LDEV name. RAID Level Displays the RAID level. Emulation Type Displays the emulation type of the virtual volume. Capacity Displays the capacity. Provisioning Type Displays the LDEV type. Migrate CLPR Resources Opens the Migrate CLPR Resources window. Export Opens the window for outputting the table information.
Setting fields Use the left side of this window to create CLPRs. Item Description CLPR ID Displays the smallest CLPR number of available CLPR numbers. Displays a blank if no CLPR number is available. CLPR Name Enables you to enter the CLPR name. You can use up to 16 alphanumeric characters but cannot specify CLPR names that are already reserved. A blank is displayed if no CLPR number is available. For details see “CLPR names” (page 4).
Item Description The default is 0, and 0 to 16384 can be specified. The maximum available capacity (subtract the total usage capacity of other CLPRs from the total capacity of the storage system) is displayed as the upper limit value. Add> You can add the CLPR set in the left side of the window to the Selected CLPR table. Default CLPR table Displays the information about CLPR 0. Item Description CLPR Displays the CLPR number and CLPR name.
Setting fields Item Description Task Name Enables you to enter a name (up to 32 alphanumeric characters) for the specified create CLPR task. Default CLPR table Displays the information about CLPR 0. Item Description CLPR Displays the CLPR number and CLPR name. Cache Size Displays the cache capacities in the storage system.
Selected CLPRs table Use this table to view the information of CLPR to be created. Item Description CLPR Displays the CLPR number and CLPR name. Cache Size Displays the cache capacities: • General: CLPR cache capacity • Resident: Resident cache capacity • Total: Total cache capacity Number of Resident Extents Displays the number of resident caches in the storage system.
Available Parity Groups table Item Description Parity Groups ID Displays the parity group ID. CLPR Displays the CLPR number and CLPR name. RAID Level Displays the RAID Level. Base Emulation Type Displays the emulation type of the parity group. Capacity Displays the capacity. Resource Group Name (ID) Displays the resource group name (ID). Available Virtual Volumes table Item Description LDEV ID Displays the LDEV IDs. Click the LDEV ID to open the properties window of each LDEV.
Setting fields Item Description Detail Opens the CLPR Properties window. Confirm window for Migrate CLPR Resources Use this window to confirm the CLPR resources to be migrated and to assign a name to the migrate CLPR resources task. CLPRs table Displays the information about the CLPRs to be migrated. Item Description CLPR Displays the CLPR number and CLPR name. Total Cache Size Displays the total cache capacity of the CLPR.
Edit CLPR wizard Related information • “Editing the settings of an existing CLPR” (page 15) • “Edit CLPR window” (page 33) • “Confirm window for Edit CLPR” (page 34) Edit CLPR window This window appears when you click Edit CLPR on the Cache Partition window. Setting fields Item Description CLPR ID Displays the CLPR number. CLPR Name Displays the CLPR name set at the time of the CLPR creation, and enables you to edit the name.
Item Description The value can be selected in increments of 0.5 GB. The maximum value is 2,014 GB (cache residency capacity of the storage system), but the maximum available capacity (subtract the total usage capacity of other CLPRs from the total capacity of the storage system) is displayed as the upper limit value. If resident cache exists in the selected CLPR and the selected resident cache size is smaller than the resident cache capacity that is already set, an error occurs.
Default CLPR table Displays the information about CLPR 0. Item Description CLPR Displays the CLPR number and CLPR name. Cache Size Displays the cache capacities in the storage system. • General: CLPR cache capacity • Resident: Resident cache capacity • Total: Total cache capacity Number of Resident Extents Displays the number of resident caches in the storage system. Selected CLPR table Displays information about CLPRs to be created. Item Description CLPR Displays the CLPR number and CLPR name.
Setting fields Item Description CLPR Name Displays the CLPR name set at the time of the CLPR creation, and enables you to edit the name. • Prefix: You can use up to 16 alphanumeric characters but cannot specify CLPR names that are already reserved. For details see “CLPR names” (page 4). • Initial number: You can use numbers 0 to 9, and a blank is set by default. Up to 9 characters can be used. The maximum number of characters for CLPR name is 16, including both Prefix and Initial number, not 25 (16+9).
CLPR Properties table Item Description CLPR Displays the CLPR number and CLPR name. Cache Size Displays the cache capacities in the storage system. • General: CLPR cache capacity • Resident: Resident cache capacity • Total: Total cache capacity Number of Resources Displays the number of resources already assigned to CLPRs.
Item Description • Device Name*: Displays the virtual device name of the LDEV. Only specified content is displayed out of virtual emulation type, number of virtual LUSE volumes, and virtual CVS attribute. A blank is displayed when none of these items (virtual emulation type, number of virtual LUSE volumes, virtual CVS attribute) is specified. Only the attributes that have been specified are displayed. "CVS" is given at the end when the virtual CVS attribute is specified.
Selected CLPR table Displays information about CLPRs to be deleted. Item Description CLPR Displays the CLPR number and CLPR name. Cache Size Displays the cache capacities: • General: CLPR cache capacity • Resident: Resident cache capacity • Total: Total cache capacity Number of Resident Extents Displays the number of resident caches.
Glossary allocation The ratio of allocated storage capacity versus total capacity as a percentage. Allocated storage refers to those logical devices (LDEVs) that have paths assigned to them. Allocated storage capacity is the sum of the storage of these LDEVs. Total capacity is the sum of the capacity of all LDEVs on the disk array. BC P9000 or XP Business Copy. An HP application that provides volume-level, point-in-time copies in the disk array.
to be associated with 1 to 36 LDEVs. Essentially, LUSE makes it possible for applications to access a single large pool of storage. M-VOL Main volume. MCU Main control unit. OPEN-x A general term describing any of the supported OPEN emulation modes (for example, OPEN-E). There are two types of OPEN-x devices: legacy OPEN-x devices with a fixed size (such as OPEN-3, OPEN-8, OPEN-9, and OPEN-E), and OPEN-V, which has a variable size and is a CVS-based volume.
Index Business Copy quick restore operations across multiple CLPRs, 6 ShadowImage quick restore operations across multiple CLPRs, 6 Volume Migration manual migration across multiple CLPRs, 6 A Auto LUN restrictions on manual migration across multiple CLPRs ,6 B Business Copy restrictions on quick restore operations across multiple CLPRs, 6 C cache capacity recommendations, 7 partitioning, 4 partitioning example, 5 CLPRs creating, 13 deleting, 16 migrating resources, 14 contacting HP, 19 conventions docum