HP XP7 Fast Snap User Guide Abstract This document describes and provides instructions for using Fast Snap to plan, configure, and perform pair tasks on a HP XP7 Storage.
© Copyright 2014 Hewlett-Packard Development Company, L.P. Confidential computer software. Valid license from HP required for possession, use or copying. Consistent with FAR 12.211 and 12.212, Commercial Computer Software, Computer Software Documentation, and Technical Data for Commercial Items are licensed to the U.S. Government under vendor's standard commercial license. The information contained herein is subject to change without notice.
Contents 1 Overview of Fast Snap................................................................................7 Workflow for Fast Snap.............................................................................................................7 Workflow of the storing of snapshot data................................................................................7 Components of Fast Snap..........................................................................................................
Calculating the remaining shared memory............................................................................32 Workflow for calculating Fast Snap pairs based on cache management devices.........................33 Calculating the number of cache management devices...........................................................33 Fast Snap cache management device requirements................................................................33 Fast Snap pair restoration and host server I/O performance.........
Fast Snap pair resynchronization..............................................................................................83 Pair resynchronization methods............................................................................................83 Forward resynchronization..............................................................................................83 Reverse resynchronization...............................................................................................
Automatic completion of SIMs............................................................................................142 Manually completing SIMs................................................................................................142 Confirming SIM completion...............................................................................................143 Workflow for recovering blocked pools...............................................................................
1 Overview of Fast Snap With Fast Snap (FS), you can perform cost-effective replication by storing the differential data between primary volumes (P-VOLs) and secondary volumes (S-VOLs) of virtual volumes (V-VOLs). This chapter provides instructions for planning and designing, configuring, operating, monitoring, and troubleshooting FS. This chapter includes the following information: Workflow for Fast Snap Fast Snap stores snapshots, or a point-in-time copy of data, in a XP7 Storage (XP7) system.
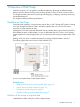
The following figure shows how data in the pool is replaced. NOTE: The host references the P-VOL, which includes Snapshot data A and Snapshot data B. These snapshots are handled as FS S-VOLs. Use 1. 2. 3. 4. the following workflow to replace data in the pool: You create an FS pair. The pair is in “PAIR” status. The host updates the P-VOL. The replaced data is copied to the pool (Snapshot data A). The host updates the P-VOL again. You split the FS pair. The copying of replaced data to the pool is stopped.
For more information about consistency and snapshot groups, see “Consistency and snapshot groups” (page 9). • XP7 storage system software applications: ◦ Fast Snap For more information about FS, see “Fast Snap” (page 10). ◦ Thin Provisioning (THP) For more information about THP, see “Thin Provisioning” (page 10).
• “Workflow for removing snapshot groups” (page 87). • For more information about defining Cnt Ac-S pairs in consistency groups, see HP XP7 Continuous Access Synchronous User Guide. • For more information about defining Cnt Ac-J pairs in consistency groups, see HP XP7 Continuous Access Journal User Guide. • For more information about defining BC pairs in consistency groups, see HP XP7 Business Copy User Guide.
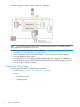
Related topics • “Splitting Fast Snap pairs to store snapshot data using the RAID Manager” (page 75). How Fast Snap works This topic explains how FS works. Fast Snap pools and pool volumes FS stores snapshot data in pools. A pool consists of multiple pool-VOLs which are, as a group, the container for the snapshot data. For more information about pool requirements, see “Fast Snap data pool requirements” (page 30). The following figure illustrates the relationship between an FS pair and a pool.
• “Deleting pools” (page 130). • “Workflow for restoring suspended Fast Snap pairs” (page 81). Virtual volumes and Fast Snap pairs V-VOLs do not have any physical storage space. FS uses V-VOLs as S-VOLs. Related topics • For more information about confirming the status of a volume, see “Monitoring pair properties ” (page 98). • For more information about creating FS pairs, see “Creating Fast Snap pairs” (page 64).
Use the following workflow to create a snapshot group and store volume snapshot data in the group: 1. Split the pair and store snapshot data for a group. To do this, using the RAID Manager, run the following raidcom command: raidcom modify snapshot -snapshot_data create 2. The host issues a write request to each P-VOL in the group. Snapshot data for the volumes are stored. 3. Split the pair and store snapshot data for a consistency or snapshot group.
Related topics • For more information about the maximum number of consistency groups that you can create, see the table in “Consistency and snapshot groups” (page 9). • For more information about the differences between snapshot groups and consistency groups, see the table in “Consistency groups and splitting pairs” (page 10). • For more information about creating consistency groups, see “Creating Fast Snap pairs” (page 64). • “Pair tasks using the RAID Manager or Remote Web Console” (page 148).
Workflow for the CAW method The following workflow describes the CAW method and how a XP7 storage system stores snapshot data: 1. The host writes data to a P-VOL. 2. The XP7 storage system returns the write completion status to the host. 3. The XP7 storage system stores snapshot data for the P-VOL in the background. Workflow for the COW method The 1. 2. 3. following workflow describes the COW method and how XP7 stores snapshot data: The host writes data to a P-VOL.
The following workflow shows the FS pair status changes: 1. You choose two unpaired volumes and complete the following: 2. 3. • You pair the P-VOL with at least one S-VOL (“PAIR” status). • You do not pair the P-VOL with an S-VOL. The pair status changes to “COPY” and then to “PAIR”. You created the pair to store snapshot data (“PSUS” status). You complete one of the following: • You delete the last P-VOL snapshot data and then immediately continue to create an FS pair.
5. You restore the suspended FS pair (“PSUS” status) (see “Workflow for restoring suspended Fast Snap pairs” (page 81)). The snapshot data is overwritten to the P-VOL. The FS pair status first changes to “RCPY” and then the volumes are paired (“PAIR” status). 6. You complete one of the following while the volumes are paired (“PAIR” status): • You exceed the pool capacity by reaching the total capacity of snapshot data in the pool.
• “Fast Snap pair restoration” (page 15). • “Fast Snap pair restoration and host server I/O performance” (page 34). Sharing FS volumes with other XP7 storage system software applications You can create FS pairs using pair volumes for XP7 storage system replication software applications, such as BC and Continuous Access Synchronous (Cnt Ac-S). You can also create FS pairs using volumes to which you define attributes using Data Retention or RAID Manager.
Software application volume type Used as an FS P-VOL Used as an FS S-VOL Legend: • Yes: You can share the volume. • No: You cannot share the volume. Related topics • “Sharing volumes and Data Retention access attributes” (page 19). Sharing volumes and Data Retention access attributes You can create FS pairs using volumes on which you set Data Retention access attributes. Access attributes and supported FS tasks Depending on access attributes, you cannot perform some pair tasks and pool tasks with FS.
Volume access attributes specified for the FS pair FS pair task P-VOL S-VOL Create, split, Resync (Reverse Delete suspend, Resync Copy)1 pair (Normal Copy) S-VOL Disable No 1. Reverse Copy does not copy S-VOL access attributes to P-VOLs (see “Pair resynchronization methods” (page 83)). The following table lists the relationship between P-VOL and S-VOL access attributes specified by FS and FS pool tasks when using RAID Manager or RWC to assign Data Retention access attributes.
FS volume Pair status Access attribute to be assigned Volume Read/Write Read Only Protect S-VOL Disable Yes: You can perform the setting No: You cannot perform the setting The following table shows the FS pair status that is required to use Data Retention to assign access attributes to some FS P-VOL and S-VOLs when using RAID Manager to assign Data Retention access attributes.
The following table lists the relationship between FS tasks and BC pair status.
BC task FS pair status COPY PAIR, PFUL PSUS, PFUS SMPL(PD) RCPY PSUE Quick Restore No No No No No No Suspend replication Yes Yes Yes Yes Yes Yes Delete pair Yes Yes Yes Yes Yes Yes Legend Yes: You can perform the task No: You cannot perform the task (the command is rejected) The following table lists the BC tasks that you can perform if you share an FS P-VOL with an BC S-VOL.
The following table shows the FS tasks when the P-VOL is shared with a Cnt Ac-S or Cnt Ac-J P-VOL.
Cnt Ac-S/Cnt Ac-J task FS status COPY PAIR, PFUL PSUS, PFUS RCPY PSUE Remote storage: Remote storage system The following table shows the Cnt Ac-S/Cnt Ac-J tasks when the FS P-VOL is shared with a Cnt Ac-S/Cnt Ac-J S-VOL.
Capacity and using Fast Snap, Thin Provisioning, and Thin Provisioning Z in a single storage system If you are using FS, THP, and THP Z in a single storage system, note the following when creating FS pairs: • You can create an FS pair whose P-VOL is an THP V-VOL only if you are not currently expanding the THP V-VOL capacity. • You can use a maximum THP volume size of 4 TB (4,398,046,511,104 bytes) as an FS P-VOL.
2 Planning and design requirements This discusses the planning and design requirements for using FS. Read this topic before using FS. This chapter includes the following information: System requirements The following is a list of system requirements that are required to perform FS tasks: • A XP7 storage system with P-VOL and S-VOLs. • FS and THP, which run on RWC computers. THP accesses data in pool-VOLs by way of V-VOLs. It can handle data in open-system servers such as UNIX and PC servers.
The following table shows the FS volumes and capacity calculated as the FS usage. The total amount of these values must not exceed FS’s licensed capacity. The intended volumes The intended capacity Software application Volume types Normal volume or THP-VOL FS P-VOL Normal volume The volume capacity THP-VOL The pool capacity used by the volume Normal volume The volume capacity Pool-VOL For more information about licenses, see the HP XP7 Remote Web Console User Guide.
Related topics • “Deleting pools” (page 130). Fast Snap volume requirements FS requires the following types of volumes: • P-VOLs • S-VOLs • Pool-VOLs The following table lists the requirements for FS P-VOLs. Item Requirement Volume type Logical volumes (LDEVs).
Item Requirement To maintain performance levels, use the following configurations: • Place normal volumes and pool-VOLs in separate parity groups (see “Fast Snap licensed capacity requirements” (page 27)). • Ensure that pool-VOLs consist of LDEVs from more than one parity group. You cannot specify the following volumes as FS pool-VOLs: • Volumes that have a volume status other than “Normal” or “Normal (Quick Format)”. Note: While you are blocking or copying a volume, you cannot specify the volume.
Item Requirement Pool limit per storage system 128 This can include THP, Smart, and FS pool types. Increasing capacity Dynamically increase the pool-VOL capacity. To do this, increase the capacity for at least one parity group. Decreasing pool capacity Use the following workflow to decrease pool capacity: 1. Delete the pool-VOLs (see “Decreasing pool capacity” (page 121)). 2. Reconfigure the pool (see “Workflow for creating Fast Snap data pools” (page 38)).
Requirements for Fast Snap tasks You must calculate the number of FS pairs you can create. When you create FS pairs for a P-VOL for the first time, the number of FS pairs that you can create in a storage system depends on the following: • The number of FS pairs that you can create based on the number of available pair tables (see “Calculating the number of Fast Snap pairs based on pair tables” (page 32)).
The remaining SM = The whole SM capacity - The SM area used by FS pools and FS pairs Related topics • “Workflow for calculating Fast Snap pairs based on the snapshot estimated manageable capacity” (page 32). Workflow for calculating Fast Snap pairs based on cache management devices Cache management devices are the unit for controlling the cache in association with logical volumes (LDEVs). They are required to perform FS tasks, such as creating FS pairs for a volume.
Fast Snap pair restoration and host server I/O performance If a problem occurs with a P-VOL due to a failure, you can restore the FS pair so that data in the P-VOL is returned to a normal condition, the condition it was when you stored snapshot data. Restoring FS pairs when the workload on the storage system is high can decline host server I/O performance because the P-VOL replication process starts. Enable the Copy threshold option to lower the workload on the storage system.
Related topics • “Shared memory requirements” (page 28). Workflow for resolving insufficient pool capacity If the pool capacity is insufficient, the storage system can suspend FS pairs (“PSUE” status). Use the following workflow to resolve an insufficient pool capacity: 1. Estimate the capacity of snapshot data to be copied to the pool. If the capacity of snapshot data to be copied to the pool varies hour by hour, ensure that the largest capacity is your pool capacity. 2.
For more information about how to restore a blocked pool, see “Workflow for recovering blocked pools” (page 144). For more information about external storage systems and disaster recovery methods for external volumes, see the HP XP7 External Storage for Open and Mainframe Systems User Guide.
3 Configuring Fast Snap This describes how to create data pools, create LDEVs, and use the settings of the command device to configure FS. Setting up to configure Fast Snap Before you perform configuration tasks, complete the following items: • Install a sufficient amount of SM. For more information about installing SM, contact HP Technical Support. • Create a V-VOL management area in the SM. This area is automatically created when you install additional SM.
a. b. 4. 5. Recover the data by recovering the FS pair (see “Workflow for restoring suspended Fast Snap pairs” (page 81)). Split the pair, which writes snapshot data over the P-VOL (see “Splitting Fast Snap pairs to store snapshot data” (page 73)). Maintain the FS pair status (see “Fast Snap pair status” (page 15)). Release the FS pairs (see “Releasing Fast Snap pairs” (page 87)). Workflow for creating Fast Snap data pools Use the following workflow to create FS data pools: 1.
2. In the Create Pools window of the Create Pools wizard, complete the following items for the pool you want to create: • Pool Type Select Fast Snap as the pool type. Default: Thin Provisioning Required: Yes • System Type Value: Open Default: Open • Pool Volume Selection Select the pool volume you want to use for the pool. Complete the following: - Drive Type/RPM Select your pool-VOL’s data drive type and RPM. Values: - Mixable - External Storage: Select to enable External LDEV Tier Rank.
Default: 1 • Warning Threshold The data pool capacity threshold. Range (%): 20 - 95 Default (%): 80 The pool-VOL is added to the Selected Pools table of the Create Pools window. 4. Click Finish. 5. In the Confirm window of the Create Pools wizard, complete the following and then click Apply: • For Task Name, type a name for the task.
1. Complete one of the following in the RWC main window: • In the resource tree in the Explorer, click Pools > Create Pools. • From General Tasks, click Create Pools. 2. In the Create Pools window of the Create Pools wizard, in the Pool Volume Selection section, click Select Pool VOLs. 3. In the Select Pool VOLs window, from the Available Pool Volumes table, select the pool-VOL you want to add to the pool and click Add. The pool-VOL is added to the Selected Pool Volumes table. 4. Click OK.
The following table shows the priority of pool-VOLs with system area when creating pools. Priority Data drive type 1 SAS7 2K 2 SAS10K 3 SAS15K 4 SSD 5 External volume If more than one pool-VOL of the same data drive type exists in the storage system, the pool-VOLs priority is determined according to the storage system’s internal index information.
3. In the Create LDEVs window of the Create LDEVs wizard, in the Selected LDEVs table, click Edit SSIDs. ____NEED ITPD to send updated HP screenshots___ In the Edit SSIDs window, in the SSIDs table, existing SSIDs and those to be generated are shown in the list. 4. In the Edit SSIDs window, select the row of the SSID you want to edit and click Change SSIDs. 5. In the Change SSIDs window, for Initial SSID, type the new SSID and click OK.
6. 7. In the Edit SSIDs window, click OK. In the Create LDEVs window of the Create LDEVs wizard, click Finish. 8. In the Confirm window of the Create LDEVs wizard, complete the following items and then click Apply: • For Task Name, type a task name. Character and symbol limit: 32 Allowable characters: All alphanumeric except \ / : , ; * ? " < > | Default: date-task name • For Go to tasks window for status, select to open the Tasks window. Default: Cleared The V-VOL’s SSID is changed.
1. In the RWC main window, in the resource tree in the Explorer, click Pools. 2. In the Pools window, in the Pools tab, click Create LDEVs. 3. In the Create LDEVs window of the Create LDEVs wizard, in the Selected LDEVs table, select an LDEV and click Change LDEV Settings.
4. In the Change LDEV Settings window, complete the following items and click OK: • LDEV Name Type the prefix characters and the initial number for the LDEV. • Initial LDEV ID Type the LDKC, CU, and LDEV numbers, and the interval. To confirm used LDEVs, click View LDEV IDs. For more information about confirming used LDEVs, see “Confirming used LDEV IDs” (page 47). • MP Blade Type the MP blade identifier to which you want to assign the LDEV. To specify an MP blade identifier, click the MP blade ID.
6. In the Confirm window of the Create LDEVs wizard, complete the following and click Apply: • For Task Name, type a name for the task. Character and symbol limit: 32 Allowable characters and symbols: All alphanumeric except \ / : , ; * ? " < > | Default: date-Task Name • For Go to tasks window for status, select to open the Tasks window. Default: Cleared The LDEV settings are changed. Confirming used LDEV IDs You cannot use used LDEV IDs to create a new LDEV.
3. In the Create LDEVs window of the Create LDEVs wizard, in the Selected LDEVs table, select an LDEV and click Change LDEV Settings. 4. In the Change LDEV Settings window, for Initial LDEV ID, click View LDEV IDs.
5. In the View LDEV IDs window, confirm the used LDEV IDs. Confirming generated LDEV SSIDs Use the Create LDEVs window of the Create LDEVs wizard to confirm the generated LDEV SSIDs.
1. In the RWC main window, in the resource tree in the Explorer, click Pools. 2. In the Pools window, in the Pools tab, click Create LDEVs. 3. From the Create LDEVs window of the Create LDEVs wizard, click View SSIDs.
4. 5. In the View SSIDs window, in the SSIDs table, view the SSIDs. Click Close. The Create LDEVs window of the Create LDEVs wizard is shown. Related topics • “Creating LDEVs” (page 51). • “Editing the SSID for virtual volumes” (page 42). Creating LDEVs Creating an LDEV changes the V-VOL to the pool-VOL’s paired volume and creates an open system volume. You register the V-VOLs as part of creating a V-VOL. While creating an LDEV, you can use THP to assign pool-VOLs to one or more parity groups.
Prerequisite • 1. The V-VOL group is defined. In the RWC main window, in the resource tree in the Explorer, click Pools. 2. In the Pools window, in the Pools tab, click Create LDEVs. 3. In the Create LDEVs window of the Create LDEVs wizard, complete or review the following items and then click Options: • Provisioning Type Confirm that BC/SS is selected.
Default: BC/SS • System Type Verify that Open is selected. Values: Open or Mainframe Default: Open Required: Yes • Emulation Type OPEN-V is selected. Required: Yes • Offset boundary Specify if you want to offset the specified LDEV capacity by boundary. Values: ON or OFF Default: OFF • LDEV Capacity Complete the following: - Type the amount of the LDEV capacity you want to create. Range: (Shown below the text box.) Values: Decimals up to two decimal places.
• (Optional) Confirm the LDEV SSID you generated. For more information about confirming LDEV SSIDs, see “Confirming generated LDEV SSIDs” (page 49). • For Cache Partition, select CLPR. Required: No • MP Blade, Complete one of the following: - To assign a specific MP blade that the LDEV will use, select the MP blade ID. - To assign an auto-generated MP blade, click Auto. Required: No The created LDEVs are added to the Selected LDEVs table. 5. Click Finish.
7. In the Confirm window of the Create LDEVs wizard, complete one the following and the click Apply: • For Task Name, type the task name. Character and symbol limit: 32 Allowable characters and symbols: All alphanumeric except \ / : , ; * ? " < > | Default: date-Task Name • For Go to tasks window for status, select to open the task window. Default: Cleared The LDEV is created and registered.
1. In the RWC main window, in the resource tree in the Explorer, click Pools. 2. In the Pools window, in the Pools tab, click Create LDEVs. 3. In the Create LDEVs window, in the Selected LDEVs table, complete the following and then click Finish: 1. Select the checkbox for the LDEV you want to remove from the registering task and click Remove. 2. In the warning message that appears, click OK to confirm that you want to remove the selected LDEV.
4. In the Confirm window of the Create LDEVs wizard, complete the following: • For Go to tasks window for status, select to open the Tasks window. Default: Cleared • To open the next task window, click Next. • To register the settings to the storage system, click Apply. The LDEV is removed from the registering task. The LDEV is not registered and created.
1. 2. 3. 4. Stop the process of the command and those of its parent process. Create the FS pair. Store the snapshot data. Rerun the command to recognize devices. On the server (including RAID Manager), the emulation type of the V-VOL is shown with a zero (0), such as OPEN-0V. If you create an FS pair, specify a volume whose emulation type is shown with a zero (0) for the S-VOL, such as OPEN-0V.
1. In the RWC main window, in the resource tree in the Explorer, click Replication. 2. In the Replication window, click Edit Options > Local Replication. 3. In the Edit Local Replica Options window of the Edit Local Replica Options wizard, for System Type, confirm that Open is selected. Default: Open 4. In the BC Z/FC Z/FCSE System OptionsBC/FS System Options table, select the system option you want to enable, click Enable and then click Finish.
5. In the Confirm window of the Edit Local Replica Options wizard, complete the following and then click Apply: • For Task Name, type a name for the task. Character and symbol limit: 32 Allowable characters and symbols: All alphanumeric except \ / : , ; * ? " < > | Default: date-Task Name • For Go to tasks window for status, select to open the task window. Default: Cleared The system options are set. Changing CLPR numbers You can change CLPRs in the parity group belonging to the pool-VOL.
4 Managing Fast Snap Pairs This chapter provides instructions for completing FS pair user tasks using the RWC. Fast Snap pair tasks You can perform the following tasks on FS pairs: • Check FS pair status. For more information about checking FS pair status, see “Checking Fast Snap pair status” (page 61). • Create FS pairs. For more information, see: • ◦ “Workflow for creating and managing Fast Snap pairs” (page 62). ◦ “Workflow for creating Fast Snap pairs using Remote Web Console” (page 62).
Related topics • “Monitoring pair information ” (page 88). Reloading configuration information After creating an FS pair, you can reload the configuration information if data shown in windows are different. For example, the number of pairs shown in the summary section in the Local Replication window and the number of pairs shown in the list in the FS Pairs tab can be different. 1. Wait until the configuration information has completed processing. 2.
Use 1. 2. 3. 4. 5. the following workflow to create FS pairs using RWC: Select the FS pair configuration (see “Creating Fast Snap pairs” (page 64)). Select the P-VOL. If you are not using P-VOLs of snapshot pairs as your P-VOL, select a pool (see “Selecting a pool as your primary volume” (page 68)). Otherwise, skip this step. Select the S-VOLs. Confirm that you want to create the pair.
Creating Fast Snap pairs You can create an FS pair and define the pair in a consistency group. You can create a maximum of 1,024 FS pairs at the same time. To create more than 1,024 FS pairs, repeat this task. You specify the pool to be used for the FS pair when you create the pair. An FS pair consists of a P-VOL and up to 1,024 S-VOLs. The S-VOLs are assigned in the order of 1 to 1,024. The P-VOL and S-VOLs you select must be the same size.
1. Complete one of the following in the RWC main window: • From General Tasks, click Create Pairs. • In the resource tree in the Explorer, complete the following: a. Click Replication > Local Replication > FS Pairs. b. In the FS Pairs tab in the Local Replication window, click Create Pairs. 2. In the Select Pair Configuration window of the Create Pairs wizard, complete the following and then click Next: • Copy Type Select Fast Snap as the type of the pair you want to create.
3. In the Select Primary Volumes window of the Create Pairs wizard, complete the following and then click Next: • Use Primary Volumes of Fast Snap Pairs Select the kind of volumes you want to show in the Available LDEVs table: Values: - Yes: The LDEVs that are already used as P-VOLs are shown in the table. - No: The LDEVs that are not used as P-VOLs are shown in the table. If you select No, you must select a pool (see “Selecting a pool as your primary volume” (page 68)).
4. In the Select Secondary Volumes window of the Create Pairs wizard, complete the following items and then click Finish: • (Optional) Capacity Select the capacity by which you want to filter the Available LDEVs and the Selected Pairs tables. • (Optional) Port ID Select the port identification number of the LDEV's LUN path for which you want to filter the Available LDEVs table.
NOTE: To create pairs and assign the pairs to a snapshot group using the RAID Manager, see “Creating Fast Snap pairs and defining them in snapshot or consistency groups using the RAID Manager” (page 63). Required: Yes • 5. From the Selected Pairs table, to remove the pair from the table, select the row for the pair you want to remove and click Remove. In the Confirm window of the Create Pairs wizard, complete the following and then click Apply: • For Task Name, type a name for the task.
1. Complete one of the following in the RWC main window: • From General Tasks, click Create Pairs. • In the resource tree in the Explorer, complete the following: a. Click Replication > Local Replication > FS Pairs. b. In the FS Pairs tab in the Local Replication window, click Create Pairs. 2. In the Select Pair Configuration window of the Create Pairs wizard, complete the following and then click Next: • For Copy Type, select Fast Snap as the type of the pair you want to create.
3. In the Select Primary Volumes window of the Create Pairs wizard, click Select Pool. 4. In the Select Pool window, from the Available Pools table, select the pool you want to add and then click OK. The selected pool is added to Selected LDEVs table on the Select Primary Volumes window. Related topics • “Creating Fast Snap pairs” (page 64). Complex Fast Snap pairs A complex FS pair is a pair where the P-VOL and S-VOL are not connected one by one.
Use the following workflow to add S-VOLs to an existing FS pair: 1. Check the current number of S-VOLs for the existing pair (see “Viewing local replication summary information” (page 90)). 2. In the Select Pair Configuration window of the Create Pairs wizard, for Number of Secondary Volumes, edit the value to a value that is larger than current number of S-VOLs already assigned to the P-VOL. For more information about using this window, see “Creating Fast Snap pairs” (page 64).
2. Selecting the S-VOLs and delete them. The following is an example of how to create FS pairs of different configurations simultaneously. In this example, one pair of two S-VOLs and another pair of one S-VOL are created simultaneously: 1. Specify 2 as the number of S-VOLs and select two P-VOLs. By default, two pairs will be created, each with two S-VOLs. 2. Select an S-VOL and delete the S-VOL MU#1 of the second pair. Delete the S-VOL so that you can create multiple pairs of different configurations.
Related topics • For more information about creating FS pairs, see “Creating Fast Snap pairs” (page 64). • For more information about splitting pairs to store snapshot data from the consistency group for those pairs that are defined in the consistency group, see “Snapshot data storage methods” (page 73). • For more information about how to store snapshot data for a group using the RAID Manager, see “Workflow for creating groups and storing snapshot data using the RAID Manager” (page 12).
1. In the RWC main window, in the resource tree in the Explorer, click Replication > Local Replication > FS Pairs. 2. In the FS Pairs tab, select the pair you want to split and then click Split Pairs. 3. In the Split Pairs window of the Split Pairs wizard, complete the following and then click Finish: • For Split Type, select the mode in which you want to split the selected pairs. Values: - Quick Split: The pair is split and then the differential data is copied to the S-VOL in the background.
4. In the Confirm window of the Split Pairs wizard, complete the following and then click Apply: • For Task Name, type a name for the task. Character and symbol limit: 32 Allowable characters and symbols: All alphanumeric except \ / : , ; * ? “ < > | Default: date-task name • For Go to tasks window for status, select to open the task window. Default: Cleared The pair is split and the snapshot data is stored. Related topics • “Split Pairs wizard” (page 184).
A pair is created and defined in a consistency group. This group is the target of the consistency group pair-split. The consistency group number option you specified automatically enables the consistency group pair-split. 2. Create the pair to store snapshot data for a group. To do this, using the RAID Manager, run the following raidcom command: raidcom modify snapshot -snapshot_data create 3. 4. The XP7 storage system receives the command.
The following figure show the consistency group pair-split configuration when sharing FS P-VOLs with Cnt Ac-S S-VOLs.
The following table explains when you can run the consistency group pair-split with shared volumes.
Restoring Fast Snap pairs Restoring an FS pair overwrites the existing P-VOL data with the differential data on the S-VOL. CAUTION: Failures can occur while restoring FS pairs, which suspends the pairs (“PSUE” status). During a failure, the storage system does the following: • Blocks and suspends the FS pair (“PSUE” status), including the FS pairs has snapshot data in the pool. You must recover the suspended pairs (“PSUE” status) (see “Workflow for restoring suspended Fast Snap pairs” (page 81)).
3. In the Resync Pairs window of the Resync Pairs wizard, complete the following: 1. For Resync Type, select Reverse Copy (Secondary > Primary), which fully restores the P-VOL data with the S-VOL data. 2. Click Finish. 4. In the Confirm window of the Resync Pairs wizard, complete the following and then click Apply: • For Task Name, type a name for the task.
Workflow for restoring suspended Fast Snap pairs Use the following workflow to restore suspended pairs (“PSUE” status) after a failure occurs: NOTE: 1. You can only recover one FS pair at a time. Complete one of the following: • Overwrite the backup data to the P-VOL. • Format the P-VOL. For more information about overwriting backup data to the P-VOL or formatting LDEVs, see the HP XP7 Provisioning for Open Systems User Guide.
3. On the Create LDEVs window of the Create LDEVs wizard, for Format Type, select Normal Format. Values: Quick Format, Normal Format, or No Format Default: Quick Format 4. Click Finish. 5. In the Confirm window of the Create LDEVs wizard, complete the following and then click Apply: • For Task Name, type a name for the task.
Fast Snap pair resynchronization Resynchronizing a pair updates the S-VOL with the differential data and deletes the replaced data, the data in the pool. Resynchronizing a pair maintains the relationship between the P-VOL and S-VOLs. CAUTION: The amount of time that is required to resychronize depends on the following: • The amount of capacity the pool is using. • The amount of pairs being resynchronized concurrently.
Prerequisite • 1. You have the Storage Administrator (Local Copy) role. In the RWC main window, in the resource tree in the Explorer, click Replication > Local Replication > FS Pairs. 2. In the FS Pairs tab of the Local Replication window, select the pair you want to resynchronize and then click Resync Pairs. 3. In the Resync Pairs window of the Resync Pairs wizard, for Resync Type, select the method you want to use to resynchronize pair and then click Finish.
4. In the Confirm window of the Resync Pairs wizard, complete the following and then click Apply: • For Task Name, type a name for the task. Character and symbol limit: 32 Allowable characters and symbols: All alphanumeric except \ / : , ; * ? “ < > | Default: date-task name • For Go to tasks window for status, select to open the task window. Default: Cleared The pair is resynchronized (“PAIR” status).
Deleted pairs are not shown in RWC. CAUTION: After deleting an FS pair, the number of pairs shown in the summary section in the Local Replication window and in the list in the FS Pairs tab can be different. Wait until the configuration has completed processing. If the numbers do not match, reload the configuration information (see “Reloading configuration information” (page 62)). Prerequisites 86 • You have the Storage Administrator (Local Copy) role. • 1.
3. In the Delete Pairs window, complete the following and then click Apply: • For Task Name, type a name for the task. Character and symbol limit: 32 Allowable characters and symbols: All alphanumeric except \ / : , ; * ? “ < > | Default: date-task name • For Go to tasks window for status, select to open the task window. Default: Cleared The pair deletion process begins (“SMPL(PD)” status) and then the pair is deleted.
5 Monitoring and maintaining Fast Snap This provides information and instructions for monitoring and maintaining FS. Monitoring pair information You can monitor pair information in the following ways: • “Viewing summary replication information” (page 88). • “Viewing local replication summary information” (page 90). • “Viewing the number of pairs and a list of pairs” (page 96). • “Monitoring pair properties ” (page 98). • “Monitoring synchronous rates” (page 101).
2. In the summary section in the Replication window, view the following information: • Licensed Capacity The used and licensed capacity of each software application. • Number of Replica LDEVs The number of LDEVs used for replication. • Number of FC Z/FCSE Relationships The number of FC Z and FCSE relationships that are in use. • Number of Differential Tables The number of differential tables that are in use and the differential table limit in a XP7 storage system.
Related topics • “Viewing local replication summary information” (page 90). • “Changing system options that affect Fast Snap performance” (page 58). • “Viewing Fast Snap pair task history” (page 107). • “Replication window” (page 157). Viewing local replication summary information You can view summary local replication information, such as the number of pairs for each software application you are using, in the summary section of the Local Replication window. 1.
2. In the summary section of the Local Replication window, view the following information: • Number of Pairs The number of pairs for each local replication software application type. The total number of pairs is shown on the Total line. Default: Business Copy, Business Copy Z, and Fast Snap • Number of Consistency Groups The number of consistency groups that are in use and the consistency groups limit in a XP7 storage system.
1. In the RWC main window, in the resource tree in the Explorer, click Replication > Replica LDEVs. 2. In the Replication window, in the Replica LDEVs tab, click the ID of the LDEV for which you want to view the properties.
Monitoring pair information 93
3. In the LDEV Properties window, complete the following: 1. In the LDEV Properties table, view the following properties for the LDEV you have selected: - LDEV ID The selected LDEV's identification number. Click the ID to open the LDEV Properties window. Use this window to search for pool information. - LDEV Name The selected LDEV's name. - Emulation Type The selected LDEV's emulation type. - Capacity The selected LDEV's capacity. 2.
Migration volume. - Status The LDEV status. Values: - Normal The status is normal. - Blocked The volumes are blocked from host access. - Warning The volume is experiencing a problem. - Formatting Volumes are being formatted. - Preparing Quick Format Volumes are being prepared for quick formatting. - Quick Formatting Volumes are being quick formatted. - Correction Access Access attribute is being corrected. - Copying Data in the volumes are being copied. - Read Only Data in the volumes can only be read.
- Security The Command Device Security setting, enable or disable. - User Authentication The user authentication setting, enable or disable. - Device Group Definition The Device Group Definition setting, enable or disable. - Number of Paths The selected LDEV’s number of paths. - UUID The UUID. - CLPR The identifier and name of the CLPR in ID:CLPR format. - Access Attribute The LDEV’s access attribute. - SSID The SSID. - Cache Mode The cache mode.
1. In the RWC main window, in the resource tree in the Explorer, click Replication > Local Replication. 2. 3. In the summary section in the Local Replication window, for Number of Pairs, view the number of pairs. Click the FS Pairs tab. 4. In the Local Replication window, in the FS Pairs tab, view the list of FS pairs. Related topics • “Workflow for calculating Fast Snap pairs based on the snapshot estimated manageable capacity” (page 32).
For more information about the corresponding RAID Manager pair command results, see “RAID Manager pair command results” (page 148). The following table describes the FS pair status definitions, the S-VOL access for the status, and the corresponding status that is shown in RAID Manager. Pair status Description SMPL(PD) The pair is in the process of being deleted. You cannot perform pair Read/write tasks when the pair is in this status.
Prerequisite • 1. You have the Storage Administrator (Local Copy) role. In the RWC main window, in the resource tree in the Explorer, click Replication > Local Replication > FS Pairs. 2. In the Local Replication window, in the FS Pairs tab, select the pair you want to monitor from the list and then click More Actions > View Pair Properties.
3. In the View Pair Properties window, monitor the following pair properties: • Copy Type The copy type for the pair you selected. Values: - Business Copy: BC pair - Fast Snap: FS pair - Business Copy Z: BC Z pair • Pool Name (ID) The S-VOL's pool name and identification number. Click the name to open the window which information of each pool is shown. • Most Recent Snapshot Date The most recent date and time you created the pair to store snapshot data.
Related topics • “View Pair Properties window” (page 169) Monitoring synchronous rates You can check the percentage of data that is synchronized between the P-VOL and S-VOLs. FS’s synchronous rate shows the rate that S-VOL data matches that of the next new generation of the S-VOL. If the S-VOL is the latest one, the synchronous rate is computed by comparing the S-VOL with the P-VOL. The synchronous rate is a rough value, and can have a large margin of error.
Prerequisite • 1. You have the Storage Administrator (Local Copy) role. In the RWC main window, in the resource tree in the Explorer, click Replication > Local Replication > FS Pairs. 2. In the Local Replication window, in the FS Pairs tab, select the pair you want to monitor synchronous rates from the list and then click More Actions > View Pair Synchronous Rate.
3. (Optional) In the View Pair Synchronous Rate window, view the following information: • Primary Volume The P-VOL information. Values: - LDEV ID: The P-VOL's LDEV identification number. - LDEV Name: The P-VOL's LDEV name. - CLPR: The P-VOL's CLPR number. • Snapshot Group The snapshot group name. • Status The pair status. • Synchronous Rate (%) The rate at which the current S-VOL matches the next new generation of the S-VOL.
- LDEV ID: The S-VOL's LDEV identification number. - LDEV Name: The S-VOL's LDEV name. - CLPR: The S-VOL's CLPR number. 4. To check a pairs’ status and ensure the data is current, click Refresh. The latest synchronous rates are shown. Related topics • “View Pair Synchronous Rate window” (page 167) Monitoring consistency groups You can monitor consistency groups in the following ways: • “Viewing the number of consistency groups” (page 104). • “Viewing consistency group list” (page 105).
For more information about viewing this information on this window, see “Viewing consistency group properties” (page 106). Related topics • “Local Replication window” (page 159) • “Consistency Group Properties window” (page 173) Viewing consistency group list • In the RWC main window, in the resource tree in the Explorer, click Replication > Local Replication > Consistency Groups. A list of consistency groups is shown in the Local Replication window, in the Consistency Groups tab.
Related topics • “Local Replication window” (page 159). • “Viewing local replication summary information” (page 90). Viewing consistency group properties You can view the properties of a consistency group using the Consistency Group Properties window. Prerequisite • 1. You have the Storage Administrator (Local Copy) role. In the RWC main window, in the resource tree in the Explorer, click Replication > Local Replication > Consistency Groups. 2.
3. In the Consistency Group Properties window, view the following consistency group properties: • CTG ID The consistency group identification number. • Status The consistency group status. Values: - BC Used: BC is using the consistency group. - BC Z Used (RAID Manager): BC Z is using the consistency group and RAID Manager is managing the consistency group. - BC Z Used (PPRC/BCM): BC Z is using the consistency group and PPRC and Business Continuity Manager are managing the consistency group.
Prerequisite • 1. You have the Storage Administrator (Local Copy) role. In the RWC main window, in the resource tree in the Explorer, click Replication. 2. In the Replication window, click View Histories > Local Replication. 3. In the Histories window, for Copy Type, select FS as the copy type for the pair you selected. For more information about the values for Copy Type, see “Histories window” (page 172).
4. In the FS Histories table, view the following information: • Date and Time The date and time you performed the task. • LDEV ID The primary/source volume's LDEV identification number. • Provisioning Type The P-VOL’s provisioning type. Values: - Basic: Internal volume - THP: THP V-VOL - External: External volume • Secondary Volume Information about the S-VOL. • For Mirror Unit, view the mirror unit number. • Pool ID The pool identification number.
Related topics • “Histories window” (page 172). Viewing the number of cache management devices You can view the current number of cache management devices that are available and in use and the maximum amount of cache management devices you can create in the storage system in the View Management Resource Usage window. • In the RWC main window, in the resource tree in the Explorer, click Actions > View Management Resource Usage.
Monitoring pool information You can monitor pool information, such as used pool capacity, in the Summary section of the Pools window and in the Primary Volumes tab in the selected pool window. This task shows how to monitor pool information in the Primary Volumes tab in the selected pool window. 1. In the RWC main window, in the resource tree in the Explorer, click Pools. 2. In the Pools window, in the Pools tab, select the pool name for the pool you want to monitor pool information.
3. In the selected pool window, in the Primary Volumes tab , view the following information about the selected pool: • LDEV ID Shows the combination of the LDKC, CU, and LDEV. Clicking the ID opens the LDEV Properties window. Use this window to search for P-VOL information. • LDEV Name Shows the LDEV name. • Status For more information about this item, see the HP XP7 Provisioning for Open Systems User Guide. • Used Pool Capacity Shows the used pool capacity.
Related topics • “Editing the data pool warning threshold” (page 124). Viewing formatted pool capacity and pool usage rates You can view the progress of rebalancing the pool usage rates among parity groups using the View Pool Management Status window. For more information about the formatted pool capacity and pool usage rates, see the HP XP7 Provisioning for Open Systems User Guide. 1. In the RWC main window, in the resource tree in the Explorer, click Pools. 2.
Related topics • “Editing the data pool warning threshold” (page 124). • For more information about the View Pool Management Status window, see the HP XP7 Provisioning for Open Systems User Guide. Workflow for rebalancing pool volume usage rates among parity groups You can use FS to automatically rebalance the pool-VOL usage rate among parity groups for which pool-VOLs are defined.
1. In the RWC main window, in the resource tree in the Explorer, click Pools. 2. In the Pools window, in the Pools tab, select the check box for the pool-VOL for which you want to view rebalancing progress from the list and then click More Actions > View Pool Management Status.
3. In the View Pool Management Status window, view the following rebalancing progress of the usage level among pool-VOLs: • Pool Name (ID) The pool name and pool ID. • Pool Type The pool type. Values: - THP: The pool is a Thin Provisioning pool. - Smart:The pool is a a Smart Tiers pool. - Mainframe THP: The pool is a Thin Provisioning Z pool. - Mainframe Smart: The pool is a Smart Tiers Z pool. - FS: The pool is a Fast Snap pool.
- Waiting for Rebalance The rebalance process has not started. - Rebalancing The rebalance process is being performed. - Waiting for Relocation The tier relocation process has not started. - Relocating The tier relocation process is being performed. - Waiting for Shrink The pool shrinking process has not started. - Shrinking The pool shrinking process is in progress. - Hyphen (-) The pool management task is not being performed on the pool.
Related topics • “Viewing formatted pool capacity and pool usage rates” (page 113) Increasing pool capacity Adding pool-VOLs to a pool increases, or expands, the pool’s capacity. Check the pool’s available capacity and expand the pool as needed.
3. In the Expand Pool window of the Expand Pool wizard, click Select Pool VOLs. 4. In the Select Pool VOLs window, complete the following and then click OK: • (Optional) To filter rows, in the Available Pool Volumes table, select ON in the Filter component. • (Optional) To select all of the pool-VOLs in the list, in the Available Pool Volumes table, click Select All Pages. • (Optional) To specify the capacity unit and the number of rows to display, in the Available Pool Volumes table, click Options.
6. In the Confirm window of the Expand Pool wizard, complete the following and then click Apply: • For Task Name, type a name for the task. Character and symbol limit: 32 Allowable characters and symbols: All alphanumeric except \ / : , ; * ? " < > | Default: date-task name • For Go to tasks window for status, select to open the task window. Default: Cleared The pool-VOL is added to the pool. Related topics • “Workflow for rebalancing pool volume usage rates among parity groups” (page 114).
• The access attribute on the pool-VOL in the selected pool has been corrected. • You are not operating the format function for available pool capacity. Decreasing pool capacity Deleting tiers in pools decreases the pool capacity. You can decrease the pool capacity for up to eight tasks at the same time. For more information about decreasing pool capacity and formatting LDEVs, see the HP XP7 Provisioning for Open Systems User Guide.
1. In the RWC main window, in the resource tree in the Explorer, click Pools > Pool Name. 2. In the Pool Name window, in the Pool Volumes tab, select the check box for the pool that contains the pool-VOLs you want to delete to decrease pool capacity from the list of pool names and click Shrink Pool. NOTE: 122 You can select one or more pools.
3. In the Shrink Pool window, complete the following and then click Apply: • For Task Name, type a name for the task. Character and symbol limit: 32 Allowable characters and symbols: All alphanumeric except \ / : , ; * ? “ < > | Default: date-task name • For Go to tasks window for status, select to open the task window. Default: Selected • In the Prediction Result of Shrinking table, confirm the pool capacity, the used pool capacity, and the free pool capacity.
3. In the Stop Shrinking Pools window, complete the following and then click Apply: • For Task Name, type a name for the task. Character and symbol limit: 32 Allowable characters and symbols: All alphanumeric except \ / : , ; * ? “ < > | Default: date-task name • For Go to tasks window for status, select to open the task window. Default: Selected The process of decreasing the pool capacity is stopped.
1. In the RWC main window, in the resource tree in the Explorer, click Pools > Pools. 2. In the Pools window, in the Pools tab, select the check box for the pool with the warning threshold that you want to change from the list and then click More Actions > Edit Pools. 3. In the Edit Pools window of the Edit Pools wizard, complete the following and then click Finish: Warning Threshold Type the data pool warning threshold.
Default: 80% CAUTION: Excessive pool usage rates (rates over 50%) are rounded down to the closest integer 50 and 50% is shown for this item. 4. In the Confirm window of the Edit Pools wizard, complete the following and then click Apply: • For Task Name, type a name for the task. Character and symbol limit: 32 Allowable characters and symbols: All alphanumeric except \ / : , ; * ? " < > | Default: date-task name • For Go to tasks window for status, select to open the task window.
1. In the RWC main window, in the resource tree in the Explorer, click Pools. 2. 3. In the Pools window, select Pools. In the Pools window, in the Pools tab, click the pool whose name you want to change from the list and then click More Actions > Edit Pools. 4.
1. For Pool Name, type the new pool name. - For Prefix, type the alphanumeric characters that precede the pool number. Case-sensitive: Yes - For Initial Number, type the pool’s initial number. Digit Limit: 9 Character limit: 32 2. 5. Click Finish. In the Confirm window of the Edit Pools wizard, complete the following and then click Apply: • For Task Name, type the name for the task.
1. In the RWC main window, in the resource tree in the Explorer, click Pools > Pools. 2. In the Pools window, in the Pools tab, select the check box for the pool that you want to recover from the list and then click More Actions > Restore Pools. 3. In the Restore Pools window, complete the following and then click Apply: • For Task Name, type a name for the task.
Workflow for deleting pools Use the following process to delete pools: 1. Delete all of the FS pairs. For more information about how to delete FS pairs, see “Deleting Fast Snap pairs” (page 85). 2. Delete the pools. For more information about how to delete pools, see “Deleting pools” (page 130). 3. (Optional) Erase data from the volume (volume shredding). For more information about volume shredding, see the HP XP7 Volume Shredder for Open and Mainframe Systems User Guide.
3. In the Delete Pools window of the Delete Pools wizard, click Finish.
4. In the Confirm window of the Delete Pools wizard, complete the following and then click Apply: • For Task Name, type a task name. Character and symbol limit: 32 Allowable characters: All alphanumeric except \ / : , ; * ? " < > | Default: date-task name • For Go to tasks window for status, select to open the task window. Default: Cleared • Click Next to erase data from the volume (volume shredding).
2. In the Pool Name window, in the Virtual Volumes tab, select the check boxes for the the V-VOLs you want to change in the list and then click More Actions > Edit LDEVs. 3. In the Edit LDEVs window of the Edit LDEVs wizard, for LDEV Name, type the prefix and the initial number and then click Finish.
4. In the Confirm window of the Edit LDEVs wizard, complete the following and then click Apply: • For Task Name, type a name for the task. Character and symbol limit: 32 Allowable characters and symbols: All alphanumeric except \ / : , ; * ? " < > | Default: date-task name • For Go to tasks window for status, select to open the task window. Default: Selected The V-VOL name is changed.
Releasing virtual volume definitions You can release V-VOL definitions if you are not using them as FS S-VOLs. Releasing the FS pairs that are using the V-VOLs releases the V-VOL definitions. • Release the FS pairs that are using the V-VOLs (see “Releasing Fast Snap pairs” (page 87)). Workflow for deleting V-VOLs specified for Fast Snap S-VOLs Typically, you cannot delete V-VOLs and V-VOL groups that are specified for FS S-VOLs. If the groups are specified for S-VOLs, complete the following: 1.
3. In the Delete LDEVs window, complete the following and then click Apply: • For Task Name, type a name for the task. Character and symbol limit: 32 Allowable characters and symbols: All alphanumeric except \ / : , ; * ? " < > | Default: date-task name • For Go to tasks window for status, select to open the task window. Default: Cleared The V-VOL is deleted. Related topics • For more information about the Delete LDEVs window, see the HP XP7 Provisioning for Open Systems User Guide.
If the pool is blocked and the pairs are suspended, complete the following: 1. Restore the power. 2. Recover the pools (see “Recovering blocked pools” (page 128)). If you interrupt the storing of snapshot data by consistency group by switching off the power supply and the status of all the pairs in a consistency group has not completely changed, the storing of snapshot data is not resumed when you switch the power supply on again. The status of some pairs may remain unchanged.
6 Troubleshooting This provides information on troubleshooting FS. General troubleshooting General troubleshooting includes the following: • “Workflow for completing SIMs related to cache management devices” (page 140). • “Workflow for recovering blocked pools” (page 144). The following table list the problems that can occur and the causes and solutions related to the problem Problem Causes and solutions Pool information is not displayed. Cause: The pool is blocked. A pool is blocked.
Problem Causes and solutions You cannot create FS pairs. Causes: • You have reached the maximum amount of cache management devices. • You have not met the prerequisites to create the pair. • The status of the specified volume is not displayed because you are deleting the FS pair. Solutions: • Make sure that you have enough cache management devices to create the pairs (see “Fast Snap cache management device requirements” (page 33)).
Problem Causes and solutions 3. Reboot the host server or run a command that causes the system to recognize the device. 4. Start the monitoring application on the host and check whether the host has access to pair volumes (see “Fast Snap pair status” (page 15)). The host computer attempts to access the port and an error occurs. Cause: A port may go offline because access to a volume on another port has been rejected. Solutions: • Wait until the process has completed and then retry the task.
3. 4. Remove all of the snapshots in the unneeded P-VOLs (see “Resynchronizing Fast Snap pairs” (page 83)). Complete the SIMs related to cache management devices (see “Workflow for correcting problems related to SIMs” (page 141)). Related topics • “Viewing the number of cache management devices” (page 110). • “Workflow for correcting problems related to SIMs” (page 141). • “Calculating the number of the remaining cache management devices” (page 141).
- Shrink the capacity of the THP pool or Smart pool. • 2. 3. (For reference code 603000) If a long time has passed since you performed the tasks listed for reference code 62400 (above), reference code 624000 is reported. Clear the SIM from the storage system. Depending on the SIM’s reference code, one of the following occurs: • The SIM is automatically completed (see “Automatic completion of SIMs” (page 142)). • You manually complete the SIM (see “Manually completing SIMs” (page 142)).
1. In the RWC main window, in the resource tree in the Explorer, click Pools > More Actions > Complete SIMs. 2. In the Complete SIMs window, complete the following and then click Apply: • For Task Name, type a name for the task. Character and symbol limit: 32 Allowable characters and symbols: All alphanumeric except \ / : , ; * ? " < > | Default: date-Task Name • For Go to tasks window for status, select to open the task window. Default: Selected The SIMs are completed (“Completed” status).
Workflow for recovering blocked pools Use the following workflow to recover blocked pools: 1. Recover the blocked pool-VOLs. For more information about recovering blocked pool-VOLs, contact HP Technical Support. 2. Recover the pool. Do one of the following: • Add additional pool-VOLs to the pool (see “Increasing pool capacity” (page 118)). • Increase the unused capacity by deleting the P-VOL’s snapshot data (see “Resynchronizing Fast Snap pairs” (page 83)).
7 Support and other resources Contacting HP For worldwide technical support information, see the HP support website: http://www.hp.
HP websites For additional information, see the following HP websites: • http://www.hp.com • http://www.hp.com/go/storage • http://www.hp.com/service_locator • http://www.hp.com/support/manuals • http://www.hp.com/support/downloads • http://www.hp.
Table 1 Document conventions (continued) Convention Element Monospace text • File and directory names • System output • Code • Commands, their arguments, and argument values Monospace, italic text • Code variables • Command variables Monospace, bold text WARNING! CAUTION: IMPORTANT: NOTE: TIP: Emphasized monospace text Indicates that failure to follow directions could result in bodily harm or death. Indicates that failure to follow directions could result in damage to equipment or data.
A RAID Manager command reference This describes RAID Manager commands corresponding to actions in the RWC GUI. Use the RAID Manager to perform FS tasks. You do this by entering commands from a host. Pair tasks using the RAID Manager or Remote Web Console You can use the RAID Manager to perform pair tasks. When you use the RAID Manager, perform tasks by running an existing command for pair tasks or a RAID Manager command.
Status PSUE RAID Manager command paircreate paircreate -split pairsplit pairresync pairresync -restore pairsplit -S pairsplit -E Ab Ab Ab Ok Ab Ok Ab Ok: The command ends normally and the task is performed. Np: The command is not rejected and ends normally but the task is not performed. Ab: The command is rejected and ends abnormally. Do not specify the noread mode (-m noread) for S-VOLs using RAID Manager. If you do, the command ends normally but the noread mode does not take effect.
4. Locate the description of the SSB1/SSB2 error code combination in the following table. For more information about error codes that are not described in the following table, contact HP Technical Support. The following table lists the SSB2 codes, the related RAID Manager command, and the cause of the error. SSB2 RAID Manager command Cause of error 9100 All commands You cannot run the command because the user authentication is not performed.
SSB2 RAID Manager command Cause of error 9729 paircreate, pairsplit, pairresync, pairresync -restore The command ended abnormally because you specified a volume as the FS P-VOL and that volume has an emulation type other than OPEN-V. 972A paircreate You cannot create the FS pair because the volume you specified as the FS P-VOL has the command device setting. 972C paircreate You cannot create the FS pair because the capacity of the volume you specified as the FS P-VOL exceeds the supported size.
SSB2 RAID Manager command Cause of error 9748 paircreate You cannot create the FS pair because you specified Cnt Ac-S S-VOL as the FS S-VOL. 9749 paircreate You cannot create the FS pair because you specified an Cnt Ac-J data volume or journal volume in the intermediate site of 3DC cascading configuration as the FS S-VOL, the pair cannot be created. 974A paircreate You cannot create the FS pair because you specified an Cnt Ac-J P-VOL as the FS S-VOL.
SSB2 RAID Manager command Cause of error 9774 paircreate The FS pair cannot be created because the FS P-VOL and BC P-VOL share the volume, and the MU number you specified for the FS pair is already used by the BC pair. 9777 paircreate The FS pair cannot be created because the FS P-VOL and BC S-VOL share the volume, and you specified MU number zero (0) for the FS P-VOL.
SSB2 RAID Manager command Cause of error 97A4 paircreate You cannot create the FS pair because you have specified a THP V-VOL in the initialization process as the FS P-VOL. 97A5 All commands The command ended abnormally because you specified a volume that was undergoing online data migration as the FS P-VOL. 97A6 All commands The command ended abnormally because you specified a volume that was undergoing online data migration as the FS S-VOL.
SSB2 RAID Manager command Cause of error when the virtual storage machine's serial number is specified for P-VOL and S-VOL. 97D6 All commands You cannot run the command because the model, serial number, or virtual LDEV ID of the volume specified as P-VOL is being changed. 97D7 All commands You cannot run the command because the model, serial number, or virtual LDEV ID of the volume specified as S-VOL is being changed.
The pair is split (“PSUS” status). CAUTION: While this command is running, do not run commands to perform tasks, such as deleting snapshot data or the FS pair, on the pair that is defined in the consistency group. Related topics • “Resynchronizing Fast Snap pairs” (page 83). Maintaining the consistency of snapshot data You can maintain the consistency of the snapshot data that you want to store and avoid abnormal command termination.
B Fast Snap GUI reference This describes Fast Snap (FS) windows and dialog boxes. Replication window Use this window to perform the following tasks: • Viewing replication summary information (see “Viewing summary replication information” (page 88)). • Opening the window from which you can view local replication summary information (see “Viewing local replication summary information” (page 90)).
Item Description Number of FC Z/FCSE Relationships The number of FC Z and FCSE relationships that are in use. Number of Differential Tables The number of differential tables that are in use and the differential table limit in a XP7 storage system. Note: FS does not use differential tables. Note: This number does not include the number of differential tables that FC Z/FCSE Relationships use. View Histories > Local Replication Click to open the View Histories for location replication window.
Item Description Values: • Model/Serial Number: The model type and serial number of the volume’s virtual storage machine. • LDEV ID: The identification number of the volume’s virtual LDEV. If no virtual LDEV ID is assigned, a blank displays. • Device Name: The name of the volume’s virtual device, in a combined format of “virtual emulation type”, “number of virtual LUSE volumes”, and “virtual CVS attribute”. Each of these three items displays only if it is specified.
Item Description For more information about how to calculate the remaining SM capacity, see “Calculating the remaining shared memory” (page 32). Note: This value does not guarantee that the FS pairs of the indicated capacity have been successfully created. Number of Pair Tables The number of pair tables. This number varies depending on the combinations of software applications you are using.
Item Description • LUN ID: P-VOL LDEV's LUN path’s LUN identification number. • Provisioning Type*: The P-VOL’s provisioning type. ◦ Basic: Internal volume ◦ THP: THP V-VOL ◦ External: External volume ◦ External MF: Migration volume • Emulation Type*: The P-VOL’s emulation type. • Capacity*: The P-VOL's capacity. • CLPR*: The P-VOL's CLPR number. • Virtual Storage Machine*: The model type and serial number of the virtual storage machine to which the P-VOL belongs.
Item Description (BC Z) Resync-R/REVRSY ◦ You are in the process of Steady Split. Status: (BC) COPY(SP)/COPY (BC Z) SP-Pend/TRANS • The volumes are paired. Status: Status (continued) ◦ (BC) PAIR ◦ (BC Z) DUPLEX • This icon is used for the following: ◦ The pair is split. Status: (BC) PSUS (BC Z) Split/SUSPOP ◦ You are splitting the pair in Quick Split mode. Status: (BC) PSUS(SP)/PSUS (BC Z) V-Split/SUSPVS • The pair is suspended.
Item Description • Virtual Storage Machine*: The model type and serial number of the virtual storage machine to which the S-VOL belongs. • Virtual LDEV ID*: The identification number of the S-VOL’s virtual LDEV. If no virtual LDEV ID is assigned, a blank displays. • Virtual Device Name*: The name of the S-VOL’s virtual device, in a combined format of “virtual emulation type”, “number of virtual LUSE volumes”, and “virtual CVS attribute”. Each of these three items displays only if it is specified.
The following table lists the items in the FS Pairs tab in the Local Replication window. Item Description Primary Volume The P-VOL information. Values: • LDEV ID: The P-VOL's LDEV identification number. Click the identification number to open the LDEV Properties window. Use this window to search for P-VOL information. • LDEV Name: The P-VOL's LDEV name. • Port ID: The port name of the P-VOL LDEV’s LUN path. • Host Group Name: The P-VOL LDEV’s LUN path host group name.
Item Description Status The pair status. The following icons and pair statuses are shown: • The FS pair is in the process of being deleted. Status: “SMPL(PD)” • This icon is used for the following: ◦ You are copying the pair. Status: “COPY” ◦ You are resynchronizing the pair from the S-VOL to the P-VOL. Status: “RCPY” • This icon is used for the following: ◦ The volumes are paired. Status: “PAIR” ◦ You have exceeded the data pool threshold.
Item Description Pool Name (ID)* The S-VOL's pool name and identification number. Click the pool name to open the Pool Volumes tab in the selected pool window, from which you can view the selected pool’s information. For more information about this tab, see the HP XP7 Provisioning for Open Systems User Guide. CTG ID* The identifier of the consistency group to which the FS pair is assigned. Mirror Unit* The FS pair’s mirror unit number. Create Pairs button Click to open the Create Pairs window.
Item Description Click the identification number to open the Consistency Group Properties window. Status The consistency group status. Values: • BC Z Used (RAID Manager): You have defined an BC Z pairs in a consistency group and you are managing the group with RAID Manager. • BC Z Used (PPRC/BCM): You have defined an BC Z pair in a consistency group and you are managing the group with PPRC or Business Continuity Manager. • FS Used: You have assigned an FS pair to the consistency group.
Pairs table The following table lists the items in this table on the View Pair Synchronous Rate window. Item Description Primary Volume The P-VOL information. Values: • LDEV ID: The P-VOL's LDEV identification number. • LDEV Name: The P-VOL's LDEV name. • CLPR: The P-VOL's CLPR number. • Virtual Storage Machine: The model type and serial number of the virtual storage machine to which the P-VOL belongs. • Virtual LDEV ID: The identification number of the P-VOL’s virtual LDEV.
Item Description Values: • BC-L1: BC L1 pair • BC-L2: BC L2 pair • BC Z: BC Z pair Snapshot Group The FS snapshot group name. If you have not configured a snapshot group for the FS pair, this item is blank. Status The pair status. For more information about FS pair status, see “Fast Snap pair status definitions” (page 97). Synchronous Rate (%) The rate at which the current FS S-VOL matches the next new generation of the S-VOL.
Pair Properties table The following table lists the items on this table. Item Description Copy Type The volume’s copy type. Values: • Business Copy: BC pair • Fast Snap: FS pair • Business Copy Z: BC Z pair Pool Name (ID) For non-FS pairs, a hyphen (-) is shown. The pool name and identification number. Most Recent Snapshot Date For non-FS pairs, a hyphen (-) is shown. The most recent date and time you created the pair to store snapshot data.
Pairs table This table shows a list of all pairs related to a pair shown in the Pair Properties table. The following table lists the items in this table. Item Description Primary Volume P-VOL information. Values: • LDEV ID: The P-VOL's LDEV identification number. • LDEV Name: The P-VOL's LDEV name. • Provisioning Type: The P-VOL’s provisioning type. ◦ Basic: Internal volume ◦ THP: THP V-VOL ◦ External: External volume • Emulation Type: The P-VOL's emulation type.
Item Description • CLPR: The S-VOL's CLPR number. • Mode: Indicates whether the S-VOL has been written to. ◦ - “W” is shown if the S-VOL has been written to when its pair status is “PSUS(SP)/PSUS” or “PSUS”. - A hyphen (-) is shown if the S-VOL has not been written to. • Virtual Storage Machine: The model type and serial number of the virtual storage machine to which the S-VOL belongs. • Virtual LDEV ID: The identification number of the S-VOL’s virtual LDEV.
Item Description • BC Z: BC Z • FC Z/FCSE: FC Z and FCSE FS Histories table This table is shown on the Histories window. Only tasks that you have performed on the pairs that consist of the P-VOL and/or S-VOLs to which you are allocated are shown on this table. The following table lists the items in this table. Item Description Date and Time The date and time you performed the task. Primary Volume The information about the P-VOL.
Consistency Group Properties table The following table lists the items in this table. Item Description CTG ID The consistency group identification number. Status The consistency group status. Values: • BC Used: BC is using the consistency group. • BC Z Used (RAID Manager): BC Z is using the consistency group and RAID Manager is managing the consistency group. • BC Z Used (PPRC/BCM): BC Z is using the consistency group and PPRC and Business Continuity Manager are managing the consistency group.
Item Description • Emulation Type: The P-VOL's emulation type. • Capacity: The P-VOL's volume capacity. • CLPR: The P-VOL's CLPR number. • Virtual Storage Machine: The model type and serial number of the virtual storage machine to which the P-VOL belongs. • Virtual LDEV ID: The identification number of the P-VOL’s virtual LDEV. If no virtual LDEV ID is assigned, a blank displays.
Create Pools wizard Use this wizard to create data pools. This wizard consists of the following windows: • Create Pools • Confirm For more information about creating data pools, see “Creating Fast Snap data pools” (page 38). Create Pools window This window is the first window of the Create Pools wizard. The following image shows this window. Confirm window This window is the second and last window of the Create Pools wizard. The following image shows this window.
This wizard consists of the following windows: • Select Pair Configuration • Select Primary Volumes • Select Secondary Volumes • Confirm For more information about creating pairs, see “Creating Fast Snap pairs” (page 64). Select Pair Configuration window This window is the first window of the Create Pairs wizard. The following image shows this window. The following table lists the descriptions of the items in this window. Item Description Copy Type The volume’s copy type.
The following table lists the items on the Select Primary Volumes window of the Create Pairs wizard. Item Description Use Primary Volumes of Fast Snap Pairs Specifies whether you want to use the Fast Snap pair’s P-VOL. Values: • Yes: The storage system shows only P-VOLs of the pair that is already created in the Available LDEVs table. • No: The storage system shows only LDEV of the pair that is not created yet in the Available LDEVs table.
Item Description Values: • Basic: Internal volume • THP: THP V-VOL • External: External volume Capacity The capacity of the LDEV. CLPR The LDEV’s CLPR number. Number of Secondary Volumes The total number of S-VOLs assigned to the P-VOL. Primary Volumes If you use the LDEV as an S-VOL for an existing pair, information about the P-VOL is shown. Values: • LDEV ID: The LDEV’s identification number. • LDEV Name: The LDEV’s name. • Port ID: The port name of the LDEV's LUN path.
Item Description Values: • LDEV ID: The P-VOL's LDEV identification number. • LDEV Name: The P-VOL's LDEV name. • Port ID: The port name of the P-VOL LDEV's LUN path. • Host Group Name: The host group name of the P-VOL LDEV's LUN path. • LUN ID: The LUN ID of the P-VOL LDEV's LUN path. • Emulation Type: The P-VOL's emulation type. • Capacity: The P-VOL's capacity. • CLPR: The P-VOL's CLPR number. Mirror Unit The mirror unit number.
The following table shows the items in this window. Item Description Capacity list Click to select the capacity for which to filter the available LDEVs. The remaining number you have to select This item refers to the selected P-VOLs in the Selected Pairs table that have not been assigned an S-VOL. Port ID list Filters LDEVs in the Available LDEVs table by the Port ID. Host Group Name list Filters LDEVs in the Available LDEVs table by the Host Group Name.
Selected Pairs table The following table lists the items in this table in the Select Secondary Volumes window of the Create Pairs wizard. Item Description Primary Volume The P-VOL information. Values: • LDEV ID: The P-VOL's LDEV identification number. • LDEV Name: The P-VOL's LDEV name. • Port ID: The port name of the P-VOL LDEV's LUN path. FS and BC/SS only. • Host Group Name: The host group name of the P-VOL LDEV's LUN path. FS and BC/SS only. • LUN ID: The LUN ID of the P-VOL LDEV's LUN path.
Selected Pairs table The following table lists the items in this table in the Confirm window of the Create Pairs wizard. Item Description Primary Volume The P-VOL information. Values: • LDEV ID: The P-VOL's LDEV identification number. • LDEV Name: The P-VOL's LDEV name. • Port ID: The port name of the P-VOL LDEV's LUN path. • Host Group Name: The host group name of the P-VOL LDEV's LUN path. • LUN ID: The LUN ID of the P-VOL LDEV's LUN path. • Capacity: The P-VOL's volume capacity.
Available Pools table The following table lists the items in the Available Pools table of the Select Pool window. Item Description Pool Name (ID) The pool name and identification number. RAID Level The RAID level of the pool. Capacity The pool capacity. Values: • Total: The total pool capacity. • Used: The amount of pool capacity that is used. • Used (%): The percentage of pool capacity that is use. Note: This number is truncated to an integer. Drive Type/RPM The data drive type and RPM.
Selected Pairs table The following table lists the items in this table in the Split Pairs window of the Split Pairs wizard. Item Description Primary Volume P-VOL information for the pairs you have selected to split. Values: • LDEV ID: The P-VOL's LDEV identification number. • LDEV Name: The P-VOL's LDEV name. • Emulation Type: The P-VOL's emulation type. • Capacity: The P-VOL's volume capacity. • CLPR: The P-VOL's CLPR number. Copy Type The volume’s copy type.
Item Description Values: • Quick Split: The pair is split and then remaining differential data is copied to the S-VOL in the background. Specify this value when you want to write to or read from the S-VOL immediately after splitting a pair. • Steady Split: The differential data is copied to the S-VOL and then the pair is split. Note: This value is only available if you specify the copy type as FS. Default: Steady Split Copy Pace The speed at which the S-VOL is copied. A hyphen (-) is shown.
Item Description Information is shown for this item only if you have configured a snapshot group for the FS pair. Status The pair status. For more information about pair status definitions, see “Fast Snap pair status definitions” (page 97). Split Type The split type. Values: • Quick Split: The pair is split and then remaining differential data is copied to the S-VOL in the background. • Steady Split: The differential data is copied to the S-VOL and then the pair is split.
Selected Pairs table The following table lists the items in this table in the Resync Pairs window of the Resync Pairs wizard. Item Description Primary Volume P-VOL information. Values: • LDEV ID: The P-VOL's LDEV identification number. • LDEV Name: The P-VOL's LDEV name. • Emulation Type: The P-VOL's emulation type. • Capacity: The P-VOL's volume capacity. • CLPR: The P-VOL's CLPR number. Copy Type The volume’s copy type. Values: • FS: FS pair Snapshot Group Snapshot group name.
Selected Pairs table The following table lists the items in this table in the Confirm window of the Resync Pairs wizard. Item Description Primary Volume P-VOL information. Values: • LDEV ID: The P-VOL's LDEV identification number. • LDEV Name: The P-VOL's LDEV name. • Emulation Type: The P-VOL's emulation type. • Capacity: The P-VOL's volume capacity. • CLPR: The P-VOL's CLPR number. Copy Type The volume’s copy type. Values: • FS: FS pair Snapshot Group Snapshot group name.
Item Description Values: • LDEV ID: The S-VOL's LDEV identification number. • LDEV Name: The S-VOL's LDEV name. • Emulation Type: The S-VOL's emulation type. • Capacity: The S-VOL's volume capacity. • CLPR: The S-VOL's CLPR number. Pool Name (ID) The pool name and identification number. Mirror Unit The mirror unit number. Delete Pairs window Use this window to delete pairs and to restore pairs. For more information about deleting pairs, see “Deleting Fast Snap pairs” (page 85).
Item Description Status The pair status. For more information, see “Fast Snap pair status definitions” (page 97). Snapshot Date The date and time you split the pairs to store snapshot data. Secondary Volume The S-VOL information. Values: • LDEV ID: The S-VOL's LDEV identification number. • LDEV Name: The S-VOL's LDEV name. • Emulation Type: The S-VOL's emulation type. • Capacity: The S-VOL's volume capacity. • CLPR: The S-VOL's CLPR number. Pool Name (ID) The pool name and identification number.
Setting fields The following table lists the items in the Edit Local Replica Options window of the Edit Local Replica Options wizard. Item Description System Type The storage system type. Values: • Open Select when you want to change system options that affect BC and FS performance. • Mainframe: Select when you want to change system options that affect BC Z, FC Z, and FCSE performance.
Item Description • FC Slower Copy1 (FC Z or FCSE only): Reduces the multiplicity of background copy into half. • FC Slower Copy 2 (FC Z or FCSE only): Reduces the multiplicity of background copy into quarter. • FC Ext. Slower Copy1: Inhibits background copy and improves host I/O response when the operating ratio of the MP blade (FC Z or FCSE S-VOL or T-VOL is allocated) exceeds 65%. • FC Ext.
BC Z/FC Z/FCSE System Options table 194 Item Description System Option Options that can be changed. Status Shows whether the option is currently enabled or disabled.
Glossary allocation The ratio of allocated storage capacity versus total capacity as a percentage. Allocated storage refers to those logical devices (LDEVs) that have paths assigned to them. Allocated storage capacity is the sum of the storage of these LDEVs. Total capacity is the sum of the capacity of all LDEVs on the disk array. BC P9000 or XP Business Copy. An HP application that provides volume-level, point-in-time copies in the disk array.
to be associated with 1 to 36 LDEVs. Essentially, LUSE makes it possible for applications to access a single large pool of storage. M-VOL Main volume. MCU Main control unit. OPEN-x A general term describing any of the supported OPEN emulation modes (for example, OPEN-E). There are two types of OPEN-x devices: legacy OPEN-x devices with a fixed size (such as OPEN-3, OPEN-8, OPEN-9, and OPEN-E), and OPEN-V, which has a variable size and is a CVS-based volume.
Index B R blocked pool, 138 blocked pool, recovering, 144 blocked volume, 139 Raid Manager command device, 58 troubleshooting with, 149 related documentation, 145 C consistency group, monitoring, 104 contacting HP, 145 conventions document, 146 storage capacity values, 146 text symbols, 147 creating pools, 38 D deleting V-VOLs, 135 document conventions, 146 related information, 145 documentation HP website, 145 providing feedback, 145 S Shared Memory Requirements, 28 SIMs for pool problems, 142 status