
HP XP7 Getting Started Guide


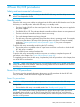
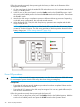

Follow this procedure exactly when powering the disk array on. Refer to the illustration of the
control panel as needed.
1. On the control panel, check the amber BS LED and make sure it is lit. It indicates that the disk
array is in standby mode.
2. In the PS area on the control panel, move the Enable switch to the ENABLED position. Hold
the switch in the Enabled position and move the PS ON switch to the ON position. Then release
the ENABLE switch.
3. Wait for the disk array to complete its power-on self-test and boot-up processes. Depending
on the disk array configuration, this may take several minutes.
4. When the Ready LED is ON, the disk array boot up operations are complete and the disk
array is ready for use.
NOTE: If the Alarm LED is also on, or if the Ready LED is not ON after 20 minutes, please
contact HP Technical Support. The disk array generates a SIM that provides the status of the
battery charge (see “Cache destage batteries” (page 39)).
Power Off procedures
CAUTION: Only a trained HP support representative can shut down and power off the disk array.
Do not attempt to power down the disk array other than during an emergency.
Prerequisites:
• Ensure that all software specific shutdown procedures have been completed. Please see the
applicable user manuals for details.
• Ensure that all I/O activity to the disk array has stopped. You can vary paths offline and/or
shut down the attached hosts.
Follow this procedure exactly when powering the disk array off.
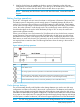
1. In the PS area on the power panel, move the Enable switch to the Enabled position. Hold the
switch in the Enabled position and press the PS OFF switch on the Operator Panel.
38 Power On/Off procedures