HP iPAQ Product Guide Trademark and Copyright Information © Copyright 2007 Hewlett-Packard Development Company, L.P. http://www.hp.com Microsoft, Windows, the Windows logo, Outlook, and ActiveSync are trademarks of Microsoft Corporation in the U.S. and other countries. HP iPAQ Products are Powered by Microsoft Windows Mobile 6.0 Standard. SD Logo is a trademark of its proprietor. Bluetooth® is a trademark owned by its proprietor and used by Hewlett-Packard Development Company, L.P. under license.
This document contains proprietary information that is protected by copyright. No part of this can document may be photocopied, reproduced, or translated to another language without the prior written consent of Hewlett-Packard Development Company, L.P.
HP iPAQ Voice Messenger 1100 mAh Li–Ion removable/rechargeable battery Getting Started CD with special software HP iPAQ documentation Wired stereo headset (1) (2) (3) (4) (5) NOTE: Listening to personal stereo equipment at full volume for long periods can damage hearing. To reduce the risk of hearing loss, do not spend much time listening to personal stereo equipment at full volume. HP recommends use of the headset manufactured by Merry, part number EMC220–X00, that is included with your HP iPAQ.
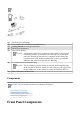
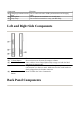
Component Display (1) Screen Right (2) Softkey Power (3) Button or End Key Back Key (4) Keypad (5) 4–Way (6) Navigation Key Home Key (7) Send Key (8) Action (9) Button Left (10) Softkey Earpiece (11) Function Use to view the contents on the screen. Press to launch HP iPAQ Shortcuts from the Home screen. Press to end a phone call. Press and hold to switch your HP iPAQ on or off. Press to go back to the previous screen. Use keys on the keypad to enter text, dial numbers, or navigate menus.
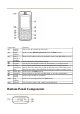
Component (1) Charging/Communications Port (2) Microphone (3) Strap Loop Function Use to connect the mini–USB synchronization and charging cable. Use for phone conversations or to record notes. Use to attach accessories to carry your HP iPAQ. Left and Right Side Components Component (1) Volume Button (2) MicroSD Slot (3) Headset Connector (4) Voice Commander Button Function Press to increase or decrease the earpiece volume.
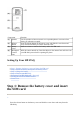
Component (1) Speaker Release Button Battery Cover HP Digital Camera Lens (2) (3) (4) Function Use the speakers to listen to music or as a speakerphone to converse when driving or otherwise occupied. Press the release button on the battery cover and slide the cover down and away from the HP iPAQ to remove the back cover. Remove to insert or remove the battery and/or the SIM card. With the camera turned on, frame the subject in the camera lens and view it on your HP iPAQ screen before capturing the photo.
2. Remove the battery. NOTE: If the battery is already installed, remove it before inserting the SIM card. The SIM card is provided by a mobile phone service provider. 3. Place the SIM card in the provided slot. NOTE: Make sure that the metal contacts are facing down and the notched corner is in the correct position. 4. Slide the SIM card into the slot.
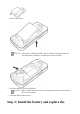
battery cover 1. 2. Align the battery connectors on the battery with the housing pins in the battery compartment, and insert the battery. Place the battery cover down and slide up until it clicks into place.
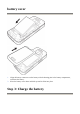
CAUTION: To avoid damaging your HP iPAQ or the AC adapter, Make sure all connectors are properly aligned before connecting. The battery provides power for your HP iPAQ to operate. Your HP iPAQ comes with a mini–USB synchronization cable, which must be used to charge the device. It takes approximately 2–4 hours to fully charge the battery for the first time. Subsequent charges may take longer. 1. 2. 3. Insert the USB end of the mini–USB synchronization cable into the port on the AC adapter.
1. Press Start > Settings > Security > Device Lock. 2. Select the Prompt if device unused for check box, and select the time that your HP iPAQ must be unused before you are prompted for a password. 3. In the Password type box, select the type of password you would like to use. Enter the password and then confirm the password. 4. Press Done. The next time your HP iPAQ is unused for the specified period of time, you are prompted to enter your password.
Battery level low Battery charging No battery or battery fault Sync error Ringer off Speaker phone on Wi-Fi on Bluetooth Roaming General Packet Radio Service (GPRS) available GPRS in use GPRS available in roaming Enhanced Data for GSM Evolution (EDGE) available EDGE in use EDGE available in roaming Phone connection unavailable or network error Radio off Signal strength Learning the Basics Get started with your HP iPAQ by learning basic functions such as entering text, knowing the Home screen,
From the Home screen, scroll and select the cellular carrier and Wi–Fi connection status display module to open the Wireless Manager. Next, press All to turn all wireless connections on/off. At the top of the Home screen are the connectivity icons, the volume indicator, and the clock. The top of the Home screen also displays the icons of the last ten programs you used so that you can quickly recall them. Use the Home screen to do the following: ● Access all applications and settings by pressing Start.
Entering Text You can enter text and numbers on the HP iPAQ using the keypad. The HP iPAQ supports two input modes for entering text: Multipress and T9. The status indicator on the top of the display screen shows the input mode that is currently in use. This section provides information about the following topics: z z z Changing Input Modes Entering Text in the Multipress Mode Entering Text in the T9 Mode Changing Input Modes You can change the text mode to Multipress or T9 as follows: 1.
4. The letter entered remains underlined until you complete multiple keypresses and the cursor moves to the next position. When you enter letters that are on the same number key, wait until the underline disappears before entering the next letter. This pause is called the Multipress time out, and you can adjust the length of the pause between multiple keypresses. To change the Multipress time out: 1. Press Start > Settings > More… > Accessibility. 2.
NOTE: Your HP iPAQ stores the unrecognized word and includes it in the list of alternative word choices. When memory space for unrecognized words is filled, your HP iPAQ deletes oldest words as it adds new words. TIP: You can also enter numbers and symbols in messages. Entering the Owner Information Enter your information so that the HP iPAQ can be returned to you if it is lost. 1. 2. Press Start > Settings > More… > Owner Information. Enter your personal information and press Done.
● From the Language list, select the language. ● From the Locale list, select the locale. ● From the Short date style/Long date style lists, select the date format. ● From the Time format list, select the time display option. ● From the Positive number/Negative number lists, select the number display options. ● From the Positive currency/Negative currency lists, select the currency display options.
1. 2. 3. 4. Press Start > Settings > More… > Power Management. Select Display time out. Select the length of time. Press Done. Dimming or Adjusting the Brightness of the Backlight You can set the backlight to dim after a specified amount of time has elapsed. 1. 2. 3. 4. Press Start > Settings > More… > Power Management. Select Backlight time out on battery or Backlight time out on AC. Select the length of time. Press Done. You can also increase or decrease the brightness of the backlight. 1.
If programs are lost from your HP iPAQ for any reason, most of them can be re–installed using Microsoft ActiveSync. Open the ActiveSync help on your computer, click Tools > Add/Remove Programs. Select the program to be added and click OK. Opening and Closing Programs You do not need to exit a program to open another or to conserve memory. The system manages memory automatically. To open a program, press Start and then select the program you want from the list.
1. Press Start > Settings > Clock & Alarm > Alarm. 2. Scroll to Alarm time and set the alarm time. 3. Scroll and select the required option from the Alarm list. 4. Press Done. Creating and Assigning a Category In the Contacts and Tasks programs, you can use categories to help organize and group your contacts and tasks. 1. 2. 3. 4. From the list, select an existing item or create a new one. Do one of the following: ● For an existing item in Tasks, open the task and press Edit > Categories.
● Synchronize links ● Send and receive e–mail ● Request meetings Synchronizing your HP iPAQ with your computer allows you to keep the same information (such as calendar, contacts, and e–mail messages) on both units, making it available when you work on your computer or when you take your HP iPAQ on the go. You can synchronize your HP iPAQ with your computer using: ● mini–USB synchronization cable ● Bluetooth To synchronize your HP iPAQ and your computer using the mini–USB synchronization cable: 1.
● ● Need to connect your HP iPAQ to your computer while you are using a Virtual Private Network (VPN) tunnel from your computer. Are running personal or company-enforced firewall software on your computer. You should use USB RNDIS mode if you are transferring large files and do not have any connection issues between your HP iPAQ and your computer. To change to ActiveSync RNDIS mode on your HP iPAQ: 1. Press Start > Settings > Connections > More… > USB. 2. Press Menu > ActiveSync Settings. 3.
Windows Mobile Device Center. NOTE: HP does not guarantee the accurate functionality of any third party applications with Windows Vista. ● ● If you are running ActiveSync 4.5 or later and personal firewall software on your computer, please add ActiveSync to the firewall program’s exception list. (Firewall software, such as Sygate Personal Firewall, TrendMicro PC–cillin Internet Security 2005, Norton Personal Firewall, McAfee Personal Firewall, or Zone Alarm Security Suite may block synchronization.
z z z z z z z z z z z z z z z z z z Using the Home Key Using the Back key Using the 4–Way Navigation Key Calling Features Checking Your Connection and Signal Strength Changing the SIM Personal Identification Number Managing Calls Using Call History Using Wireless Manager Quick Launch Changing the Ring Tone and Ring Type Changing Network Settings Profiles Automatic Frequency Band Selection Copying a Contact From a SIM to a Device ActiveSync – Synchronizing Contacts, Tasks, Calendar and E–mail with Exchange/
TIP: Down and up are your primary movements within menus and navigation through the contacts. Move left and right to change feature settings and edit text. ● The top of the Home screen displays the icons of the last ten programs you used so that you can quickly recall them. Press the Action button to open any program.
When you receive a call, you can answer or ignore the call, the phone stops ringing and the caller may be sent to Voice mail, depending on the settings provided by your mobile phone service provider. To disregard the call, press Ignore on the onscreen keypad or press the End Call key. Using Call Waiting Use Call Waiting to be notified of incoming calls when you are in another call. To turn on Call Waiting: 1. Press Start > Settings > Phone > Call Waiting. 2.
Making a Call from the Home Screen To make calls from the Home screen: 1. Use the keypad to enter the contact name. 2. In case there is more than one contact with the same name, scroll to select the required contact. 3. Press the Send key to make the call. Making a Call from the Contacts You can select a person’s name from your contacts list and press the Send key to place the call. If a contact has more than one phone number, such as Work, Home, and Fax, do the following: 1. 2. 3. Press Start > Contacts.
Making a Call Using Voice Commander Press Voice Commander button and say Call (Contact name) to dial a number saved in your HP iPAQ's contacts list or by saying Digit dial (number) to directly call a number not stored in your HP iPAQ. Making Emergency Calls You can make calls to emergency service numbers, even if you have locked the SIM card and/or the HP iPAQ.
4. Use navigation keys to select a speed dial number from 2–99 under Keypad assignment. 5. Press Done. TIP: You can also assign speed dial numbers to Web addresses and e–mail addresses that are stored in the Contacts on your HP iPAQ. To make a speed dial call: ▲ From the Home screen, press and hold the keypad number you assigned as a speed dial entry. For two-digit speed dial numbers, press the first digit and press and hold the second digit of the number.
Making Data Calls Use Data Connections settings to set up General Packet Radio Service (GPRS), dial–up, Virtual Private Network (VPN), proxy, and Wi–Fi connections so you can connect to the Internet or your corporate network. With a data connection, you can browse the Web, download e–mail, chat using MSN Messenger, or synchronize with the server without using wires.
You can talk to two or more people simultaneously, using the conference call facility. 1. 2. 3. 4. 5. 6. Press the Send key. Use the keypad to dial the first number. Press the Send key. After you are connected, press Hold. Dial the second number, and then press the Send key. After you are connected, press Menu > Conference. NOTE: To add more parties to the conference call, dial each number, connect, and then press Menu > Conference.
After you insert an active SIM card into your HP iPAQ, it connects to your service provider's network. The signal strength icon indicates that you are connected to your service provider's network. A full strength connection is indicated by a full signal strength icon. The number of vertical bars in the icon diminish as the signal strength diminishes. No bars indicate no signal.
NOTE: When the Phone feature is turned off, you cannot receive or make a call, including emergency calls. To receive and make a call, turn on the Phone feature and re-engage your phone’s RF capability. To use wireless manager, press Start > Settings > Connections > Wireless Manager. Option All Wi–Fi Bluetooth Phone Description Press the Action button to turn on/off the functions of Wi–Fi, Bluetooth, and Phone features. Press the Action button to turn on/ off the functions of Wi–Fi connection.
You can switch from one network to other as follows: 1. Press Start > Settings > Phone. 2. Select Networks to view your Current network, or Network selection to switch to a different network. TIP: You can select a different network by searching the network either automatically or manually. Profiles You can use profiles on your HP iPAQ to personalize the ringtones, ring volumes, and other settings according to your choice.
● Name ● Ring type ● Ring volume ● Alarm type ● Alarm volume ● Reminder type ● Reminder volume ● Notification type ● System sound volume Automatic Frequency Band Selection Your HP iPAQ has an integrated Global System for Mobile Communication (GSM)/General Packet Radio Service (GPRS)/Enhanced Data for GSM Evolution (EDGE) feature that supports four different frequency bands (850/900/1800/1900) for international roaming.
You can synchronize Contacts, Tasks, Calendar and E–mail with Exchange/Outlook 1. 2. 3. After your computer is synchronized with your HP iPAQ, click Tools > Options on the Microsoft ActiveSync dialog box. Select the check boxes which you want to synchronize. Click OK. Setting up E–mail Before sending and receiving e–mail messages, you may have to complete the e–mail account setup.
Setting up E–mail using Exchange Server 1. Press Start > Messaging > New E–mail Account…. 2. Scroll and select the Exchange Server option from the Your e–mail Source box. 3. Press Next to synchronize outlook with your organization's Exchange e–mail server. 4. In Server address, enter the Outlook Web Access server address. 5. Enter the User name, Password, and Domain on the User Information tab. 6. Select the check box for the items you want to synchronize, and press Finish.
Connecting to Intranet URLs To connect to intranet sites that have periods in their URLs (for example, intranet.companyname.com), add them to the Work URL Exceptions list. 1. Press Start > Settings > Connections. 2. Press Menu > Advanced. To enter the URL, press Menu > Work URL Exceptions. 3. Press Menu > Add and in in URL Pattern, enter the intranet URL. NOTE: If you use many URLs that share the same root company name, you can avoid entering them individually by entering *.companyname.com.
2. Press Menu > Add to set up a new proxy server connection. Press Menu > Edit to edit a proxy server. 3. Scroll to select the required option from the Connects from list. 4. Scroll to select the The Internet option from the Connects to list. 5. In the Proxy (name:port) box, enter the proxy server name and port. 6. Scroll to select the required protocol option from the Type list.
● Host name or IP address of the VPN server To set up a VPN server connection: 1. Press Start > Settings > Connections. 2. Select VPN and press the Action button. 3. Enter the details given by the network administrator. 4. To edit details of an already existing VPN connection, scroll to select the connection and press Menu > Edit. NOTE: To delete an existing connection scroll to select the connection and press Menu > Delete.
Term 802.11 standard Device-to-computer or ad-hoc Domain Name System (DNS) Encryption Hotspots Infrastructure Definition An approved standard specification of radio technology from the Institute of Electrical and Electronics Engineers (IEEE) used for wireless local area networks (WLANs). A mode that does not use access points. It provides independent peer-to-peer connectivity in a wireless LAN. The way that Internet domain names are located and translated into IP addresses.
box. Else, enter the network key. NOTE: To delete a Wi–Fi connection, press Start > Settings > Connections > Wi–Fi. Select the required connection and press Menu > Delete. Finding an IP Address You need to be connected to a Wi–Fi network to find the IP address of your connection 1. Press Start > Settings > More… > Wireless LAN. 2. Press Menu > Advanced to find the IP address and network related details of your connection. Deleting a Wireless Network Connection You can delete networks you manually entered.
Assistant You can make voice calls using VoIP and Internet Protocol Private Branch Exchange (IP PBX) in addition to normal GSM calls. VoIP routes voice conversations using an IP based network. VoIP to VoIP phone calls to any provider are typically free. To make calls using IP PBX: 1. On the Home screen, scroll to Internet calling, which is off by default, and press the Action button. 2. Scroll and select the required option from the Use Internet Calling box. 3.
z z z z Creating, Accepting, and Ending a Bluetooth Partnership Making a Device Discoverable Setting Up an Incoming or Outgoing COM Port Ending a Connection Bluetooth Terms Term Authentication Authorization Bonding (Paired devices) Device address Device discovery Device ID Encryption Passkey Personal Information Manager (PIM) Profiles Service discovery Definition Verification of a numeric passkey before a connection or activity can be completed.
● Advanced Audio Distribution Profile (A2DP) ● Audio Video Remote Control Profile (AVRCP) ● Personal Area Networking (PAN) ● Generic Access Profile (GAP) ● Hands Free Profile (HFP) ● Headset Support Profile (HSP) ● Human Interface Device Profile (HID) ● Object Exchange (OBEX) Protocol ● Object Push Protocol (OPP) ● Serial Port Profile (SPP) Creating, Accepting, and Ending a Bluetooth Partnership You can create a partnership between your HP iPAQ and another device that has Bluetooth capab
3. If a passkey is requested, enter an alphanumeric Passkey between 1 and 16 characters in Passkey box, and press Next. Enter the same Passkey in the device requesting the partnership. Using a Passkey provides greater security. 4. To give the partnership a more meaningful name, change the name of the device in Display Name. 5. Press Done. If you cannot discover another device, try the following: ● Make sure Bluetooth is turned on. ● Move closer to the device.
Ending a Connection It can be useful to end a connection when you are done using it. This frees resources on your HP iPAQ and can save connection charges. ● When connected via mini–USB synchronization cable, detach your HP iPAQ from the cable. When connected via Bluetooth, press Start > Settings > Connections > Bluetooth and then press Menu > Turn off Bluetooth to end a bluetooth connection.
CAUTION: Editing network parameters is not recommended unless you are being assisted by your mobile phone service provider. Connecting to a Laptop You can use your HP iPAQ as a wireless modem. The Internet Sharing software on your HP iPAQ guides you during the connection process. Insert a GPRS–enabled SIM into your HP iPAQ before setting up Internet Sharing. You may also need to install the software drivers (located on the Getting Started CD) on to your laptop.
1. Make sure that your HP iPAQ is not connected to your computer. 2. Press Start > More > Internet Sharing. 3. Scroll and select USB from the PC Connection list. 4. Scroll and select the type of GPRS connection you want to use from the Network Connection list. 5. Now connect your HP iPAQ to your computer with the mini–USB synchronization data cable and press Connect.
NOTE: The connector fits only one way so do not force it. If the connector does not insert easily, turn it over. 3. When prompted, check the items you want to synchronize between your HP iPAQ and your computer. 4. Select the folder you want to synchronize. 5. Click Explore on the computer ActiveSync dialog box to explore folders present on your HP iPAQ. 6. Press Sync to synchronize the selected folders. NOTE: To configure ActiveSync over GPRS, contact your corporate network administrator.
z z Capturing Photos Viewing Photos Capturing Photos You can capture images and store them in your HP iPAQ or memory card. 1. Press Start > Camera. 2. Use the 4–way Navigation key to zoom in or out. 3. Use the 4–way Navigation key to decrease or increase brightness. 4. Press the Action button to click a photo and automatically save it in File manager > My Documents > My Pictures. Viewing Photos To view photos captured on your HP iPAQ: 1. Press Start > More > Pictures & Videos. 2.
z z z z Changing Mode Settings Changing Zoom Settings Changing White Balance Settings Configuring File Settings Changing Brightness Settings 1. Press Start > Camera. 2. Press Menu > Brightness. 3. Make the necessary changes and press the Action button. Changing Resolution Settings 1. Press Start > Camera. 2. Press Menu > Resolution. 3. Make the necessary changes and press the Action button.
● ● Timer – Set the self-timer to determine after how long you want the camera to click a photo after you press the shutter button. Burst – Set the maximum number of photos that can be taken at a time. Changing Zoom Settings 1. Press Start > Camera. 2. Press Menu > Zoom. 3. Make the necessary changes and press the Action button. The Zoom settings can be changed to: ● Zoom*1(default) ● Zoom*2 ● Zoom*3 Changing White Balance Settings 1. Press Start > Camera. 2. Press Menu > White Balance. 3.
Use your HP iPAQ File Settings to resize pictures for e–mail and to optimize for slideshow viewing. Press Start > Camera, and then press Menu > Options to change one or more of following options: 1. General ● The general settings can be changed to: ● Large (640*480) (default) ● ● Medium ● Small ● Original The orientation of picture can be changed to: ● Left ● 2. Right Slide Show ● The Slide Show settings can be changed to: ● Landscape ● ● 3.
Recording Videos You can use the built-in camcorder on your HP iPAQ to create short videos and share them with your friends and family. 1. Press Start > Camera. 2. Press Menu > Video. 3. Press the Action button to start recording. Press the Action button again to stop recording. Configuring Video Format Press Start > More > Pictures & Videos, and then press Menu > Options > Video. ● Select the Include audio when recording video files check box to record both audio and video.
1. 2. 3. 4. 5. 6. Press Start > Messaging > MMS. Press Menu > New. Navigate to highlight Insert Picture/Video… area. Press the Action button to open Pictures & Videos. Navigate to a required picture you want to add and press the Action button. Press Send. Using Bluetooth You can do the following to transfer images from your HP iPAQ to other devices: 1. Press Start > More > Pictures & Videos. 2. Scroll and select a picture. 3. Press Menu > Beam…. Select the device and press Beam.
connection. You will need your account settings for VPN connection (typically a work account). You can also send pictures, video, and audio files on your phone and storage card using MMS. You can send only pictures, or a combination of pictures and videos, or audio files. Text can also be added to a MMS slide. Text messages can be sent using your HP iPAQ. Text messages are sent and received through your wireless service provider using the phone number as the message address.
messages you move are mirrored on the e–mail server. Therefore, messages are available to you anytime you connect to your e–mail server, whether it is from your HP iPAQ or computer. This synchronization of folders occurs whenever you connect to your e–mail server, create new folders, or rename/delete folders when connected. You can also set different download options for each folder.
Setting up Messaging Accounts This section provides information about the following topics: z z z z z z z Text Messaging MMS Messaging Setting up E–mail using Exchange Server Setting up E–mail using POP3 or IMAP4 account Receiving E–mail Attachments Receiving Meeting Requests Creating or Changing a Signature Text Messaging Text messaging is the transmission of short text messages to and from a mobile phone, fax machine, and/or IP address.
1. 2. 3. 4. 5. 6. Press Start > Messaging > New E–mail Account…. Scroll and select the Exchange Server option from the Your e–mail Source box. Press Next. Press Next again to synchronize Outlook with your organization's Exchange e–mail server. In Server address, enter the Outlook Web Access server address. Enter the User name, Password, and Domain in the User Information tab. Select the check boxes of the data you want to synchronize, and then press Finish. Setting up E–mail using POP3 or IMAP4 account 1.
4. Press Next until you reach Server information, and press Options. 5. Press Next twice, and select the check boxes Get full copy of messages and When getting full copy, get attachments. NOTE: Embedded pictures and objects cannot be received as attachments. An embedded message can be viewed as an attachment when using IMAP4 to receive e–mail. However, this feature does not work if Transport Neutral Encapsulation Format (TNEF) is enabled so that you can receive meeting requests.
4. Select the Use signature with this account check box if it is not already selected. 5. Select the Include when replying and forwarding check box, if required. 6. Enter a signature in the box. To stop using a signature, clear the Use signature with this account check box. TIP: You can use a different signature with each messaging account.
sent the next time you connect. Replying or Forwarding a Message 1. 2. 3. Press the Action button to open the selected message, and then press Menu > Reply, Reply All, or Menu > Forward. Enter your response. To quickly add common messages, press Menu > My Text and navigate to select a required message. Press Send. NOTE: You can also use the voice commander to reply to any message. Use HP Voice Reply to reply using an audio e–mail message. Adding an Attachment to a Message 1.
Sync to synchronize this folder. Downloading Messages from a Server 1. On the message list, press Menu > Tools > Switch Accounts and select the account you want to use. Press Menu > Send/Receive. The messages on your device and e–mail server are synchronized: new messages are downloaded to the device Inbox folder, messages in the device Outbox folder are sent, and messages that have been deleted from the server are removed from the device Inbox folder. 2.
1. 2. Press Sign In after navigating to a required sign-in status. Enter your information in the Sign-in and Password box. Press Sign In. To sign out of the Messenger: ▲ Press Menu > Sign Out to sign-out of MSN Messenger. If you do not sign out of MSN Messenger, you remain on a data connection, which may result in additional charges from your service provider.
You can change your status on MSN Messenger according to your need. To change your status: 1. 2. Press the Action button to select your name in the contact list. Press Menu > Change Appearances, and navigate to select the required status. Calendar z z z z z Keeping Track of Appointments Creating an Appointment Updating an Appointment Canceling an Appointment Changing the Display of the Work Week Keeping Track of Appointments You can keep a track of your appointments in various views: 1.
To update an appointment on your calendar: 1. Press Start > Calendar. 2. Select and open the appointment, and then press Menu > Edit to make your changes. 3. Press Done. Canceling an Appointment When you delete an appointment in calendar on your HP iPAQ, it is also deleted on your computer the next time you synchronize. If the appointment has not been synchronized with a computer, it will be deleted only from your HP iPAQ. 1. 2. 3. 4. Press Start > Calendar.
z z z z z z z z z Adding a Contact Deleting a Contact Changing Contact Information Copying a Contact Adding a Photo Sending an E–mail Message to a Contact Sending a Text Message to a Contact Adding and Removing a Picture Working with the Contact List Adding a Contact 1. Press Start > Contacts. 2. Press New to add a new contact. 3. Select Outlook Contact or SIM Contact type. 4. Enter the information. 5. Press Done. TIP: Select Outlook Contact type to enter more information about contact.
Copying a Contact 1. 2. 3. 4. 5. 6. Press Start > Contacts. Select the contact you want to copy. Press Menu > Copy Contact. Select the copy of the contact to make your changes. Press Menu > Edit. Change the contact information as needed and press Done. NOTE: The displayed category is automatically assigned to the new contact. Adding a Photo To add a photo to contact information: 1. 2. 3. 4. 5. Press Start > Contacts. Select the contact. Press Menu > Edit. Select Picture.
message to and choose the address. Sending a Text Message to a Contact 1. 2. 3. 4. Press Start > Contacts. Select and open the contact you want to send a message to. Select Send text message and press Text. Enter your message. To quickly add common messages, press Menu > My Text and select a desired message. 5. Press Send. If you are working offline, e–mail messages are moved to the Outbox folder and are sent the next time you connect.
Working with the Contact List There are several ways to use and customize the contact list. Here are a few tips on how to make it work for you. 1. 2. Press Start > Contacts. In the contact list, do any of the following: ● To search for a contact by entering a name or number, or by using the alphabetical index, enter the name or number into the Name view. ● To see a list of contacts employed by a specific name or company, press Menu > View By > Name or Company.
Using HP Voice Reply You can use HP Voice Reply to reply to your e–mail messages or compose a new e–mail. You can either do a reply to all, just reply to the sender, or forward a message. Use HP Voice Reply with your Outlook account as well as the POP3 and IMAP4 accounts from your HP iPAQ. You can access HP Voice Reply in three different views: ● List View – While reviewing a list of messages in the Inbox. ● Read View – While reading a particular message from the list of messages in the Inbox.
Use HP iPAQ Setup Assistant to simplify configuring settings on your HP iPAQ. HP iPAQ Setup Assistant lets you save the settings on your computer. This can help you restore configuration settings on your HP iPAQ at any time. HP iPAQ Setup Assistant also allows you to perform a factory reset on your HP iPAQ and view detailed product information. Using HP iPAQ Setup Assistant, you can manage multiple configurations and apply them quickly to your HP iPAQ.
NOTE: You can also launch the voice commander by pressing the hookswitch on your HP iPAQ headset.
Use HP iPAQ Shortcuts to access a list of shortcuts to your favorite applications or features on your HP iPAQ. You can edit the default shortcuts list or create new shortcuts and store them in the existing list. To use HP iPAQ Shortcuts: 1. 2. 3. From the Home screen, press Shortcuts. Scroll to the application you want to use. Press the Action button or Select to select the application. Editing HP iPAQ Shortcuts You can change the default shortcuts and assign different applications. To edit a shortcut: 1.
You can use the HP iPAQ DataConnect application to automatically configure your GPRS settings according to the service provider and the country in which your HP iPAQ is being used. To configure GPRS using HP iPAQ DataConnect: 1. Press Start > More > Accessories > HP iPAQ DataConnect. 2. Follow the onscreen instructions to complete the process of setting up GPRS using your HP iPAQ DataConnect. HP iPAQ Tips Use HP iPAQ Tips to perform operations on your HP iPAQ in a quick and efficient manner.
To create a new playlist: 1. On the Library screen, press Menu > Open File. 2. Navigate to the required media file, and press Menu > Queue Up to add the media file in the Now Playing screen. 3. Press Menu > Now Playing to go to the Now Playing screen. 4. Press Menu > Save Playlist to save the list of media files on the Now Playing screen. NOTE: Navigate the Library screen to select the playlist you want to delete, and then press Menu > Delete From Library. To play a streaming media file on the web: 1.
3. To delete or rename the voice clip, press Menu > Rename/Delete. 4. Press Menu > Set as Ringtone to set the voice clip as your HP iPAQ ringtone. Using MS Office Applications To use MS Excel applications: 1. 2. 3. 4. Press Start > More > Office Mobile > Excel Mobile. Navigate to select the file, and then press the Action button to open the file. Press Menu > Edit Mode to edit. Press Menu > Save As and enter the name. Select the location for the file and press Save. To use MS Word applications: 1.
To copy/paste a file/folder: 1. Navigate the Tree or List view to select the file to be copied, and press Menu > File > Copy To. 2. Navigate the List view to select the destination folder, and press Menu > Paste to paste the file. To create shortcut: 1. Navigate the Tree or List view to select the file for which you want to create a shortcut, and press Menu > File > Create Shortcut. 2. Navigate the Tree or List view to select the destination folder to save the shortcut in and press Done.
Playing Solitaire The objective of Solitaire is to use all the cards in the deck to build up four suit stacks in ascending order, beginning with the aces. You win the game when all cards are on the suit stacks. To play a game: 1. 2. 3. Press Menu > More > Games > Solitaire. Press the number or character above the card stack displaying the card you want to move, and press the number or character above the card stack to which you want to move the card.
Storage Cards z z z z Using Storage Cards Inserting a Storage Card Removing a Storage Card Viewing Content of a Storage Card Using Storage Cards Use optional storage cards for: ● Expanding the memory of your HP iPAQ ● Adding functionality NOTE: Storage cards must be purchased separately and are not included with your HP iPAQ. To locate information about storage cards, visit http://www.hp.com/accessories/ipaq. Inserting a Storage Card To insert a storage card into the storage slot on the HP iPAQ: 1.
Removing a Storage Card To remove a Micro Secure Digital (Micro–SD) storage card from the storage slot on the HP iPAQ: 1. Close all programs that are using the storage card. 2. Remove the card from the storage card slot by lightly pushing on the card to unlock it. 3. When the card disengages and pops out, pull it from the storage card slot. Viewing Content of a Storage Card Use File Explorer to view the files that are located on your optional storage card. 1. 2. Press Start > File Manager.
4. Double-click Mobile Device. 5. On your computer, right–click the Start menu, and select Explore. 6. Locate the file to be moved. NOTE: You cannot copy pre-installed files or system files. 7. Drag and drop your files between your HP iPAQ and your computer. ActiveSync converts the files so that they can be used by the Office Mobile programs, if necessary. Move your files directly into My Documents on your HP iPAQ (or into a folder inside My Documents), so the programs on your device can locate them.
How you manage the cost of synchronizing without wires from your HP iPAQ depends on your priorities. To Reduce network connection or data transfer costs Extend battery life Keep your information up to date Do this Increase the time between scheduled synchronizations, or synchronize manually. Check the details of your rate plan. Schedule synchronization less frequently or synchronize manually. During periods of high mail volume, schedule synchronization at regular but frequent intervals.
1. Press Start > Tasks. 2. Press Menu > Options. 3. Select the Show start and due dates check box. 4. Press Done. Marking a Task as Completed To mark a task as completed: 1. 2. Press Start > Tasks. In the task list, select the task you want to complete and press Complete to mark a check box as completed. To mark an open task as completed: 1. 2. 3. 4. Select and open the task you want to complete. Press Edit. In the Status box, select the Completed check box. Press Done.
input frequency 50 to 60 Hz, output voltage 5 V DC, output current 1 A TFT Micro–reflective, 176x220 2.0”, 65K Colors Multi-level brightness adjustment with power save mode Supports micro SD memory 3.5–mm jack with dual earbud style headset— Included in box Internal, Quad-Band antenna Speaker, and one 3.5–mm stereo headset jack 1,100 mAh Li–Ion removable/rechargeable battery Bluetooth 1.
z z z z z z z z z z z z z z z Canadian Notice Avis Canadien European Union Notice Battery Warning Battery Recycling Battery Disposal Equipment Warning Airline Travel Notice Medical Electronic Equipment SAR Notice Wireless Notices Japanese Notice Taiwan DGT Notice Korean Notice Acoustics Warning Federal Communications Commission Notice This equipment has been tested and found to comply with the limits for a Class B digital device, pursuant to Part 15 of the FCC Rules.
The FCC requires the user to be notified that any changes or modifications made to this device that are not expressly approved by HP may void the user's authority to operate the equipment. Cables To maintain compliance with FCC Rules and Regulations, connections to this device must be made with shielded cables having metallic RFI/EMI connector hoods. Declaration of Conformity for Products Marked with the FCC Logo (United States Only) This device complies with Part 15 of the FCC Rules.
Canadian Notice This Class B digital apparatus meets all requirements of the Canadian Interference-Causing Equipment Regulations. Avis Canadien Cet appareil numérique de la classe B respecte toutes les exigences du Règlement sur le matériel brouilleur du Canada.
Hewlett-Packard GmbH, HQ-TRE, Herrenberger Strasse 140, D-71034 Böblingen, Germany The telecommunications functionality of this product may be used in the following EU and EFTA countries: Austria, Belgium, Cyprus, Czech Republic, Denmark, Estonia, Finland, France, Germany, Greece, Hungary, Iceland, Ireland, Italy, Latvia, Liechtenstein, Lithuania, Luxembourg, Malta, Netherlands, Norway, Poland, Portugal, Slovak Republic, Slovenia, Spain, Sweden, Switzerland, and United Kingdom.
License required for use. Verify with your dealer or directly with the General Direction for Frequency Planning and Management (Direzione Generale Pianificazione e Gestione Frequenze). Battery Warning WARNING! This HP iPAQ contains a lithium ion rechargeable battery. To reduce the risk of fire or burns, do not disassemble, crush, puncture, short external contacts, or dispose of in fire or water. Replace only with the HP spare. CAUTION: Risk of explosion if battery is replaced by an incorrect type.
WARNING! To reduce the risk of personal injury, electrical shock, fire or damage to the equipment: Plug the AC adapter into an AC outlet that is easily accessible at all times. Disconnect power from the equipment by unplugging the AC adapter from the AC outlet or unplugging the synchronization cable from the host computer. Do not place anything on the power cord or any of the other cables. Arrange them so that no one may accidentally step on or trip over them. Do not pull on a cord or cable.
The exposure standard for mobile devices employs a unit of measurement known as the Specific Absorption Rate, or SAR. The SAR limit stated in the international guidelines is 2.0 W/kg*. Tests for SAR are conducted using standard operating positions with the device transmitting at its highest certified power level in all tested frequency bands. Although the SAR is determined at the highest certified power level, the actual SAR of the device while operating can be well below the maximum value.
limits, human proximity to the antenna should be minimized. No metallic body accessories are allowed and 1.5 cm spacing between PDA and the body must be maintained to satisfy RF Exposure. This PDA has been tested and demonstrated compliance when Bluetooth, WLAN, and mobile phone are transmitting simultaneously. This PDA must not be co-located or operating in conjunction with any other antenna or transmitter.
Japanese Notice This section provides information about the following topics: z z z Wireless LAN 802.11b Devices Wireless LAN 802.11g Devices Bluetooth Devices Wireless LAN 802.11b Devices Wireless LAN 802.
Taiwan DGT Notice Korean Notice Acoustics Warning WARNING! Listening to personal stereo equipment at full volume for long periods can damage your hearing. In order to reduce the risk of damage to hearing, one should lower the volume to a safe, comfortable level, and reduce the amount of time listening at high levels.
● For your own safety, headsets or earphones used with this product should comply with the headphone limits in clause 7 of EN 50332–2. HP recommends to use the headset delivered with your HP iPAQ (part number 430219, manufactured by Plantronics), that is in compliance to EN 50332–1. ● Frequently Asked Questions z z z z z z z z z z z I am having trouble turning on my HP iPAQ. What should I do? I am unable to make or receive calls. How do I fix this? I have trouble connecting to the Internet.
● Is the reception of the network signal good? ● Is the network setup properly? If necessary, try to select your network manually. Have you activated the Fixed Dialing, Call Forwarding, and Call Barring functions? If yes, deactivate them temporarily. Are you using your HP iPAQ with other SIM cards with the Enable SIM PIN function activated? If yes, deactivate the function temporarily. Is your HP iPAQ switched to the Flight mode? If yes, turn it off.
You may hear disturbing noises if you use your HP iPAQ near a microwave oven, speakers, or a television set. Avoid using your HP iPAQ near such items as it has an adverse effect on the voice quality. Why are the standby and talk time shorter at times? Follow the guidelines given below to improve the standby and talk times on your HP iPAQ. ● ● ● ● The HP iPAQ may consume more power when the signal reception is poor. Try to move to an open location when you use your HP iPAQ.
should I do? If you have trouble charging your battery, please perform the following checks: ● Is the battery charger correctly plugged into the battery charger socket on the HP iPAQ? ● Is the power cord of the charger damaged? ● Is the battery very old? If yes, replace with a new battery and try again. I am unable to use the ActiveSync feature. What should I do? To be able to use the ActiveSync feature, upgrade your computer to the latest version of ActiveSync. It is recommended to use ActiveSync 4.
● Transfer your SMS messages from the HP iPAQ's memory to the SIM card memory. Guidelines for cleaning your HP iPAQ ● ● Use a soft, clean, and slightly moistened cloth to clean your HP iPAQ. Do not let water come into contact with the earpiece, microphone, or the metal surface. Do not wipe your HP iPAQ with any corrosive liquid or coarse objects. This can damage the outer surface of your HP iPAQ.