HP ProCurve Identity Driven Manager 3.
© Copyright 2004, 2005, 2007, 2009 Hewlett-Packard Development Company, LP. All Rights Reserved. Publication Number 5990-8851 May, 2009 Disclaimer The information contained in this document is subject to change without notice. The only warranties for HP products and services are set forth in the express warranty statement accompanying such products and services. Nothing herein should be construed as constituting an additional warranty.
Contents 1 About ProCurve Identity Driven Manager Introduction . . . . . . . . . . . . . . . . . . . . . . . . . . . . . . . . . . . . . . . . . . . . . . . . . . 1-2 Why IDM? . . . . . . . . . . . . . . . . . . . . . . . . . . . . . . . . . . . . . . . . . . . . . . . . . . 1-3 What’s New in IDM 3.0 . . . . . . . . . . . . . . . . . . . . . . . . . . . . . . . . . . . . . . . 1-5 IDM Architecture . . . . . . . . . . . . . . . . . . . . . . . . . . . . . . . . . . . . . . . . . . . . 1-6 Terminology . . . .
Contents IDM Preferences . . . . . . . . . . . . . . . . . . . . . . . . . . . . . . . . . . . . . . . . . . . 2-41 Using Active Directory Synchronization . . . . . . . . . . . . . . . . . . . . . . . 2-43 3 Using Identity Driven Manager IDM Configuration Model . . . . . . . . . . . . . . . . . . . . . . . . . . . . . . . . . . . . . . 3-3 Configuration Process Review . . . . . . . . . . . . . . . . . . . . . . . . . . . . . . . . 3-3 Configuring Identity Management . . . . . . . . . . . . . . . . . . . .
Contents Importing Users from XML files . . . . . . . . . . . . . . . . . . . . . . . . . . . . . . 3-74 4 Using the Secure Access Wizard Overview . . . . . . . . . . . . . . . . . . . . . . . . . . . . . . . . . . . . . . . . . . . . . . . . . . . . . 4-2 Supported Devices . . . . . . . . . . . . . . . . . . . . . . . . . . . . . . . . . . . . . . . . . . 4-2 Using Secure Access Wizard . . . . . . . . . . . . . . . . . . . . . . . . . . . . . . . . . . . 4-3 5 Troubleshooting IDM IDM Events . . . . . .
Contents iv
1 About ProCurve Identity Driven Manager Chapter Contents Introduction . . . . . . . . . . . . . . . . . . . . . . . . . . . . . . . . . . . . . . . . . . . . . . . . . . 1-2 Why IDM? . . . . . . . . . . . . . . . . . . . . . . . . . . . . . . . . . . . . . . . . . . . . . . . . . . 1-3 What’s New in IDM 3.0 . . . . . . . . . . . . . . . . . . . . . . . . . . . . . . . . . . . . . . . 1-5 IDM Architecture . . . . . . . . . . . . . . . . . . . . . . . . . . . . . . . . . . . . . . . . . . . .
About ProCurve Identity Driven Manager Introduction Introduction Network usage has skyrocketed with the expansion of the Internet, wireless, and convergence technologies. This increases the burden on network managers working to control network usage. Also, the complexity of large networks makes it difficult to control network access and usage by individual users.
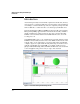
About ProCurve Identity Driven Manager Introduction Why IDM? Today, access control using a RADIUS system and ProCurve devices (switches or wireless access points) is typically made up of several steps. Figure 1-2. Current Access Control process 1. A client (user) attempts to connect to the network. 2. The edge device recognizes a connection state change, and requests identifying information about the client. This can include MAC address, username and password, or more complex information. 3.
About ProCurve Identity Driven Manager Introduction When using IDM, the authentication process proceeds as described in the first three steps, but from that point the process changes as follows: 4. The RADIUS server validates the user’s identity in the user directory. Based on the validation result received from the user directory, the authentication server returns an accept or deny response to the switch.
About ProCurve Identity Driven Manager Introduction What’s New in IDM 3.0 ProCurve Identity Driven Manager version 3.0 includes the following new features and enhancements: ■ Support for PCM’s new architecture The new architecture in PCM 3.0 lets you logically divide the network and manage devices on remote segments of large networks connected by WAN links that might or might not be behind a NAT firewall. For additional information, see the HP ProCurve Manager Network Administrator’s Guide.
About ProCurve Identity Driven Manager Introduction IDM Architecture In IDM, when a user attempts to connect to the network through an edge switch, the user is authenticated via the RADIUS Server and user directory. Then, IDM is used to return the user’s "access profile" along with the authentication response from RADIUS to the switch.
About ProCurve Identity Driven Manager Introduction • A Decision Manager that receives the user data and checks it against user data in the local IDM data store. Based on the parameters defined in the data store for the user data received, the Decision Manager outputs access parameters for VLAN, QoS, bandwidth, and network resource access to the RADIUS interface component. • A Local Data Store that contains information on Users and the Access Policy Groups to which the user belongs.
About ProCurve Identity Driven Manager Terminology Terminology Access Policy An IDM access policy group consists of one or more rules that govern the login Group times, devices, quality of service, bandwidth, and VLANs for users assigned to the access policy group. Access Profile An IDM access profile sets the VLAN, quality of service, and bandwidth (ratelimits) applied when a user logs in and is authenticated on the network. Authentication The process of proving the user’s identity.
About ProCurve Identity Driven Manager Terminology Endpoint Integrity Also referred to as "Host Integrity," this refers to the use of applications that check hosts attempting to connect to the network to ensure they meet requirements for configuration and security. Generally to make sure that virus checking and spyware applications are in place and up to date. IDM Agent The IDM Agent resides on the RADIUS server.
About ProCurve Identity Driven Manager IDM Specifications IDM Specifications Supported Devices ProCurve Identity Driven Manager (IDM) supports authorization control functions on the following ProCurve devices*: ProCurve Switches: 6400cl Series 6200 Series 5400 Series 5300xl Series 4200 Series 3500 Series 3400cl Series 4100gl Series 2800 Series 2600 Series (PWR included) 6100 Series 2500 Series ProCurve Wireless (420, 520wl, 530) Wireless Edge Services Module (WESM) 9300 9400 2900 Series 6600 8212zl * Not a
About ProCurve Identity Driven Manager IDM Specifications ■ • Microsoft Network Policy Server on Windows Server 2008 (32-bit) • Microsoft Internet Authentication Service (IAS) on Windows Server 2003 (32-bit) • FreeRADIUS supplied with Red Hat Enterprise Linux (4.7 and 5.2) • FreeRADIUS supplied with SuSE Enterprise Linux (9.3 and 10.2) • RADIUS on the ProCurve Network Access Controller 800 ProCurve Manager Plus software must be installed for IDM to operate.
About ProCurve Identity Driven Manager IDM Specifications If you want to test the IDM 3.0 functionality using the 60-day trial provided with the PCM 3.0 Auto-update package, you need to install the software on a separate system that has no previous IDM version installed or in use. When you upgrade to IDM 3.0, you need to manually install the IDM Agent upgrade on each of your RADIUS Servers. Refer to “Installing the IDM Agent” on page 2-2 for detailed instructions.
About ProCurve Identity Driven Manager Learning to Use ProCurve IDM Learning to Use ProCurve IDM The following information is available for learning to use ProCurve Identity Driven Manager (IDM): ■ This User’s Guide—helps you become familiar with using the application tools for access control management.
About ProCurve Identity Driven Manager Learning to Use ProCurve IDM 1-14
2 Getting Started Chapter Contents Before You Begin . . . . . . . . . . . . . . . . . . . . . . . . . . . . . . . . . . . . . . . . . . . . . . 2-2 Installing the IDM Agent . . . . . . . . . . . . . . . . . . . . . . . . . . . . . . . . . . . . . . 2-2 Using the IDM Auto-Discover Feature . . . . . . . . . . . . . . . . . . . . . . . . . . 2-5 IDM Configuration Process Overview . . . . . . . . . . . . . . . . . . . . . . . . . . 2-6 IDM Usage Strategies . . . . . . . . . . . . . . . . . . . . . . . . . . .
Getting Started Before You Begin Before You Begin If you have not already done so, please review the list of supported devices and operating requirements under “IDM Specifications” on page 1-10. If you intend to restrict user access to specific areas of the network using VLANs, make sure you have set up your network for use of VLANs. For details on configuring VLANs, refer to the HP ProCurve Manager Network Administrator’s Guide, or the Advanced Traffic Management Guide for your ProCurve switch.
Getting Started Before You Begin http://10.15.20.25:8040 2. Click the Download the Windows PCM/IDM agent link, and click Save to download the file. 3. Once the download completes, close the Download window and the web browser. 4. Open the downloaded procurve-agent-setup.exe file by double-clicking on it. The Agent Installation Wizard will then guide you through the installation. 5. On the Agent Information window of the Agent Installation Wizard: Figure 2-1. Agent Information a. Select IDM Agent. b.
Getting Started Before You Begin Figure 2-2. Server Information For the Agent to communicate with the PCM server, these values MUST MATCH the values set on the PCM server for this Agent. a. If the Agent will initiate connection to the PCM server, check the Agent Initiates Connection check box. If the PCM server will initiate a connection to the Agent, ensure this check box is unchecked.
Getting Started Before You Begin Once installed the IDM Agent begins collecting User, Realm, and RADIUS data. On a Linux System or ProCurve Network Access Controller To install the IDM Agent on a supported Linux system or ProCurve Network Access Controller: 1. Start a web browser, and type the IP address of the PCM server computer followed by a colon and the port ID 8040. For example, if the IP address of the server computer is 10.15.20.25, enter the following URL: http://10.15.20.25:8040 2.
Getting Started Before You Begin IDM Configuration Process Overview To configure IDM to provide access control on your network, first let IDM run long enough to "discover" the Realms, RADIUS servers, and users on your network. Once IDM has performed these tasks for you, your configuration process would be as follows: 1. If you intend to use them, define "locations" from which users will access the network. A location may relate to port-based VLANS, or to all ports on a device. (See page 3-7) 2.
Getting Started Before You Begin Authenticate Authorize Strategy Description VLAN QoS Rate- Network Limit Resources Monitor and report user activity.
Getting Started Before You Begin Understanding the IDM Model The first thing to understand, is that IDM works within the general concept of ‘domains’ or ‘realms’. Basically, realms are very large organizational units; every user belongs to one, and only one, realm. While it is possible to have multiple realms, most organizations have only one, for example, hp.com or csuchico.edu. The basic operational model of IDM involves Users and Groups.
Getting Started IDM GUI Overview IDM GUI Overview To use the IDM client, launch the PCM Client on your PC. Select the ProCurve Manager option from the Windows Program menu to launch the PCM Client. The PCM Client will start up and the Login dialogue is launched. Figure 2-3. PCM Login If you did not enter a Username or Password during install, type in the default Username, Administrator, then Click Login to complete the login and startup.
Getting Started IDM GUI Overview Figure 2-4. IDM Dashboard The IDM initial display provides a quick view of IDM status in the Dashboard tab, along with an Events tab, navigation tree, and access to menu and toolbar functions. You can resize the entire window, and/or resize the panes (subwindows) within the Identity Management Home window frame.
Getting Started IDM GUI Overview IDM Dashboard The IDM Dashboard is a monitoring tool that provides a quick summary view of IDM users, RADIUS servers, and events. The Dashboard can be viewed: • From within PCM by selecting Network Management Home and clicking the Identity Driven Manager tab. • By clicking the Identity tab at the bottom of the PCM navigation tree.
Getting Started IDM GUI Overview Using the Navigation Tree The navigation tree in the left pane of the IDM window provides access to IDM features using the standard Windows file navigation system. Click the nodes to expand the list and change the display in the right window panel. Figure 2-5. IDM Navigation Tree Realms The top level of the tree lists each of the Realms that have been discovered by an IDM Agent or defined manually.
Getting Started IDM GUI Overview Figure 2-7. Realm Dashboard tab Realm Dashboard: The Realm Dashboard is a monitoring tool that provides a quick summary view of IDM users and Agents. The Dashboard tab is similar to the IDM Dashboard but contains statistics for the selected realm only. The Agent Status pane contains a color-coded graph showing the number of currently active and inactive IDM agents installed on RADIUS servers for the selected realm.
Getting Started IDM GUI Overview The Top Talkers pane displays input octets (bytes), output octets, or both. Use the drop-down list in this pane to select whether to display input octets, output octets, or both. You can hide the legend for this pane by unchecking the Legend check box. The Logins per Hour pane is a scrolling 24-hour display that summarizes the total number of successful and failed IDM user logins for the selected realm at any given time during the past 24 hours.
Getting Started IDM GUI Overview The following information is shown on the Realm Properties tab: Realm Name Name used to identify the Realm Realm Alias Alternate name for the Realm (usually the NETBIOS name) Is Default Realm Whether the Realm is set as the default Realm: true means this Realm is the default Realm and false means it is not. The default Realm is used when IDM cannot determine the Realm for a RADIUS server or user login. Last Deployed Date and time the policy was last deployed.
Getting Started IDM GUI Overview Access Policy Groups: Click the Access Policy Group node to display the Access Policy Groups tab with a list of currently configured groups. You can also expand the node to view the APGs in the tree. Figure 2-10. Access Policy Groups tab Click the individual group node in the tree to display the group’s Dashboard, Properties, and Users tabs. The Dashboard tab is similar to the IDM Dashboard but contains statistics for the selected access policy group only.
Getting Started IDM GUI Overview RADIUS Servers: Clicking the RADIUS Servers node displays the RADIUS List tab, with status and configuration information for each RADIUS Server in the Realm that has an IDM Agent installed, or that is manually defined. Figure 2-12. RADIUS List tab You can expand the RADIUS Servers node to view the servers in the tree. Click the individual server to display the RADIUS Server Properties. Figure 2-13.
Getting Started IDM GUI Overview Toolbars and Menus Because IDM is a module within PCM, it uses the same Main Menu and Global toolbar functions. Individual tabs or windows within the IDM module also include separate component toolbars. The functions available in the component toolbar vary based on applicable functions for that component. Toolbar icons for disabled functions are grayed out. The component toolbar options are described under the process they support in the next chapter.
Getting Started Using IDM as a Monitoring Tool Using IDM as a Monitoring Tool Whether or not you configure and apply access and authorization parameters using IDM, you can use IDM to monitor user sessions on the network and generate usage reports. You can use the monitoring features along with the IDM Reports to track usage patterns, user session statistics, bandwidth usage, top users, and so on.
Getting Started Using IDM Reports Using IDM Reports IDM provides reports designed to help you monitor and analyze usage patterns for network resources. The report options are available from the Reports>User Access Control menu at the top of the window. Figure 2-15. IDM Reports Menu The Report wizard screens and report parameters vary, depending on the type of report selected. When you select a report using the Reports>User Access Control drop-down list, the Report wizard is launched.
Getting Started Using IDM Reports You can save the report to a file, or print the report. To apply customized Report Header information for your company, use the Reports option in the global preferences (Tools> Preferences> Reports). You can also schedule reports to be created at recurring intervals by creating a policy with PCM’s policy manager, as described in “Creating Report Policies” on page 2-24.
Getting Started Using IDM Reports authenticate the user has a endpoint integrity solution, the computer where the user logged in may be checked for integrity criteria such as up-to-date antivirus software and an authorized operating system. This report is especially helpful in identifying computers that require anti-virus, operating system, or other software installations/updates.
Getting Started Using IDM Reports To display the User Report select a username in the Users tab of the Access Policy Group or RADIUS Server window, and then click the User Report icon in the toolbar.
Getting Started Creating Report Policies Creating Report Policies You can also use the Policy Manager feature to schedule reports to be created at regular intervals, or in response to an event. For complete details on creating policies, refer to “Configuring Policies” in the HP ProCurve Manager Network Administrator’s Guide. The basic process for creating a Report Policy is: ■ Configure the Time periods when the report policy can be executed. If no time is specified, the policy can execute at any time.
Getting Started Creating Report Policies Figure 2-17. Policy Manager, Actions The Manage Actions window displays the list of defined Actions. 3. Click New... to launch the Create Action dialog: Figure 2-18.
Getting Started Creating Report Policies 4. Select the Report Manager:Generate Report Action type from the pull-down menu. Figure 2-19. Policy Manager, Select Action 5. Type a Name for the Action (required) and a brief Description (optional) 6. Click OK to save the Action and display the Action Properties tab. The properties you set in the previous step should appear. Figure 2-20.
Getting Started Creating Report Policies At this point the other tabs displayed are: Type: Lets you select the Report type you want to generate. As soon as you select a report type, additional tabs may appear in the window depending on the filter criteria for the report. Format: Lets you set the report output format Delivery: lets you select where the report will be sent (to file, e-mail, etc.) 7. Click the Type tab and select the IDM Report type you want included in the action.
Getting Started Creating Report Policies Figure 2-22. Report Manager Action: Report format selection • PDF Produce the report in .pdf format. To view this file format, you will need Adobe Acrobat Reader, which can be downloaded free from http://get.adobe.com/reader. • HTML Produce the report in .html format, which can be viewed with any Web browser. • CSV Produce the report using comma separated values with double quotes.
Getting Started Creating Report Policies Figure 2-23. Report Manager Action: Report Delivery method E-mail is the default method. It will e-mail the report to the address specified. It also requires that you have an SMTP profile for the e-mail address. See “Creating SMTP Profiles” in the HP ProCurve Manager Network Administrator’s Guide for details. Use the pull-down menu to select a different delivery method. Figure 2-24.
Getting Started Creating Report Policies e. In the Password field, type the password used to access the FTP site. f. Select the Filename conventions to use: – No timestamp in file name: Name the file exactly as entered in the Filename field. – Prepend timestamp to file name: Add the timestamp at the beginning of the filename entered in the Filename field – Append timestamp to file name: Add the timestamp at the end of the filename entered in the Filename field.
Getting Started Creating Report Policies To modify the IDM Session Cleanup Alert: 1. Click the Policies icon in the global (PCM and IDM) toolbar at the top of the window to display the Policy Manager window. 2. Click the Alerts node in the navigation tree to display the Manage Alerts panel. Figure 2-25. Manage Alerts: IDM Session Cleanup selection 3. Select the IDM Session Cleanup Policy and click the Edit... button to display the properties. Figure 2-26.
Getting Started Creating Report Policies 4. Click the Schedule tab to review and edit the schedule parameters. Figure 2-27. IDM Session Cleanup Schedule, alert configuration 5. Set the Start Date for enforcement of the policy. The default is the start date and time for IDM. You can type in a new date and time, or use the arrows to increase or decrease the date and time entries. Note that the time clock uses 24 hour format; thus a time of 22:00 is used to indicate a start time of 10:00 pm.
Getting Started Creating Report Policies 7. 8. Weekly Check the boxes for the days of the week you want to enforce the policy. Monthly Click the Last day of the month button to enforce the schedule on the last day of the month. OR Click the Day button and use the up or down arrows to select the day of the month. Click the radio button to select No end date, End by, or Maximum occurrences to identify when the schedule should end.
Getting Started User Session Information User Session Information You can use IDM to just monitor the network, and receive detailed information about user's access to the network. The User Session information provides statistics about exactly *how* the network is being used (when the user logged in and out, where a user logged in from, and how much bandwidth they consumed, for example).
Getting Started User Session Information The Session List provides a listing of recent sessions, including the following information: Active True if the user is currently logged in for this session or False if the session has ended Login Time Date and time the user logged in Login Successful True if the user logged in successfully or False if login failed Location Name of the location where the user logged in Access Profile Access profile assigned to the access policy group governing the user’s pe
Getting Started User Session Information Input octets Bytes received by the user during the session Output octets Bytes sent by the user during the session To track the user’s login location information for the session, click the Location Information tab.
Getting Started User Session Information Finding a User The Find User feature lets you search for and display information about a user by name or MAC address. The displayed information is similar to User Session Status information. To find information for a user or MAC address: 1. In the IDM navigation tree, right-click the Realms or Access Policy Groups folder to which the user or computer is assigned. Select Find User from the right-click menu. This launches the Find User window. Figure 2-29.
Getting Started User Session Information User Reports To review information for multiple sessions, run the User Report. 1. Select a username in the Users tab of the Access Policy Group or RADIUS Server window. 2. Click the User Report icon in the toolbar. This launches the Report Wizard, Report Filter window. Figure 2-30. Report Wizard, Report Filter 3. 2-38 To report a specific time range, uncheck the All Dates check box and select the Start Date and End Date.
Getting Started User Session Information Figure 2-31. Report Wizard, Columns to Include 4. Click the check boxes to select the data columns. If wireless settings are enabled the WLAN and BSSID options also appear. 5. Click Finish to run the report. The report is displayed in a separate window on the IDM Client. Show Mitigations The Show Mitigations window lists all NIM mitigations (actions taken to resolve security threats) for the selected user and is used to delete NIM mitigation rules.
Getting Started User Session Information Figure 2-32. Show Mitigations To show or delete mitigations: 1. In the IDM Users tab, right-click a mitigated user and choose Show Mitigations to display the Mitigations window. This function is selectable for mitigated users only. Mitigated users are identified by one of the following icons: User successfully logged in, but the session was mitigated in some way (e.g.
Getting Started User Session Information IDM Preferences The IDM Preferences window is used to set up global attributes for session accounting and archiving, as well as enabling the Endpoint Integrity option. Click the Tools menu and select Identity Management to display the Preferences, Global:Identity Management window. Figure 2-33. Global Preferences for IDM Click on the option check boxes to select (check) or deselect (blank) the option. 1.
Getting Started User Session Information Click to select the Disable automatic deploy to IDM agents option if you do not want to use automatic IDM configuration deployment. If you "disable" the Configuration Deployment option. in order for IDM configuration changes to take affect you will need to manually deploy the configuration to the IDM agent(s). 2. The Wireless Settings option is used to allow configuration of Identity Management features for select ProCurve wireless devices.
Getting Started User Session Information 7. To ignore capability override warnings generated by switches that don't support certain capabilities (e.g., VLAN, QoS, Bandwidth, and ACL overrides), check the Ignore device capability warnings checkbox. 8. To send only those attributes supported by the device, check the Only send supported device attributes to device checkbox. 9.
Getting Started User Session Information Figure 2-34. Identity Management Preferences: User Directory Settings. 2-44 1. Check the Enable automatic Active Directory synchronization check box, which enables the remaining fields and displays the current status of the connection between IDM and Active Directory (AD Status) at the bottom of the window. 2. In the Username field, type the Username for the Active Directory.
Getting Started User Session Information 5. To Add a group to the "Groups to Synchronize" list, click Add or Remove Groups... to display the Add or Remove Groups dialog. Figure 2-35. Active Directory Synchronization: Add or Remove Groups The Active Directory is queried for all groups in the domain and the groups are displayed in the "Groups in Active Directory" list.
Getting Started User Session Information 6. Select the Active Directory Groups you want to Synchronize to IDM, then click the >> button to move the groups to the "Groups to Synchronize" list. Use the Filter field to locate a group easily. To remove groups from the synchronization, select the group in the "Groups to Synchronize" and click the << button to move it to the "Groups in Active Directory" list. 7. Click OK to save the Groups to Synchronize and return to the User Directory Settings window. 8.
Getting Started User Session Information ■ Users deleted from Active Directory while synchronization is disabled are assigned to the default Access Policy group during the resynchronization process (instead of being deleted). This prevents users who were added by another method from being deleted. ■ Within a Realm, Access Policy Group names must be unique.
Getting Started User Session Information 2-48
3 Using Identity Driven Manager Chapter Contents IDM Configuration Model . . . . . . . . . . . . . . . . . . . . . . . . . . . . . . . . . . . . . . 3-3 Configuration Process Review . . . . . . . . . . . . . . . . . . . . . . . . . . . . . . . . 3-3 Configuring Identity Management . . . . . . . . . . . . . . . . . . . . . . . . . . . . . . 3-4 Configuring Locations . . . . . . . . . . . . . . . . . . . . . . . . . . . . . . . . . . . . . . . . . 3-6 Adding a New Location . . . . . . . . . . . . . . . . . .
Using Identity Driven Manager Adding RADIUS Clients . . . . . . . . . . . . . . . . . . . . . . . . . . . . . . . . . . . . . . . Deleting RADIUS Servers . . . . . . . . . . . . . . . . . . . . . . . . . . . . . . . . . . . . Adding New Users . . . . . . . . . . . . . . . . . . . . . . . . . . . . . . . . . . . . . . . . . . Using the User Import Wizard . . . . . . . . . . . . . . . . . . . . . . . . . . . . . . . . . Importing Users from Active Directory . . . . . . . . . . . . . . . . . . . . . . . .
Using Identity Driven Manager IDM Configuration Model IDM Configuration Model As described in the IDM model on page 2-8, everything relates to the top level, or Realm. Each User in the Realm belongs to an Access Policy Group (APG). The APG has an Access Policy defined for it that governs the access rights that are applied to its Users as they enter the network. The Access Policy is defined using a set of Access Rules.
Using Identity Driven Manager IDM Configuration Model 2. Define "times" (optional) at which users will be allowed or denied access. This can be by day, week or even hour. 3. If you intend to restrict a user’s access to specific systems, based on the system they use to access the network, you need to modify the User profile to include the MAC address for each system from which the user is allowed to login. 4.
Using Identity Driven Manager IDM Configuration Model 2. Click the Configure Identity Management icon in the Realms window toolbar. The Identity Management Configuration default display is the Access Profiles pane with the Default Access Profile. Figure 3-1. Identity Management Configuration, default display Click the node in the navigation tree to display the defined configuration parameters and add or edit new configuration parameters, as described in the following sections.
Using Identity Driven Manager Configuring Locations Configuring Locations Locations in IDM identify the switch and/or ports on the switch and wireless access points where users connect to the network. Users generally are allowed to log in to the network from a variety of locations, IDM allows you to create customized locations to match specific environments.
Using Identity Driven Manager Configuring Locations Adding a New Location To create a new location: 1. Click the New Location icon in the toolbar to display the new locations window. Figure 3-3. Create a New Location display 2. Type in a Name for the location. 3. Type in a Description for the location. To add wired devices to the location: 4. Click Add device... to open the New Device window, and define the devices and/or port combinations that will be included in the location.
Using Identity Driven Manager Configuring Locations Figure 3-4. New Device window 5. Use the Select Device Group drop-down list to select the Agent and device model that will be allocated to users logging in from the associated location. 6. Enter the Device to be added using the Device Selection pull-downs, or select the Manually enter device address option. Using the Device Selection option: a. Select a device group using the pull-down menu.
Using Identity Driven Manager Configuring Locations 7. Use the Port Selection to define the ports on the device that will be associated with the location. • Click to select Any port on the switch, or • Click Select ports, then use the pull down lists to select the Begin and End ports on the device that will be associated with the new location. If you manually entered the device address, the Begin port and End port pull-down menus are disabled, and you must manually enter the ports. 8.
Using Identity Driven Manager Configuring Locations Figure 3-5. Create a New Location, Wireless Devices 12. Click Add Device... to display the Wireless Devices Selection dialog. Figure 3-6. Select Wireless Device for a location 13. All discovered Radios and radio ports are displayed.
Using Identity Driven Manager Configuring Locations Click the check box to select the radio ports to be included in the location, and then click OK to save the selection and return to the Create a new Location (Wireless Devices tab) window. 14. Click OK in the Create a new Location window to save and exit, or repeat the steps to add additional devices to the location. Modifying a Location To edit the information for an existing Location: 1.
Using Identity Driven Manager Configuring Locations Deleting a Location To remove an existing Location: 1. Click the Locations node in the Identity Management Configuration navigation tree to display the Locations panel, with the list of defined locations. 2. Click on a location in the list to select it. 3. Click on the Delete Location icon in the toolbar to remove the location. The first time you use the Delete Location option, a warning pop-up is displayed.
Using Identity Driven Manager Configuring Times Configuring Times Times are used to define the hours and days when a user can connect to the network. When included in the Access Policy Group rules, the time can be used to allow or deny access from specific locations at specific time. For example, students might be allowed network access from the "Classroom" location during weekdays, from 9:00 am to 5:00 pm, but denied access from the Classroom at any other time. To configure a Time: 1.
Using Identity Driven Manager Configuring Times Figure 3-8. Times Properties Creating a New Time To configure a Time: 3-14 1. Click the Times node in the Identity Management Configuration navigation tree to display the Times panel. 2. Click the Add New Time toolbar icon to display the Create a new Time window.
Using Identity Driven Manager Configuring Times Figure 3-9. Create a New Time 3. Define the properties for the new time. Name Name used to identify the time Description Brief description of the time Time Time of day when user will be accepted on the network. To allow access the entire day, click the All day radio button. To restrict access to specific hours of the day, click the From radio button and type the beginning and ending times. The ending time must be later than the beginning time.
Using Identity Driven Manager Configuring Times Modifying a Time 1. Click the Times node in the Identity Management Configuration navigation tree to display the Times panel. 2. Click on a Time in the navigation tree to display the Time details in edit mode, similar to the Create a new Time panel. You can also select the Time in the list then click the Modify Time icon in the toolbar to display the modify panel. NOTE: 3. Modify the time parameters, as described in Table 3-1 on page 3-15. 4.
Using Identity Driven Manager Configuring Times Defining Holidays To add holidays for use when defining Times in IDM: 1. Click the Times node in the Identity Management Configuration navigation tree to display the Times panel. 2. Click the Holidays icon in the toolbar to launch the Holidays window. Figure 3-10. Holidays window 3. Click Add. to launch the Add Holidays window. Figure 3-11. Add Holiday 4. The Date field defaults to the current date.
Using Identity Driven Manager Configuring Network Resources Configuring Network Resources The Network Resources in IDM are used to permit or deny traffic to and from specified sources and destination. This is done by configuring an IP-based filter based on either: ■ The IP address (individual address or subnet address) of the source or destination, or ■ The protocol (IP, ICMP, VRRP, etc.) ■ The TCP or UDP port (i.e.
Using Identity Driven Manager Configuring Network Resources The Network Resources window lists the name and parameters for defined resources, including: Name Name used to identify the resource IP Address IP Address for the switch associated with the resource ("any" if the resource is being filtered by protocol). Network Mask The subnet mask for the IP Address. Ports Device port(s) associated with the resource or Any if the resource is being filtered by protocol.
Using Identity Driven Manager Configuring Network Resources Adding a Network Resource To define a Network Resource: 1. Click the Network Resources node in the Identity Management Configuration navigation tree to display the Network Resources panel. 2. Click the Add Network Resource toolbar icon to display the Define Network Resource window. Figure 3-14. Define Network Resource 3. Define the properties for the network resource.
Using Identity Driven Manager Configuring Network Resources Protocol: Select UDP, TCP, or IP to identify the protocol used to filter access to the resource. Protocol can be used alone or with an IP address and port parameters to define the network resource access.
Using Identity Driven Manager Configuring Network Resources Deleting a Network Resource To delete a Network Resource: 1. Click the Network Resources node in the Identity Management Configuration navigation tree to display the Network Resources panel. 2. Click in the list to select the network resource to edit, then click the Delete Network Resource toolbar icon. 3. Click Yes in the confirmation pop-up to complete the process.
Using Identity Driven Manager Configuring Access Profiles Configuring Access Profiles IDM uses an Access Profile to set the VLAN, QoS, Bandwidth (rate-limits) and Network Resource access rules that are applied to the user when they are authenticated on the network. This is where the real benefits of "access control" are realized. When users log in, the Access Profile dynamically configures the switch or wireless access point settings to provide the proper network access and resources for the user.
Using Identity Driven Manager Configuring Access Profiles Click the Access Profile node in the navigation tree, or double-click on a profile in the list to display the details of the selected profile.The Name, Description, and Access Attributes are the same as defined in the Access Profiles list.
Using Identity Driven Manager Configuring Access Profiles 3. Define the attributes for the Access Profile: Name Name used to identify the Access Profile Description Brief description of the Access Profile Untagged VLAN or Select the type of VLAN used for the access profile. Tagged VLANs To select an untagged VLAN, check the Untagged VLAN check box and select the VLAN that can be accessed from the dropdown list. Selecting a VLAN from the list grants the user access to that network segment only.
Using Identity Driven Manager Configuring Access Profiles 4. If you want the IDM QoS attributes to override the switch attributes, use the QoS drop-down list to select the quality of service or priority for outbound traffic of users in groups associated with the access profile. QoS ranges from lowest to highest, with Normal being the default. 5.
Using Identity Driven Manager Configuring Access Profiles Figure 3-18. Network Resource Assignment Wizard, Allowed Network Resources 9. To permit access to Network Resources: a. Select the Resource in the Available Resources list. Use shift-click to select multiple resources. b. Move the Available Resource(s) to the Allowed Resources list (click >>) c. Click Next to continue to the Denied Resources window.
Using Identity Driven Manager Configuring Access Profiles Figure 3-19. Network Resource Assignment Wizard, Denied Network Resources 10. To deny access to Network Resources: 3-28 a. Select the Resource in the Available Resources list. Use shift-click to select multiple resources. b. Move the Available Resource(s) to the Denied Resources list (click >>) c. Click Next to continue to the Priority Assignment window.
Using Identity Driven Manager Configuring Access Profiles Figure 3-20. Network Resource Assignment Wizard, Priority Assignment 11. Set the priority (order of evaluation) for the Network Resources. To change the priority, click the Resource in the list, then click Move down or Move up. The first rule to match is the one that will be applied. 12. Click Next to continue to the Default Access window. Figure 3-21.
Using Identity Driven Manager Configuring Access Profiles 13. Select the option to tell IDM what to do if there are no matches found in the network resource access rules. 14. Click Next to continue to the Resource Accounting window. Figure 3-22. Network Resource Assignment Wizard, Resource Accounting 15. Click the check box to enable the Accounting function (optional). This enables tracking of hits on this resource on the switch or access point. Use CLI on the switch to review the hits. 16.
Using Identity Driven Manager Configuring Access Profiles Figure 3-23. Network Resource Assignment Wizard, Summary 17. Click Finish to save the Network Resource Assignments to the Access Profile and close the wizard. Click Back to return to a previous window to change the assignment, or Click Cancel to close the wizard without saving the changes. Click Start Over to return to the start of the Network Assignment Wizard. Modifying an Access Profile To modify an existing Access Profile: 1.
Using Identity Driven Manager Configuring Access Profiles The changes are displayed in the Access Profiles list. NOTE: When modifying Access Profiles, make sure the appropriate VLANs are configured on the network and at the switch. If you Modify the VLAN attribute in an Access Profile that is currently used in an Access Policy Group rule, IDM will check that the VLAN exists. If not, an error message is displayed. Deleting an Access Profile To remove an existing Access Profile: 1.
Using Identity Driven Manager Defining Access Policy Groups Defining Access Policy Groups An Access Policy Group (APG) contains rules that define the VLAN, rate-limit (bandwidth), quality of service, and network resource access rules for users in the group, based on the time, location, and system from which the user logs in.
Using Identity Driven Manager Defining Access Policy Groups To begin, expand the Realms node to display the Access Policy Group node in the IDM tree. Click to display the Access Policy Groups tab. Figure 3-24. Access Policy Groups display You can expand the Access Policy Group (APG) node in the tree, and click the individual APG node to display the policy Properties tab. Figure 3-25. Access Policy Group Properties tab Creating an Access Policy Group 3-34 1.
Using Identity Driven Manager Defining Access Policy Groups Figure 3-26. New Access Policy Group 3. Type in a Name and Description for the Access Policy Group. 4. Click New... to display the New Access Rule dialogue. Figure 3-27. New Access Rule 5. Select an option from the pull down menu for each field. When all the parameters are set, click OK to save the Access Rule configuration and close the dialogue. The parameters for Access Rules are described in the following table.
Using Identity Driven Manager Defining Access Policy Groups Location Lists the Locations you created by name, and the "ANY" option. If you select ANY and the access profile for the rule points to a VLAN, ensure that the VLAN is configured on every switch to which users in this access policy group will be connecting Time Lists the Times you created by name, and the ANY option. System Systems from which the user can log in. ANY allows user to login in on any system.
Using Identity Driven Manager Defining Access Policy Groups IDM will verify that the rules in the APG are valid. If a rule includes a defined VLAN (from the Access Profile) and the VLAN does not exist on the network or devices for the location(s), an error message is returned and you must fix the problem before the APG can be saved. Click Cancel to close the window without saving the Access Policy Group configuration. 9. The new Access Policy Group is listed in the Access Policy Groups tab.
Using Identity Driven Manager Defining Access Policy Groups Figure 3-28. Access Rule with Endpoint Integrity options Select the Endpoint Integrity option to use with the access rule, as described in the following list. • Select ANY to apply the access rule regardless of the status passed from the endpoint integrity system. • Select PASS to apply the access rule in cases where the system the user is logged in on passes the endpoint integrity check.
Using Identity Driven Manager Defining Access Policy Groups Modifying an Access Policy Group 1. Click the Access Policy Group node in the IDM tree to display the Access Policy Groups tab. 2. Click on an Access Policy Group Name to select it. 3. Click the Modify Policy Group icon in the toolbar to display the Modify Access Policy Group window. 4. Modify the Rules as needed by selecting different options from the pulldown menus for each field. (see page 3-16 for field definitions). 5.
Using Identity Driven Manager Configuring User Access Configuring User Access The process of configuring User access to network resources using IDM is simplified through IDM’s ability to learn User information from the Active Directory or RADIUS server, and the use of Access Policy Groups.
Using Identity Driven Manager Configuring User Access Friendly Name User’s friendly name, if defined, else this is same as Username. Realm Realm in which the user logs in. Access Policy Group Access policy group to which the user is assigned. Last Login Attempt Date and time the user last attempted to log in, regardless if the login failed or succeeded. Adding Users to an Access Policy Group To assign a user to an access policy group: 1.
Using Identity Driven Manager Configuring User Access Changing Access Policy Group Assignments To re-assign users to a different APG: 1. Click the access policy group or realm in the IDM tree, and then click the Users tab in the Access Policy Group or Realm window. 2. Select the users in the list, then click the Add Users to APG icon in the toolbar to display the Select Access Policy Group window. 3. Select a different option from the Assign selected Users to Access Policy Group pull-down menu. 4.
Using Identity Driven Manager Configuring User Access Using Global Rules Global Rules can be used to provide an "exception process" to the normal processing of access rules via Access Policy Groups. IDM will check for Global Rules and apply them to the designated users before processing any access rules found in Access Policy Groups.
Using Identity Driven Manager Configuring User Access Creating a Global Rule is similar to creating Access Rules for an Access Profile Group. To create a global rule: 1. In the navigation tree, click on the realm that will use the global rule, then click the Global Rules tab in the Realm’s display. 2. Click the Add Global Rule button to display the New Global Rule window. Figure 3-32. Global Rules dialog 3.
Using Identity Driven Manager Configuring User Access 4. Set the Access Properties for the Global Rule. This is similar to the process used to define Access Policy Rules when you create an Access Policy Group (see page 3-34) a. Select the Location where the global rule will be applied, or "ANY". b. Select the Time when the global rule will be used, or "ANY". c. Select the System where the global rule will be used, or "ANY" d.
Using Identity Driven Manager Deploying Configurations to the Agent Deploying Configurations to the Agent An option in the IDM Preferences allows you to automatically deploy configuration changes to the IDM agent. Or, you can manually deploy changes made to Access Profiles, Locations, Times, or Network Resource configurations. If automatic deployment is disabled, you need to deploy the configuration information to the IDM Agent once you have configured the Access Policy Groups and assigned users.
Using Identity Driven Manager Using Manual Configuration Using Manual Configuration It is simplest to let the IDM Agent run and collect information about Realms, including RADIUS servers and users in the Realm from the RADIUS server, but you can also manually define information about the Realm, RADIUS servers, and users in the IDM GUI.
Using Identity Driven Manager Using Manual Configuration 3. Click Ok to save the Realm information and close the window. The new Realm appears in the Realms list, and the IDM Tree. Modifying and Deleting Realms To modify an existing Realm: 1. Select the Realm in the Realms list. 2. Click the Modify Realm icon on the Realm list toolbar to display the Modify Realm window. (similar to the New Realm window). 3. Edit entries as needed for the Realm: 4. a. The Name used to identify the realm. b.
Using Identity Driven Manager Adding RADIUS Clients Adding RADIUS Clients You can add and update RADIUS clients (ProCurve switches and manually added clients) on supported RADIUS servers used to enforce RADIUS authentication. This wizard allows you configure consistent RADIUS parameters on RADIUS servers and HP ProCurve switches. In addition, it detects possible conflicts between parameters already configured on the servers and the parameters you are configuring.
Using Identity Driven Manager Adding RADIUS Clients Selecting a single NAC800 Enforcement Server in a Management Server deploys the RADIUS settings to all Enforcement Servers associated with the Management Server. 4. Select the ProCurve switches to be configured as RADIUS clients on the selected RADIUS servers. Figure 3-36. Add RADIUS Client Wizard, Device Selection a. Use the drop-down list above the Available Devices list to display the devices by model. b.
Using Identity Driven Manager Adding RADIUS Clients 5. If duplicate IP addresses are found, select the action to take for duplicate IP addresses. Figure 3-37. Add RADIUS Client Wizard, Device Selection a. To update the existing client with parameters you specify, select Update All. b. To retain the existing client parameters and end the wizard, select Discard All. c. Click Next. As an example, suppose two RADIUS servers (S1, S2) and two RADIUS clients (C1, C2) are selected in the wizard.
Using Identity Driven Manager Adding RADIUS Clients RADIUS clients being excluded from the wizard. If you discard rows 1 and 2, C1 will be excluded from subsequent wizard steps. Only C2 will appear in subsequent wizard steps. All RADIUS clients being excluded from the wizard. If you discard all rows (1-4), C1 and C2 will be excluded from the wizard (based on the previous point), and because no other RADIUS clients were selected, the wizard cannot continue. 6.
Using Identity Driven Manager Adding RADIUS Clients To configure RADIUS parameters for a single client: a. In the RADIUS clients list on the left, select the RADIUS client that you want to configure. b. Check up to 3 RADIUS server parameters check boxes to represent the number of RADIUS servers where the selected client will be configured. c. For each server, use the RADIUS server drop-down list to select the short name of the RADIUS client in the RADIUS server.
Using Identity Driven Manager Adding RADIUS Clients The list of configuration changes can be cut and pasted to another location. 8. Apply the selected RADIUS parameters to the selected devices and RADIUS servers. The progress and result are shown as parameters are configured on each listed ProCurve switch or RADIUS server. To view a log of applications, click View Log. Figure 3-39. Add RADIUS Client Wizard, Application of Settings 9.
Using Identity Driven Manager Adding RADIUS Clients Deleting RADIUS Servers To delete an existing RADIUS Server: NOTE: Before you can completely delete the RADIUS server, you need to uninstall the IDM Agent on the server. Otherwise, the RADIUS server may be rediscovered, causing it to re-appear in the IDM tree. 1. Use the IDM Tree to navigate to the RADIUS List window, and select the RADIUS Server you want to delete in the list. 2. Click the Delete RADIUS icon on the Radius List toolbar. 3.
Using Identity Driven Manager Adding RADIUS Clients Adding New Users You can let the IDM Agent automatically learn about the users from the Active Directory or RADIUS server on which it is installed, or you can define user accounts in the IDM Client. You can also use the IDM User Import feature in the Tools menu. Adding users in IDM: Manual Process To add a new User in IDM: 1.
Using Identity Driven Manager Adding RADIUS Clients 3. If you want to restrict the user’s access to specific systems, click the Systems tab to configure system permissions. Otherwise click OK to save the user and close the window. Configuring User Systems 1. To restrict the user’s access to specific systems, click the Systems tab. Figure 3-42. User Systems tab display You select from systems shown in the All Systems list, and click the >> button to move them to the Allowed Systems list.
Using Identity Driven Manager Adding RADIUS Clients Modifying and Deleting Users To modify an existing User: 1. Select the User in the User List and click the Modify User icon in the toolbar. 2. The Modify User window (similar to the Define a new user window) displays. 3. Edit entries as needed for the User: • Username: The user’s login name (required). • Friendly Name: Friendly name for the user. • Realm: Select the Realm the user "belongs" to, if different from the default realm.
Using Identity Driven Manager Using the User Import Wizard Using the User Import Wizard The IDM User Import Wizard lets you add users to IDM from another source, such as an Active directory or LDAP server. The IDM Import Wizard also synchronizes the IDM user database with the import source directory, and allows you to delete users from the IDM user database that are not found in the import source directory.
Using Identity Driven Manager Using the User Import Wizard Importing Users from Active Directory Importing users from Active Directory with the IDM Import Wizard synchronizes IDM users with those in Active Directory, similar to enabling Active Directory synchronization. However, if you use the Wizard to import users, user changes in Active Directory are not monitored. And, you cannot select specific Active Directory groups, as with Active Directory synchronization.
Using Identity Driven Manager Using the User Import Wizard Figure 3-44. IDM User Import Wizard, Data Source 3. Click the radio button to select the Active Directory data source. 4. Click Next to continue to the Group Scope window. Figure 3-45.
Using Identity Driven Manager Using the User Import Wizard 5. Select the scope of Active Directory groups that you want to import user data from. All Import users from all Active Directory groups Global Import users from the Global Active Directory group. This will also get user data from any custom defined group in your Active directory.
Using Identity Driven Manager Using the User Import Wizard Figure 3-47. IDM User Import Wizard, Add Users 10. Click the Select checkbox to choose the users you want to import from the Active Directory to IDM. The current Import data is compared to the existing user list in IDM. If no new (additional) users are found in the import data, the user list is empty. If any user exists in more than one Active Directory group, you will be prompted to select the group the user will belong to in IDM. a.
Using Identity Driven Manager Using the User Import Wizard 12. Click Next to continue to the Users and Groups Commitment window. Figure 3-48. IDM User Import Wizard, Users and Groups Commitment 13. Click Go to save the selected group and user data (adds and deletes) to IDM. 14. When the commit data function is done, click Next to continue to the Import Complete window. A summary of the IDM Import displays. 15. Click Finish to exit the wizard.
Using Identity Driven Manager Using the User Import Wizard Figure 3-49. IDM User Import Wizard, LDAP Authentication a. Note: To use the SSL authentication method, check the Use SSL checkbox. To use SSL, ensure that your LDAP server supports SSL. The X509 certificate for your LDAP server must be installed in your Java trust store, and the PCM server must be restarted after installing the certificate. Contact your (LDAP) Administrator to get the certificate.
Using Identity Driven Manager Using the User Import Wizard b. c. Select the LDAP Authentication type to be used with the imported user data: Simple Simple authentication, which is not very secure, sends the LDAP server the fully qualified DN of the client (user) and the client's clear-text password. Digest-MD5 In Digest MD5, the server generates a challenge and the client responds with a shared secret (password).
Using Identity Driven Manager Using the User Import Wizard Figure 3-50. IDM User Import Wizard, Simple Authentication To set up Simple authentication: 1. In the Server field, type the IP address or DNS name of the LDAP server 2. In the Domain field, type the domain name. (It will be used to create a realm in IDM.) 3. Optionally, in the Base DN field, type the Base Distinguished Name. IDM will search only for users and groups from this node of a directory tree. 4.
Using Identity Driven Manager Using the User Import Wizard Figure 3-51. IDM User Import Wizard, SASL Digest MD5 Authentication To set up Digest MD5 authentication: 1. In the Server field, type the DNS name of the LDAP server. 2. In the Domain field, type the domain name. It is used to create a realm in IDM. 3. Optionally, in the Base DN field, type the Base Distinguished Name. IDM will search only for users and groups from this node of a directory tree. 4.
Using Identity Driven Manager Using the User Import Wizard Figure 3-52. IDM User Import Wizard, SASL Kerberos V5 Authentication To set up Kerberos V5 authentication: 1. In the Server field, type the IP address or DNS name of the LDAP server. 2. In the Domain field, type the domain name. It will be used to create a realm in IDM. 3. Optionally, in the Base DN field, type the Base Distinguished Name. IDM will search only for users and groups from this node of a directory tree. 4.
Using Identity Driven Manager Using the User Import Wizard Figure 3-53. IDM User Import Wizard, SASL External Authentication To set up External authentication: 1. In the Server field, type the DNS name of the LDAP server. 2. In the Domain field, type the domain name. It is used to create a realm in IDM. 3. Optionally, in the Base DN field, type the Base Distinguished Name. IDM will search only for users and groups from this node of a directory tree. 4.
Using Identity Driven Manager Using the User Import Wizard Importing LDAP X509 User Certificates into a Keystore: If you are using a JKS Keystore, the X509 User Certificate must be installed in a keystore on the IDM server. You can get the X509 User Certificate from your LDAP Administrator. For example, if the X509 User Certificate is " myldapcert.
Using Identity Driven Manager Using the User Import Wizard 2. In the Domain field, type the domain name. 3. Optionally, in the Base DN field, type the Distinguished Name. IDM will search only for users and groups from this node of a directory tree. 4. Click Next to continue to the Extract Users and Groups window. The remainder of the process for importing users from LDAP Servers is the same as described for importing users from Active Directories. • Select the Groups and Users to Import to IDM.
Using Identity Driven Manager Using the User Import Wizard KERBEROS_AUTH_MODULE=IDMKerberos // Kerberos authentication module name. If this entry is changed, you must also change the module name in idm_kerberos_jass.conf file. KERBEROS_JAAS_CONFIG_FILE=config/ idm_kerberos_jaas.conf // configuration file for JAAS Kerberos configuration. } } LDAP_DIRECTORY_CONFIG { // Configuration for LDAP directory. Following values are for Active Directory.
Using Identity Driven Manager Using the User Import Wizard Importing Users from XML files If you select to import users from an XML File, the XML Data Source window displays. NOTE: The XML file containing user data must reside on the IDM server to use this option and contain information similar to the data shown in the “XML User Import File Example” on page 3-75. Figure 3-55. IDM User Import Wizard, XML Data Source To identify the XML file: 1.
Using Identity Driven Manager Using the User Import Wizard XML User Import File Example XML files used to import user data to IDM should have the following format. ... ...
Using Identity Driven Manager Using the User Import Wizard 3-76
4 Using the Secure Access Wizard Chapter Contents Overview . . . . . . . . . . . . . . . . . . . . . . . . . . . . . . . . . . . . . . . . . . . . . . . . . . . . . 4-2 Supported Devices . . . . . . . . . . . . . . . . . . . . . . . . . . . . . . . . . . . . . . . . . . 4-2 Using Secure Access Wizard . . . . . . . . . . . . . . . . . . . . . . . . . . . . . . . . . . .
Using the Secure Access Wizard Overview Overview The Secure Access Wizard (SAW) feature in IDM is designed to simplify the initial setup of IDM by reducing the complexity of securing the network edge. SAW facilitates the process of securing the network edge by targeting a group of devices and using a highly intuitive GUI to configure network access rather than configuring each device via CLI.
Using the Secure Access Wizard Using Secure Access Wizard Using Secure Access Wizard NOTE: The following section provides instructions on using the Secure Access Wizard to configure access security settings on ProCurve devices that support port-based user authentication using 802.1X, Web-Auth, or MAC-Auth. For a more complete description of implementation of these user authentication features, please refer to the Access and Security Guide for the switch.
Using the Secure Access Wizard Using Secure Access Wizard When you first open the wizard, the Load Settings and Load template buttons are disabled. Once you have created and saved an access control configuration, these buttons will be enabled. 2. Note: Click Next to continue to the Device Selection window.
Using the Secure Access Wizard Using Secure Access Wizard Tip : To begin, ProCurve recommends that you select only one or two devices, and then save the security access settings as a template that can be applied for other devices of the same type. 4. Click Next to continue to the next window. 5. If you selected one or more AP530 wireless devices, the 530 Group Configuration Check Step window appears and displays information about each selected AP530 that supports the group configuration feature.
Using the Secure Access Wizard Using Secure Access Wizard • The device is too old • The firmware is out of date • The device is not a ProCurve device • The device is a wireless AP with no radios or SSIDs discovered Use the Device Capabilities link to determine if you can upgrade the device software to a version that supports the secure access settings. 7. To filter the list to display only devices for one device group (model), select the device group from the Available devices drop-down list. 8.
Using the Secure Access Wizard Using Secure Access Wizard Figure 4-4. Secure Access Wizard, Authentication Method Selection example 14. Click the check box to select the authentication method (802.1X, WebAuth, or MAC-Auth) to be used for user (client) access to the device. Click the Select All option at the top of the column to apply the same authentication method to all devices that support it.
Using the Secure Access Wizard Using Secure Access Wizard Figure 4-5. Secure Access Wizard, Port Selection example 16. To select ports from a list, click the Select Ports button and then click the Select all button to select all ports or check the Selected checkbox for each port to which the secure access settings will apply. Double-clicking a row selects or unselects the port.
Using the Secure Access Wizard Using Secure Access Wizard Figure 4-6. Secure Access Wizard, Select Ports When the desired ports are selected, click OK to validate and save your selections. 17. To manually enter port numbers, in the Port to secure field, type the ports to which the secure access settings will apply. Enter any combination of single port numbers and port ranges separated by commas. For example, type A1,A3-A5,A7 to apply the access settings on ports A1, A3, A4, A5, and A7.
Using the Secure Access Wizard Using Secure Access Wizard 18. Click Next to continue. The next window display will vary based on the devices and authentication methods selected. • If you selected a wireless device, the WLAN selection window displays, as described in step 9. • If you selected only wired devices, the authentication configuration window displays. – For 802.1X, go to step 12. – For Web-Auth, go to step 13. – For MAC-Auth, go to step 14. 19.
Using the Secure Access Wizard Using Secure Access Wizard 22. The 802.1X configuration window lets you select the authentication method to be applied in the secure access settings for the selected devices. Figure 4-8. Secure Access Wizard, 802.1X Configuration display The configuration options displayed will vary based on the selected device set: wired, wireless, or both. a. Select the authentication method for the selected device types. Only one method can be applied. For Wired devices the 802.
Using the Secure Access Wizard Using Secure Access Wizard c. Click the Advanced Settings for Wired 802.1X to configure the advanced settings. Figure 4-9. Secure Access Wizard, Advanced Settings for Wired 802.1X d. Click the check box to select the setting to configure, then enter the parameter to be applied. When a parameter is configured, the Reset to default values option is enabled. Click the link to restore the advanced settings for wired 802.1X defaults. Advanced 802.
Using the Secure Access Wizard Using Secure Access Wizard Re-auth period - The re-authentication timeout (in seconds, default 0), set to 0 to disable re-authentication. Valid values are 0-999999999. Quiet period - The period of time the switch does not try to acquire a supplicant. Valid values are 0-65535, the default value is 60 sec. Unauth-vid - The VLAN to which the port is assigned when the user has not been authorized by 802.1x authentication.
Using the Secure Access Wizard Using Secure Access Wizard a. Click the radio button to select the RADIUS authentication protocol. Only one method can be applied, either: – Use PAP-capable RADIUS server for Web-Auth – Use CHAP-capable RADIUS server for Web-Auth b. Click the Advanced Settings for Wired Web-Auth to configure the advanced settings for Web-Auth on wired devices. (see figure 4-11 on the next page) c.
Using the Secure Access Wizard Using Secure Access Wizard DHCP address and mask - The base address and mask for the temporary pool used by DHCP (base DHCP address default is 192.168.0.0, and the mask default is 24 - 255.255.255.0). Redirect URL - The URL that the user should be redirected to after successful login. The default is no redirect (blank field). DHCP lease - The lease length (days) of the IP address issued by DHCP (default 10). Valid values are 5-25.
Using the Secure Access Wizard Using Secure Access Wizard e. Click Next in the configuration window to continue to the Authentication Servers step. 24. The MAC-Auth Configuration window lets you select the MAC Address format to be applied for RADIUS requests in the secure access settings for the selected devices. Figure 4-12. Secure Access Wizard, MAC-Auth Configuration display 4-16 a. Select the MAC address format. b.
Using the Secure Access Wizard Using Secure Access Wizard Figure 4-13. Secure Access Wizard, Advanced (wired) Mac-Auth settings c. Click the check box to select the setting to configure, then enter the parameter to be applied. When a parameter is configured, the Reset to default values option is enabled. Click the link to restore the advanced settings for wired MAC-Auth defaults.
Using the Secure Access Wizard Using Secure Access Wizard Unauth-vid - The VLAN to which the port is assigned when the user has not been authorized by MAC authentication. Valid values are any defined VLAN, the default value is VLAN 1. Auth-vid - The VLAN to which the port is assigned when the user has been authorized by MAC authentication. Valid values are any defined VLAN, the default value is VLAN 1.
Using the Secure Access Wizard Using Secure Access Wizard The IP address will be validated. If it is invalid or a duplicated IP, a text message indicating the error is displayed. You cannot continue until a valid IP address is entered. Note: If you had previously configured other RADIUS servers for authentication with the device, that information will be over-written by the Secure Access Wizard.
Using the Secure Access Wizard Using Secure Access Wizard If not using the same shared secret on all the devices, enter the Radius shared secret for each device in the list. Use the scroll bar as needed to move down the list. You will not be able to continue until the RADIUS shared secret is set for each device in the list. 28. When you have entered the RADIUS shared secret, click Next to select the devices that will be added to each of the previously selected RADIUS servers as RADIUS clients. 29.
Using the Secure Access Wizard Using Secure Access Wizard The data fields are the same for both the Save Settings, and Save Template dialog. Figure 4-17. Secure Access Wizard, Save Settings dialog 35. Type in a Name to apply to the secure access settings file, and (optionally) a description. You can use the same name for a "save template" and a "save settings" file, but no two "saved templates", or "saved settings" files can have the same name. 36.
Using the Secure Access Wizard Using Secure Access Wizard Figure 4-18. Secure Access Wizard, Configuration Preview display 39. Review the access security configuration settings, using the scroll bar as needed to move through the information. 40. If the configurations are correct, click Next to apply the settings to the devices.
Using the Secure Access Wizard Using Secure Access Wizard Figure 4-19. Secure Access Wizard, Applying Settings status This window displays the progress of applying the security settings to the selected devices, and will indicate if any errors occur during the process. Click the View Log button to display process status messages and errors. Click Abort to halt application of the security settings before the process is started on the next device in the list.
Using the Secure Access Wizard Using Secure Access Wizard 4-24
5 Troubleshooting IDM Chapter Contents IDM Events . . . . . . . . . . . . . . . . . . . . . . . . . . . . . . . . . . . . . . . . . . . . . . . . . . . 5-2 Pausing the Events Display . . . . . . . . . . . . . . . . . . . . . . . . . . . . . . . . . . . 5-4 Using Event Filters . . . . . . . . . . . . . . . . . . . . . . . . . . . . . . . . . . . . . . . . . . 5-5 Viewing the Events Archive . . . . . . . . . . . . . . . . . . . . . . . . . . . . . . . . . . . 5-7 Setting IDM Event Preferences . . . . . . . .
Troubleshooting IDM IDM Events IDM Events The IDM Events window is used to view and manage IDM events generated by the IDM application or the IDM Agent installed on a RADIUS server. This window helps you quickly identify IDM-related problems in your network. To view the IDM events, click the Events tab in the IDM Home display. Figure 5-1. IDM Events tab The IDM Events tab works similarly to the PCM Events tab. It lists the IDM events currently contained in the database.
Troubleshooting IDM IDM Events Sortable columns of information are available for each event: Column Heading Description Source This column contains the name or IP address of the component or device that generated the event. This column contains the name of the application component or device that generated the event. This column also contains colorcoded icons that indicate: Connected Warning Unreachable From unknown device Severity The Severity column shows the severity of each event.
Troubleshooting IDM IDM Events Select an event in the Events listing to display the Event Details at the bottom of the window. Figure 5-2. IDM Event Details The details provide additional event description information. The details will vary based on the type of event. Use the scroll bar or drag the top border of the Event Details section to review the entire event description. Acknowledging an event indicates that you are aware of the event but it has not been resolved.
Troubleshooting IDM IDM Events The Pause will toggle to the "Resume" icon. Click the resume button to restart the events display. The button will toggle back to the Pause icon. Using Event Filters The events shown in the Events tab view can be filtered to show only specific events based on the device that generated the event, severity, dates and times of occurrence, or description. Click the Filtering icon to display or hide the Filters at the top of the Events tab.
Troubleshooting IDM IDM Events 3. 5-6 To deactivate a setting in the current filter: a. If the Filtering pane is not displayed, click the + next to Filtering. b. Unselect any filters that you want to remove. c. Click Apply. 4. To clear all selections that are currently set in the filters, click Clear. This does not affect saved filters. 5. To clear current entries in the Filters section (that have not yet been saved) and go back to the last saved filter settings, click Revert.
Troubleshooting IDM IDM Events Viewing the Events Archive The Archived Events window lists details for each event in the Archive Log, which contains events that have been deleted. The events displayed can be filtered by the date the event was generated. The Archived Events window also lets you generate an Archived Events Report that can be saved to disk or printed. Archiving of IDM events can be disabled on the IDM Event Preferences window.
Troubleshooting IDM IDM Events The Archived Events window provides the following information for each event: Source System, or IP address of the device that originated the event Severity Severity level of the event: Informational, Warning, Minor, Major, Critical (listed in order of severity from lowest to highest) Date Received Time and date the event was received Description Descriptive information contained in the event You can select the date range for displayed events by clicking the Date dropd
Troubleshooting IDM IDM Events Setting IDM Event Preferences Use the IDM Event Preferences to set up archiving and automatic deletion of events from the IDM Events tab and RADIUS Server Activity Logs. To configure preference settings for IDM events: 1. Select the Identity Management, Events option in the Global Preferences window (Tools–>Preferences–>Identity Management–>Events) to display the IDM Events Settings window. Figure 5-5. Preferences, IDM Events 2.
Troubleshooting IDM IDM Events For example, Informational events is set to 60 percent. When the archive file reaches the archive storage limit and there are more than 600 Informational events, the oldest Informational event is deleted. To ensure you maintain all Critical and Major events, set the total of the two types to 100 percent (e.g., 60 and 40), and set the other severity types to 0 percent. 3. To archive events when the maximum storage size is reached, check the Archive IDM events check box.
Troubleshooting IDM IDM Events Figure 5-6. RADIUS Server Activity Log The Activity Log provides information similar to the IDM Events, except that the entries are specific to the selected server. See “IDM Events” on page 5-2 for additional information. You can acknowledge and delete events, but you cannot "filter" entries in the Activity Log.
Troubleshooting IDM Using Decision Manager Tracing Using Decision Manager Tracing IDM provides a tracing tool (DMConfig.prp) and log file (DM-IDMDM.log) to assist with troubleshooting IDM problems that may occur. These files are included on the IDM Agent when it is installed on the RADIUS server. Note that the Decision Manager (DM) is an internal component of the IDM Agent. The default configuration has the tracing options turned off because of the performance degradation when tracing is used.
A Using ProCurve Network Access Controller with IDM About ProCurve Network Access Controller 800 The ProCurve Network Access Controller 800 (ProCurve NAC) provides a comprehensive access control solution. Used in conjunction with ProCurve Manager Plus and Identity Driven Manager applications, the ProCurve NAC serves to: ■ Protect the network and resources from unauthorized or harmful users and/or systems.
Using ProCurve Network Access Controller with IDM About ProCurve Network Access Controller 800 Before You Begin For information on installing the ProCurve NAC appliance, please refer to the ProCurve Network Access Controller 800 Hardware Install Guide, and/or the information provided with your "ProCurve Network Access Controller Endpoint Integrity Implementation Startup Service" Use of the ProCurve NAC requires that you already have a licensed version of PCM+ 2.2 and IDM 2.2 installed.
Using ProCurve Network Access Controller with IDM Using the NAC Tab Displays Using the NAC Tab Displays Once the ProCurve NAC appliance is installed on the network, PCM discovery will find the appliance and create a node in the PCM navigation tree. A folder for the ProCurve Network Access Controllers is also created in the IDM tree, under the Realms folder at the same level as a RADIUS server, with nodes for each NAC (master server) device.
Using ProCurve Network Access Controller with IDM Using the NAC Tab Displays Setting the ProCurve NAC GUI Login In addition to the "NAC" tabs in the IDM window, the Global Preferences for Identity Management are expanded to include support for automatic login to the ProCurve Network Access Controller application via PCM and IDM. Figure A-2.
Using ProCurve Network Access Controller with IDM Using the NAC Tab Displays Using the NAC Home Tab The NAC Home tab launches the ProCurve NAC GUI within the IDM display. Figure A-3. Network Access Controller (NAC Home) display. From this point you can access all of the functionality provided with the ProCurve Network Access Controller application. For details on using the application, refer to the online help, or the ProCurve Network Access Controller 800 User’s Guide.
Using ProCurve Network Access Controller with IDM Using the NAC Tab Displays Click the NAC Monitor tab to launch the ProCurve NAC "System Monitor" window within the IDM display. Figure A-4. ProCurve NAC 800 System Monitor (NAC Monitor) display. The NAC Monitor window provides information on the Network Access Controllers deployed for the endpoint integrity solution, including: status for Enforcement Clusters, Enforcement Servers, access mode, endpoint test status, etc.
Using ProCurve Network Access Controller with IDM Using the NAC Tab Displays Figure A-5. ProCurve NAC 800 System Configuration (NAC Configuration) display. The ProCurve NAC 800 System Configuration window provides access to the tools needed to configure the RADIUS server, as well as configuration of Servers, User accounts, Licensing, and Quarantining methods for use in endpoint integrity testing. This window also provides access to Maintenance tools, including the system backup and restore functions.
Using ProCurve Network Access Controller with IDM Using Local Authentication Directory on ProCurve NAC Using Local Authentication Directory on ProCurve NAC When using the ProCurve NAC 800 appliance for RADIUS authentication and the IDM Agent, you can enable a Local Authentication Directory for the realm that the ProCurve NAC supports. To enable Local Authentication Directory on a ProCurve NAC: 1.
Using ProCurve Network Access Controller with IDM Using Local Authentication Directory on ProCurve NAC Adding Locally Authenticated Users The only difference in IDM between a user that is locally authenticated on a ProCurve NAC, and a user that is authenticated by an enterprise user directory is a password. That is, you must enter a password when creating a locally authenticated user. This is due to a NOT NULL constraint on the password column of the user table on the ProNAC database.
Using ProCurve Network Access Controller with IDM Using Local Authentication Directory on ProCurve NAC Figure A-7. User Properties, with Local Authentication Directory 2. Enter the user information as you regularly would (see “Adding New Users” on page 3-56), then click the Set password... link to launch the user password dialog. Figure A-8. Change User Password A-10 3. Type in the Password that will be used for authentication on the local directory.
B IDM Technical Reference Device Support for IDM Functionality Due to variations in hardware and software configuration of various ProCurve Devices, not all IDM [Access Profile] features are supported on all devices. The following table indicates IDM functionality supported by ProCurve Device type at the time this manual was printed.
IDM Technical Reference Device Support for IDM Functionality Support for Secure Access Wizard Feature IDM Device Feature Matrix ProCurve Device ACL's VLAN QoS BW MAC Web 802.1X 802.1X Auth Auth port-based X X X 420 AP 520 AP X X X X 530 AP X (5) 2500 series X X X (4) 2600 series (PWR included) X X X (2) 2800 series X X X X 3400cl X X X X X 3500 X 4100gl series X X X X 4200 6100 series X 6108 X X 6200 X X X X X 6400cl X (1) X X X X 5300xl X X X X X 5400 9300 9400 WESM 1.0 X WESM 2.
IDM Technical Reference Best Practices Best Practices Authentication Methods The IDM application is designed to support RADIUS server implementation with 802.1x using supplicants, as well as Web-auth and MAC-auth. However to gain the full benefits of using IDM, HP advises that you implement RADIUS using an 802.1x supplicant. If you use Web-auth or MAC-auth, you can still use IDM to provide authorization and access control, but the user session accounting will not work.
IDM Technical Reference Best Practices Handling Unknown or Unauthorized users If a user is authenticated in RADIUS, but is unknown to IDM, IDM will not override RADIUS authentication and default switch settings, unless you configure it to do so. Also, if IDM rejects the user, but you have set "unauth-vid", then the port will still be opened and the VLAN will be set to the unauth-vid. You can also create a "guest" profile in IDM to provide limited access for unknown users. Allowing vs.
IDM Technical Reference Best Practices In this instance, if the user attempts to login in during the times specified for the Weekends, they will be rejected, and an IDM event will be logged indicating that the APG had a specific Reject rule set to deny access. If the user logs in at times not specified for the weekend, since the time in the first rule does not match, IDM moves to the second rule.
IDM Technical Reference Types of User Events Types of User Events The USER_FAILED_LOGIN event happens whenever RADIUS sends IDM a message of an unsuccessful login. This can have various sources, which you can review in the Event Details. It can be either because IAS didn’t let the user log in (bad username, password, etc.) or because IDM rejected the login.
Index Numerics B 802.
H Holidays 3-17 I IDM Agent tracing 5-12 IDM authorization policy 3-46 IDM model 3-3 IDM Statistics 2-22 Import from Active Directory 3-60 Import procedure 3-59 Importing Users 3-60 with XML files 3-74 K Kerberos V5 authentication 3-68 L LDAP Authentication 3-66 LDAP Directory settings 3-72 LDAP Server Digest-MD5 Authentication 3-67 External Authentication 3-69 Kerberos-V5 Authentication 3-68 Simple Authentication 3-66 LDAP server import 3-59 LDAP_Server_Config 3-73 Local Authentication Directory A-8 Loc
Rules, evaluation 3-36 User Systems 3-57 Users tab 3-40 S SASL Digest MD5 authentication 3-67 Save Settings, SAW 4-21 Save Template, SAW 4-21 SAW 4-2 Secure Access Wizard 4-2 Session Cleanup 2-30 Session History 2-22 Session Information 2-35 Session List 2-35 Show Mitigations 2-39 Simple authentication 3-66 W Web-Auth Configuration, SAW 4-13 WLAN selection, SAW 4-10 X XML file, user import 3-74 XML Import File format 3-75 T tagged 1-5 tagged VLAN 3-25 tagged VLANs 1-5 Target Properties 3-44 Times 3-13
ProCurve 5400zl Switches Installation and Getting Startd Guide Technology for better business outcomes To learn more, visit www.hp.com/go/procurve/ © Copyright 2004, 2005, 2007, 2009 Hewlett-Packard Development Company, L.P. The information contained herein is subject to change without notice. The only warranties for HP products and services are set forth in the express warranty statements accompanying such products and services. Nothing herein should be construed as constituting an additional warranty.