
Owner's manual
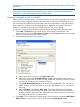

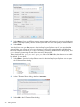

The Advanced Settings... button opens project properties for the project you are about to
create. Project properties let you change tool options, environment variables, and other project
settings. These settings are available after you create a project by selecting your project in
the NonStop Project Explorer view and then selecting Properties from the context menu.
Leave this page unchanged for now.
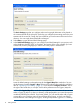
8. Select Finish. NSDEE will now create your project. A project folder icon representing your
project will be displayed in the NonStop Project Explorer view. Expand the folder to see the
contents of your project. For information about how to build, deploy, and launch your project,
skip ahead to “Building, deploying, and launching a project” (page 33) in this chapter.
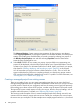
You will notice that your project contains a folder named Includes. This is a link to the
system include directory of the cross compilers and tools you chose during project creation.
CDT uses this link to help build a database of C and C++ symbols. For more information, see
“Ensuring the C/C++ indexer runs” (page 29).
Creating a managed project from existing sources
There are a number of ways you can create managed projects that you can use to build and
manage existing application sources. Important considerations include where you want your sources
to reside (inside or outside of your workspace) and how the existing sources were built previously.
If the existing source base consists of ETK projects, consider using the Import ETK Projects wizard.
The Import ETK Projects wizard imports not only your sources, but also many tool settings, such as
compiler and linker options. For details, see “Importing ETK projects” (page 69).
This section provides examples of how to create managed projects from existing sources for two
scenarios: the first creates a project and uses sources outside your workspace, the second copies
the sources into your workspace. The first example uses a sample program named Car , the second
18 Getting Started