
Owner's manual
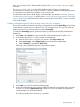

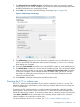


5. Select Next >. If you would like to enter a remote system and location (so you can try deploying
GeneralCpp to a NonStop system), select a remote system and user now and specify a remote
location.
6. Select Finish.
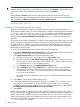
Now you need to import the sources for GeneralCpp into your project. To do so, perform the
following steps:
1. Select the GeneralCpp project folder in the NonStop Project Explorer view.
2. Select Import... from the context menu for the NonStop Project Explorer view to open the Import
wizard.
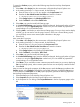
3. In the Import wizard, expand the general folder and select File System.
4. Select Next > to continue to the File system wizard page.
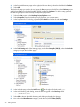
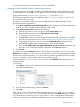
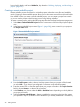
5. In the File system wizard page, enter the following location in the From directory: field:
C:\Examples\GeneralCppSources
6. A folder for GeneralCppSources will appear in the left-hand list box. Expand the folder but
do not select its check box.
7. Under GeneralCppSources, select the check boxes for the include and source directories.
8. Select Finish.
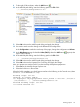
The include and source directories should now appear under the GeneralCpp project folder.
For information about how to build, deploy, and launch GeneralCpp, skip ahead to “Building,
deploying, and launching a project” (page 33) in this chapter. But first, refer to “Viewing and
changing properties of managed projects” (page 30), as the build will fail unless you specify the
location of the headers directory to the cross compiler.
Creating multiple projects to build a single application
Using multiple projects to build an application can give you more flexibility in how you build an
application. For example, if you have a multi-language application, it allows you to group differing
language files in different projects.
This section provides an example of creating a multi-project application, where one project named
CarParts creates a linkfile and the other project, named Car, links the linkfile into the main
application.
22 Getting Started