
User Manual


Maintenance for the 5258ACL
5258ACL Installation and User’s Guide—522345-001
5-3
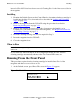
Running From the Front Panel
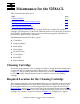
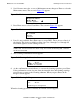
2. Scroll down to move the " next to Maintenance menu, then press Enter to select the
Maintenance menu. The screen in Figure 5-2 appears.
Figure 5-2. Maintenance Submenu
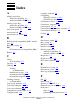
3. Press Enter once to select Clean Drive. The screen in Figure 5-3
appears.
Figure 5-3. Maintenance Submenu
4. Line 2 is not scrollable. Press Enter once to accept DLT1. The
" moves to line 4 of
the display. The choices available on Line 4 are slots 1 through 5 or 1 through 10.
Press Enter again to use the cartridge in slot 1.
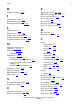
5. The Cleaning Confirmation Screen appears.
Figure 5-4. Cleaning Confirmation Screen
6. As the confirmation screen indicates, to execute the cleaning operation, press Enter.
If the confirmation screen does not show the intended drive and cleaning cartridge,
press Escape to return to the Cleaning submenu. When you press Enter, the In
Progress screen appears.
Figure 5-5. Cleaning In Progress
When the cleaning operation is finished, the Default Screen reappears.
Note. If slot 1 is unable to be used for the cleaning cartridge, scroll to line 4 to select
another slot. If reserved slots have been set up, line 4 refers to Cleaning Slot 1, which is
the first reserved slot
"
""
"
Clean Drive
Diagnostic Menu
Demo Menu
Flash Update #
##
#
Cleaning:
"
""
" * SDLT1
Using
*Slot1
Clean: SDLT1
Use: Slot1
ENTER To Execute
ESCAPE To Cancel
Clean: SDLT1
Use: Slot1
Cleaning In Progress