
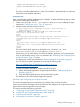
User Manual


logger.info("Returning hello view");
return new ModelAndView("insert.jsp");
}
}
Your basic controller implementation is ready. This controller is expanded further to add more
functionality to the EmpInfo application.
Creating the View
After completing the controller implementation for EmpInfo, complete the following steps to create
the first view of the EmpInfo application:
1. Create a new JSP page insert.jsp in EmpInfo/WebContent by completing the steps
explained in “Creating the index.jsp File” (page 43).
2. Add the header and body content as shown:
<%@ page language="java" contentType="text/html; charset=ISO-8859-1"
pageEncoding="ISO-8859-1"%>
<!DOCTYPE html PUBLIC "-//W3C//DTD HTML 4.01 Transitional//EN"
"http://www.w3.org/TR/html4/loose.dtd">
<html>
<head>
<meta http-equiv="Content-Type" content="text/html; charset=ISO-8859-1">
<title>Spring Getting Started with EmpInfo Application</title>
</head>
<body>
<h2 align="center"> Welcome to the EmpInfo Application </h2>
<br>
<p><B><font color = "003399">Enter Employee Details</font></B></p>
</body>
</html>
The code of the EmpInfo application developed so far is located in <My SASH
Home>\spring\getting-started\EmpInfo-InParts\Part-2.
At this point, you can either deploy and verify the EmpInfo application you have developed
so far on the NonStop system, or you can proceed to the “Developing and Configuring Views
and the Controller” (page 57) section.
For deployment, see the steps described in “Deploying EmpInfo on NonStop” (page 87).
You can verify the EmpInfo application by accessing the following URL:
http://<IP Address of the iTP WebServer>:<port#>/<servlet
directory>/EmpInfo/insert.htm
To verify the EmpInfo application, complete the following steps:
1. Deploy the EmpInfo application using the steps described in “Deploying EmpInfo on
NonStop” (page 87).
2. Verify the EmpInfo application by accessing the following URL:
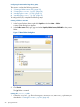
The Welcome screen of the EmpInfo application appears.
Developing and Configuring Views and the Controller
This section describes the process to develop and configure Views and the Controller.
Views are provided by JSP pages and the controller has the intelligence to recognize the business
logic based on the input provided in the JSP pages.
This section describes the following activities:
1. “Configuring the JSP Standard Tag Library (JSTL)” (page 58)
2. “Adding JSTL and JSP Related Dependency JARs” (page 60)
3. “Enhancing the Controller” (page 60)
4. “Decoupling View from the Controller” (page 61)
Getting Started with Spring 57