
Owner's manual

Chapter 6 Installing an Additional Processor
60
Firmware and Software Changes
Adding a processor may require firmware changes and the possible re-installation
of the NOS to recognize the additional processor.
Upgrading the Firmware
If your processor included a new CD, insert the CD into the HP Server DVD drive
and power on the HP Server. Follow the instructions provided on screen to ensure
the system BIOS is up-to-date. The system BIOS on the CD will be compared to
the HP Server’s current BIOS, and if necessary, will indicate to you that the BIOS
needs to be updated. Refer to Chapter 9, "Configuring the HP Server," for more
information.
Reinstalling the NOS
You may have to reconfigure or reinstall your NOS in order to use the additional
processor. Check your NOS documentation or the Readme file to determine if
your NOS requires a reinstall in order to recognize the new processor(s).
Removing a Processor
Use this procedure to remove a processor and its heatsink. The heatsink is
attached to the back of the processor. If a processor is not replaced, a CPU thermal
dummy must fill the slot to ensure proper cooling of the unit.
CAUTION Always wear a wrist-strap and use a static-dissipating work
surface connected to the chassis when handling components.
Ensure the metal of the wrist strap contacts your skin.
Before you touch the processor to remove it, touch a grounded
unpainted metal surface on the HP Server to discharge static
electricity.
To remove an existing processor, complete the following procedure:
1. Observe the safety and ESD precautions at the beginning of this chapter.
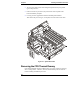
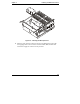
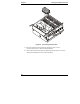
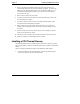
2. Remove the Processor/Memory Complex as described in “Removing the
Processor/Memory Complex” in Chapter 5.
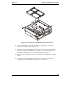
3. Orient the complex such that you have access to the surface from which
you are removing processors.