
HP Point of Sale (POS) Peripherals Configuration Guide


Page 136 of 522
6.5.8.8 Windows Printer Driver (Serial) for v1.0.3 and later for Windows 7 / 8.1 / 10
The following is an overview of the steps to test the receipt printer followed by
detailed steps:
1. Print out the diagnostic form on the printer in order to obtain the baud rate the
printer is set to.
2. Go into the communication port properties to change the Windows baud rate to
the printer is set to on the diagnostics form (previous step) and flow control to
“Hardware” for port that the printer is attached.
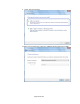
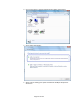
3. Go to Control Panel – Devices and Printers and select “Add a printer”.
4. Select “Add a local printer”.
5. Select “Use an existing port” option and select the COM port the printer is
attached to.
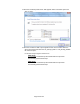
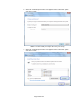
6. When the “Install the printer driver” GUI appears select “Have Disk” option and
click on “Next”.
7. When the “Install the printer driver” GUI appears select “Have Disk” option and
click on “Next”.
8. When the “Install From Disk” option appears browse to the location where the
drivers are located and select the “HP_Receipt_OEM” or “HP_Receipt_OEM64”
file and click “Open”.
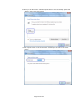
9. When you are back to the “Install the printer Driver” GUI “HP Receipt” printer
will appear, click on the “Next” button.
10. Enter a printer name or use the default of “HP Receipt” and click on the “Next”
button.
11. Once the printer drivers is installed click on the “Finish” button. Prior to clicking
on the “Finish” button one can click “Print a test page”.
Detailed Steps
1. Print out the diagnostic form on the printer in order to obtain the baud rate the
printer is set to.
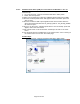
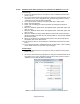
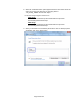
2. Go into the communication port properties to change the Windows baud rate to
the printer is set to on the diagnostics form (previous step) and flow control to
“Hardware” for port that the printer is attached.
Note: The baud rate may be different than the screen shot shown above.