
HP Point of Sale (POS) Peripherals Configuration Guide

Page 238 of 522
6.5.19 JPOS Drivers for the Receipt Printer Drivers – Slip Printing
The JPOS drivers are included in the HP factory image (C:\xxxxx\Point of Sale\Receipt
Printer\JPOS POS Printer) and are also available from HP.COM.
The following is an overview of the steps to test the receipt printer followed by detailed steps:
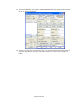
1. Open Printer/Cash Drawer/MICR Unit Test Application.
• C:\xxxxx\Point of Sale\Receipt Printer\JPOS POS Printer\HPJPOSPrinter.bat.
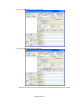
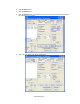
2. Select the A776 printer from the dropdown menu on the POSPrinter tab.
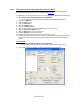
3. Click the Open button.
4. Click the Claim button.
5. Click the Enable button.
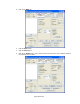
6. Select the Slip option in the Printer Station box.
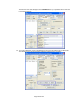
7. Click on the Slip tab:
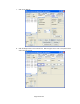
8. Click the Begin button in the Insertion box.
9. Slide the paper in the front of the printer until it comes out from the top.
10. Click the End button in the Insertion box. The paper may move down and the LED light
should stay on indicating paper is in the slip.
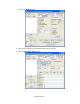
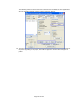
11. Click on the Simple Printing tab.
12. Type some text in the Print Data area; this is the text that should print on the receipt
printer and click on the PrintNormal button.
13. Click on the Slip tab.
14. Click the Begin button in the Removal box. Once the paper comes out from the top
remove the paper from the printer.
15. Click the End button in the Removal box.
16. To exit the application, disable/release and close the printer from the POSPrinter tab.
Detailed Steps
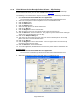
1. Open Printer/Cash Drawer/MICR Unit Test Application.
• C:\xxxxx\Point of Sale\Receipt Printer\JPOS POS Printer\HPJPOSPrinter.bat.
2. Select the A776 printer from the drop down menu in “POSPrinter” tab.