
HP Point of Sale (POS) Peripherals Configuration Guide


Page 285 of 522
6.7.5 OPOS Drivers for the MSR
The MSR OPOS drivers included in the HP factory image and are also available from HP.COM.
6.7.6 Testing MSR
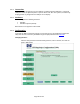
6.7.6.1 Testing MSR in USB HID Keyboard interface
Open Microsoft Notepad and swipe a card. If data appears as in the example
below, this confirms that the MSR interface is USB HID Keyboard.
If nothing appears in Notepad, the MSR interface is likely set to USB HID. Use HP
MagSwipe Configuration Utility to confirm the MSR interface and reconfigure as
USB HID Keyboard if necessary.
6.7.6.2 Testing MSR in USB HID or USB HID Keyboard interface with OPOS
The OPOS drivers for the MSR will work with the MSR in either USB HID or USB
HID Keyboard interface. In order to test the MSR when it is in USB HID interface
an OPOS aware application that interfaces with the MSR OPOS drivers is needed
in order to confirm that MSR is able to read the data from a card.
The following is overview of the steps to test the MSR followed by detailed steps:
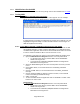
1. Open the MSR OPOS Test Program located in one of the paths below:
• C:\<Program Files directory>\HP\HP MSR I-Series OPOS\MSR
OPOS Test Program.exe
• C:\xxxxx\Point of Sale\MSR (USB)\MSR OPOS Test Program\HP
MSR OPOS Test Program.exe
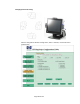
2. Select the MSR OPOS logical name from the drop down menu that you wish
to test.
3. Click “OPEN” button, if successful will receive and OPOS_SUCCESS
message.
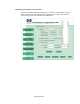
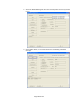
4. Click on “CLAIM” button, if successful will receive and OPOS_SUCCESS
message.
5. Click on “Device Enabled” so there is a check in the box, if successful will
receive and OPOS_SUCCESS message.
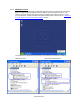
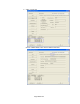
6. Swipe a credit card.
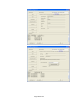
7. To close the MSR OPOS test application click on RELEASE / CLOSE / EXIT
buttons in the order stated.
Detailed Steps
1. Open the MSR OPOS Test Program located in one of the paths below:
• C:\<Program Files directory>\HP\HP MSR I-Series OPOS\MSR
OPOS Test Program.exe
• C:\xxxxx\Point of Sale\MSR (USB)\MSR OPOS Test Program\HP
MSR OPOS Test Program.exe