
HP Point of Sale (POS) Peripherals Configuration Guide


Page 339 of 522
6.10.5.3 Testing in JPOS
The following is overview of the steps to test the imaging barcode scanner followed by
detailed steps:
1. Open JavaPOStester.
• C:\xxxxx\Point of Sale\Scanner (LED_Imager)\Img_LED
JPOS\HPJPOSImagingScanner.bat.
2. Click on the Scanner tab.
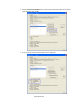
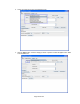
3. Select the proper device from the dropdown menu.
4. Click the Open button. After the imaging scanner is opened a check will appear in
the “Data event enabled” box.
5. Click the Claim button.
6. Check the “Device enabled” checkbox.
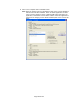
7. Check the “Decode Data” checkbox.
8. Scan a barcode and the data will appear in the “Scan Data” and “Scan Data Label”
boxes.
9. After scan is complete click the Release button.
10. Click the Close button.
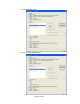
11. Click on “Exit” to close the test application.
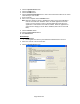
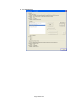
Detailed Steps
1. Open JavaPOStester.
• C:\xxxxx\Point of Sale\Scanner (LED_Imager)\Img_LED
JPOS\HPJPOSImagingScanner.bat.
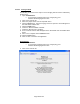
2. Click on the Scanner tab: