
HP Presentation Scanner Quick Reference Guide


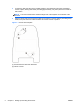

3. If necessary, drill pilot holes in the marked positions, then thread two pan head, self-tapping
screws in place, leaving their heads protruding approximately 1/8” (3mm) above the counter or
wall surface.
NOTE: The screw heads must fit inside the larger end of the keyholes on the bottom of the
scanner.
4. Align the larger ends of the keyholes located on the scanner’s bottom with the protruding screw
heads, then push down and rotate clockwise to lock the scanner in position.
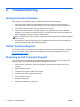
Figure 1-1 Screw Hole Template
(1) Screw head must clear this dimension
(2) Center of screw
2 Chapter 1 Setting Up and Using the Scanner ENWW