Quick Installation Guide Information in this Quick Installation Guide is available in greater detail in the HP Surestore CD/DVD-ROM Server User’s Guide. Step 1. Set up the Hardware 1. Verify with your network administrator that a 10Base-T (Ethernet) or 100Base-TX (Fast Ethernet) network connection is ready for the server. Locate the twisted-pair network cable. It has an RJ-45 connector. 2. Verify that the tower’s power is off. (The power switch should be out, not in.) 3. Verify the power configuration. a.
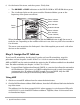
6. On the front of the tower, switch on power. Verify that: • The ON/BUSY or BUSY indicators on the HP CD-ROM or DVD-ROM drives go on. • The 4 indicator lights on the server module (illustrated below) go on at the beginning of the power-on self-test. Power indicator Status indicator Power switch SCSI indicator Network indicator Power indicator DISC indicator (not on J4152A) ON/BUSY indicator When the Status indicator remains green and the SCSI indicator is off, the server is ready for use.
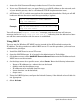
3. Access the DOS Command Prompt window from a PC on the network. 4. If you are a Windows95 user, you must first ping a valid IP address on the network, such as your default gateway (due to a Windows95 TCP/IP implementation issue). 5. All Windows NT, 95, and 98 users perform the commands shown below. Each pair of LAN hardware address characters must be separated by a hyphen: Format: arp -s ping Example: arp -s 192.124.138.80 00-60-b0-11-00-86 ping 192.124.138.
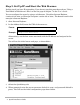
Step 3. Set Up IP and Start the Web Browser Do this step if you have IP networking. If you do not, stop this procedure and see “Using a Text Editor to Edit Server’s Files” on the last page of chapter 7 in the User’s Guide. You can configure the server by using a web browser. Use either Internet Explorer (version 4.0 or later) or Netscape Navigator (version 4.0 or later). The browser used in this example is Internet Explorer. 1. Start Internet Explorer. 2.
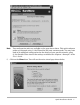
Note. Two configuration tools are available on the page shown above. This quick reference guides you through using (1) the Wizard for the most common needs. You may later need to do additional configuration for the details of your specific network, using (2) the Detailed View into all the settings available. See chapters 3 through 7 of the User’s Guide. 5. Click on the Wizard icon. You will see the main wizard page shown below.
6. On the main wizard page, select TCP/IP and click Start >. On the subsequent “TCP/IP Wizard—IP Addresses” page, select one of the following: • If you had DHCP (or another automated method, page 3) assign the IP address, click Automatically. Click Next >. On the subsequent page, make sure your automatic method, such as DHCP, is selected and click Next >. Skip to step 8. • If you assigned the IP address using ARP (page 2), click Manually. Click Next > and continue with step 7 below. 7.
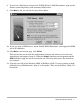
8. If you have a DNS server, then on the “TCP/IP Wizard—DNS Parameters” page set the domain name and primary and secondary DNS servers. 9. Click Next > and you will see the page shown below. 10. If you are using a WINS server, check “Enable WINS Resolution” and supply the WINS server IP addresses. 11. Click Next >. On the last page, click Finish. This restarts the server with the configuration changes and returns you to the main wizard page (see bottom of page 5).
Step 4. Set up Windows (SMB) 1. On the main wizard page (see bottom of page 5), select Windows (SMB) and click Start >. The following page appears: 2. Enter a server name. Choose a server name meaningful for your environment. 3. Enter a workgroup or NT Domain name. This is where the server will appear in Network Neighborhood. The name must already exist in your network. 4. Click Next >. 5. Click through the next page by clicking Next >. Do not set the security features.
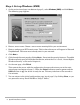
Step 5. Set up Novell NetWare (NCP) 1. On the main wizard page, select NetWare (NCP) and click Start >. The following page appears: 2. Enter a server name. Choose a server name meaningful for your environment. Click Next >. 3. On the page shown below, make sure both Bindery and NDS mode are selected. Click Next >. 4. Click through the next page by clicking Next >. Do not set bindery mode authentication.
5. The next page displays the NDS trees on your network. Select the tree containing the administrator account you want to use. The first time you install the server into an NDS tree, you must use the administrator account with supervisory privileges to the root object of the tree. This will not be necessary for any later tree installations. Click Next >. 6. Browse to select the desired account. Enter the administrator password. Click Next >.
7. Select the context and click Next >. 8. On the next page, click Finish. This restarts the server with the configuration changes and returns you to the main wizard page (see bottom of page 5). When the Status indicator remains green and the SCSI indicator is off, the server is ready for use. This may take a few seconds to five minutes. 9. Reboot the PC you are using to configure the server and other client PCs, to see the new server in NetWare. 10.
Step 6. Give Clients Access to Discs The procedure for accessing your server is similar to accessing any other Windows NT or NetWare file server. Clients (users at workstations) on the network use the same procedures to access both types of servers. Make the server available to clients on system by “mapping” it to a PC drive letter. After the server is mapped, clients access the server and its discs just like any other attached disk drive or networked file server. Typical Windows Explorer View Step 7.
Copyright © 1999 Hewlett-Packard Company Printed in U.S.A.