Administrator's Guide - Home Page Using This Guide Click on a topic in the left-hand pane to view information about the topic. For example, click on Product Overview for a detailed description of HP SureStore AutoBackup. Use the Index of Topics page to search for a particular topic. What Does the Administrator Do? The administrator initializes the system, defines backup settings as appropriate, and monitors backup status for all protected computers.
Administrator's Guide - Home Page the HP SureStore AutoBackup appliance. If you have purchased the optional HP SureStore Tape drive, the administrator is also responsible for backing up the appliance to tape for offsite storage. In the event of appliance failure (for example due to fire, earthquake or hardware failure), the administrator can then recover the whole system using new hardware.
Administrator's Guide - Home Page B904359, 3606869. Other patents pending. Windows and Windows NT are U.S. registered trademarks of Microsoft Corp. Revision History Edition 1.0 Date February 2000 file:///D|/ADMIN_~1/eng/admin/home.
Overview Of The Product Product Overview HP SureStore AutoBackup provides a complete automated solution for backing up data held on desktop and mobile PC hard disks that are connected across the network to the HP SureStore AutoBackup appliance. HP SureStore AutoBackup consists of a customized server (or appliance) with internal HP SureStore CD-Writer and customized backup and restore software.
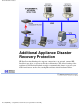
Overview Of The Product Additional Appliance Disaster Recovery Protection HP SureStore AutoBackup also supports connection to an optional, external HP SureStore tape drive, as shown on the above illustration. This allows backup of the appliance itself. Hewlett-Packard strongly recommends this feature to protect your data from disasters such as fire, earthquake and data critical hardware failure. file:///D|/ADMIN_~1/eng/admin/overview.
What Is The Product? Product Overview What Is HP SureStore AutoBackup? HP SureStore AutoBackup provides automatic backup of data held on the local hard disks of PCs connected to a network. The PCs protected by HP SureStore AutoBackup, also called clients, may have either fixed or remote access to the network. Administrators access HP SureStore AutoBackup via a web-based console for normal administration tasks. They can also download an Advanced Administration console.
What Is The Product? Once the data has been backed up, file restore is a simple drag and drop operation from Windows Explorer - with clients only ever able to access their own data on the server. This significantly simplifies the ability to restore backed up files, compared with magnetic tape, and allows restores to be carried out without IT department involvement. file:///D|/ADMIN_~1/eng/admin/whatis.
What Is The Product? In the event of a client disaster, the administrator can create a disaster recovery CD-ROM (and boot floppy. if required), so that the user can reset their connection to HP SureStore AutoBackup and restore their data once their hardware has been repaired or replaced. Use for Backup - Not as Archive It must be recognized that HP SureStore AutoBackup is designed for relatively short-term file restore rather than long-term archiving.
Why Use The Product? Product Overview Why Use HP SureStore AutoBackup? Most companies have a system where individual PCs (clients) are linked together on a network so as to provide shared resources such as printers. Clients also usually have access to a shared network drive and are instructed to save all their important files to the network drive, which will be backed up at regular intervals by the IT department, for example to magnetic tape.
Why Use The Product? Without HP SureStore AutoBackup Backup of the local hard disk is solely the responsibility of the user, is time-consuming and is not always straightforward. A company has very limited control over whether potentially important files are actually backed up. If the connection is made via a remote dial-up modem, the transfer time can be so slow that users of laptops or mobile PCs will postpone backing up their local hard disk.
How Does It Work? Product Overview How Does AutoBackup Work? This section describes the following five factors, which are fundamental to the way that backup is implemented on HP SureStore AutoBackup. Baseline and incremental backups Use of a SQL database Redundant file elimination Compression Load balancing Baseline and Incremental Backups When clients carry out the first backup operation, they carry out a "baseline" backup, which writes the full amount of data to the appliance hard disk.
How Does It Work? SQL Database The system uses an integrated SQL database to track baseline files and subsequent versions. It keeps an index containing the compressed file details (name, directory, date/time stamps and size) of all backed up files on the appliance. Redundant File Elimination The use of a database also makes it possible to identify files that have already been backed up from the networked clients and have not been changed.
How Does It Work? backups) and file recoveries are high-priority and will always run even if there are five scheduled backup jobs running. file:///D|/ADMIN_~1/eng/admin/how.
Specifications Product Overview Specification This topic describes the: Specification for the HP SureStore AutoBackup PC25/100 Minimum requirements for the administrator's PC Minimum requirements for the protected computer HP SureStore AutoBackup PC25/100 This specification covers both the PC25 and the PC100 model. Physical Specifications Dimensions: 232 mm wide x 442 mm deep x 448 mm high 9.1 x 17.4 x 17.6 inches Weight: PC 25 12 kg (26 lb) PC100 12.
Specifications Connectivity: 10/100 base-T auto-sensing LAN Connector (RJ45) Wide Ultra SCSI-3 interface (for HP SureStore Tape backup device) Requires TCP/IP network protocol Network Compatible Network TCP/IP network protocol. Requires Windows NT 4.0 Operating System: Workstation, Windows 95/98 or Windows 2000 clients Administrator's PC (Minimum Specification) This is the minimum specification for the PC that is used to run the Installation program and administer the appliance.
Specifications Client PC (Minimum Specification) This is the minimum specification for the protected computers.
Specifications Platform compatible network interface card or dial-up adapter TCP/IP network or dial-up networking Network: Unique computer name for each client Network Connection - Initial backup requires 10 Mbit connection. Full backups require at least 28Kbit connection Monitor: VGA or higher resolution (800 x 600) Browser Software: Internet Explorer v4 or higher or Netscape Navigator v4 or higher file:///D|/ADMIN_~1/eng/admin/spec.
Appliance Managment Appliance Management This topic describes: The front view of the HP SureStore AutoBackup appliance The rear view of the HP SureStore AutoBackup appliance How to switch the appliance on and off Optional connection to HP SureStore tape drive Front View The front of the appliance houses the lightbar, the LCD (liquid crystal display), the hard disk drive (or drives) and the CD-writer. file:///D|/ADMIN_~1/eng/admin/applianc.
Appliance Managment The lightbar indicates the appliance's general status. The LCD displays status information about the appliance, the network, the CD-Writer and the tape drive, when there is one connected. The Power/Reset button is used to power on the appliance. It can also be used for emergency reset. The CD-Writer disk drive is used to create disaster recovery media for client workstations. Rear View The rear of the appliance has the power socket and several ports, only two of which are used.
Appliance Managment Note: The other connections are not used. Switching the Appliance On and Off Use the Power button on the front of the server to switch the appliance off and on. HP recommends that you do not do this while backup or restore is running. Never remove the power cord before the appliance has been shut down (unless the appliance has hung and cannot be shut down by any other means).
Appliance Managment To reset the appliance 1. Click the Power button four times within two seconds. 2. A prompt will appear on the LCD asking if to confirm the reset. 3. Click the Power button four times within two seconds again to confirm the emergency reset. 4. Run install.exe from the AutoBackup installation CD-ROM to reconfigure the network settings and the administrator's password.
Getting Started Appliance Management Getting Started This topic describes the administrator's web-based console. It describes: How to access the console How to navigate the console and access Help Accessing Help and the Help menu What is available on each tab Accessing the Console The administrator's web-based console resides on the appliance. Once HP SureStore AutoBackup is configured, you can administer the appliance from any PC on the same network running Microsoft Internet Explorer Version 4.
Getting Started Click on the required tab, as appropriate. Each tab is described in more detail below. Click on the Help icon to display the Help menu . Click on the Hewlett-Packard logo to link to HP's worldwide web site. Accessing Help and the Help Menu There are two ways of accessing help: Using the Help menu as described in this section Clicking on the Help button on the bottom left of each wizard page to link directly to the help that relates to that wizard.
Getting Started Administrator's Guide: This is the option you chose to access this guide. You can also link directly to topics in this guide, by clicking on the Help button on the bottom left of each wizard page. Hardware Management Tools: This is an additional, web-based diagnostic tool that provides more details about the problem and also allows you to configure various settings. See Monitoring System Status.
Getting Started Health Indicators: Available Capacity shows how much disk space has been used. See Managing Capacity for further details. Protected Computers shows how many computers are protected by this appliance. Click on this option to display a list of protected computers. Tape Backup shows information about the optional tape backup and what percentage of the backup has been completed. See Managing Tape Backup and Restore.
Getting Started Manage Protected Computers allows you to select a specific protected computer, view its status and configure some account settings. Create Disaster Recovery CD-ROMs allows you to create CD-ROMs to recover a protected computer. Manage Tape Backup and Restore allows you to schedule tape backup, restore from tape and view the tape logs. Settings Tab The Settings tab allows you to configure various settings. file:///D|/ADMIN_~1/eng/admin/console.
Getting Started View/Configure Network Settings allows you to view the current network configuration and change any of the appliance network settings or its name. Install Software Updates allows you apply software updates to your HP SureStore AutoBackup appliance. Set administrator username/password allows you to enter a username and password for the administrator. Set Date and Time allows you to set the date, time and time zone for the appliance. file:///D|/ADMIN_~1/eng/admin/console.
Monitoring System Status Appliance Management Monitoring System Status You can obtain system status information from: The Status tab on the web application The lightbar indicator and LCD icons on the appliance The Hardware Management Tools accessed from the web application The Web Status Tab The Status tab on the administrator's web-based console provides comprehensive information about the overall status of the HP SureStore AutoBackup appliance.
Monitoring System Status Appliance Status Icon The icon in the top left-hand corner is the overall status indicator for the appliance. It appears on every web page and refreshes automatically when there is a change to the status. The overall status reflects the status of the health indicators and severity of any messages. The specific meaning of each icon is given below: Indicates the status is OK. Indicates a warning that will not stop operation but that requires investigation.
Monitoring System Status Indicates a critical error that stops operation. In the context of protected computers, the health indicator icon also provides information about the last backup status (and disk usage once a specific protected computer is selected). See Viewing the Status of Protected Computers for further information and detailed instructions on using the Status tab to manage protected computers.
Monitoring System Status Lightbar Behavior Solid green Solid amber Blinking amber Meaning System running normally System in soft-off state. This is the normal state of the appliance after you have pushed the power button and the appliance has powered down, but the power cord is still plugged in. In normal operation, you should never power down the appliance. An error has occurred.
Monitoring System Status The operating system is halted. All but essential processes and services have been stopped. (This also appears if you shut down the appliance, just before the LCD display goes blank.) The appliance is in emergency mode. Refer to the Troubleshooting Guide. Disk drive icons Icon Meaning The disk is running and available. The disk is being accessed. There is a disk error that requires immediate attention.
Monitoring System Status Wait Icon Icon Meaning Please wait. The appliance is performing a time-consuming or critical action. Hardware Management Tools Hardware alerts will appear as alerts in the Status tab page. You can use Hardware Management Tools from the Help menu to access the web-based diagnostic tool. This provides more details about the problem and also allows you to configure various settings. However, always check with Hewlett-Packard Technical Support before changing any settings.
Settings, How to Change Appliance Management Settings This topic describes how to: View/configure network settings Install software updates Set administrator user name and password Set the date and time on the appliance server Change the language settings Configure advanced settings The first four options are accessed from the Settings tab on the administrator's web-based console. Advanced settings are accessed from the Help menu. Click on the Settings tab, then click on the appropriate option.
Settings, How to Change Make the required changes in the wizard. To return to the Settings page from the first page of any of the wizards, click Back to Settings. To View/Configure Network Settings This wizard allows you to view the current network configuration and change any of the appliance network settings or its name. Click on Next from the first screen to display the appliance network settings: file:///D|/ADMIN_~1/eng/admin/settings.
Settings, How to Change If you need to change the appliance's IP address, this will have no effect on the protected computers because the software issues broadcast requests to establish the IP address. Any change is, therefore, transparent to the user. Caution: Do not change the IP address if clients are operating on a separate sub-net. Click on Next again to display the appliance name: file:///D|/ADMIN_~1/eng/admin/settings.
Settings, How to Change You may change the appliance's name, if required. Make sure that there are no active backups before you change the name, and inform users of protected computers of the new name. These users will be prompted that the AutoBackup appliance is no longer available and given the option of changing the name. They need to click on the Change Name button and select the new name from the list.
Settings, How to Change Select the appropriate option and click on Next. Follow the onscreen instructions to complete the update. If the update includes changes to the client agent software, these will be applied automatically the next time the user carries out an AutoBackup operation from a protected PC. To Create Administrator User Name and Password This wizard allows you to enter a username and password for the administrator.
Settings, How to Change Note: If you forget the administrator's password, you can reset it using the Emergency Reset button. Protected computer users will need to reinstall the Agent software if they are connected to the network via routers and you changed the appliance IP address or name during the Emergency Reset process. To Set Date and Time This wizard allows you to set the date, time and time zone for the appliance. You may also set the appliance to automatically adjust for daylight savings time.
Settings, How to Change To Set the AutoBackup Language This wizard allows you to set the language of the AutoBackup appliance. Once you have confirmed that you want to set the Appliance to a new language, the Appliance will reboot, and will restart in the new language. Advanced Settings The Advanced Settings option allows you to implement advanced options that should only be used in special circumstances, including settings which can only be maintained from the Advanced Administrator's Console.
Settings, How to Change To download advanced administrator console 1. Select the Download Advanced Console button. 2. Check that your workstation meets the requirements specified on the screen. file:///D|/ADMIN_~1/eng/admin/settings.
Settings, How to Change 3. Click on the Download Console button. The Advanced Administrator Console has its own online help. To reset the appliance software You may need to reset the appliance software for a number of reasons: If the database or backed-up data is corrupted for some reason, for example a power failure. If some sort of non-essential service fails, for example one of the automatic maintenance jobs cannot run due to corruption of one of its application files.
Capacity, How To Manage Appliance Management Managing Available Capacity This topic describes: How to choose the correct HP SureStore AutoBackup model How HP SureStore AutoBackup manages capacity Choosing the Correct Model Each model provides a different capacity level and is designed to provide data protection for a target number of clients for at least two years. A typical client, with a 20% growth requirement per year, is assumed to have 1.25 GB of unique data and 1.
Capacity, How To Manage Managing Capacity On The Selected Model HP SureStore AutoBackup products manage capacity in a number of ways: By setting a capacity threshold so that the system does not become overloaded with clients By eliminating redundant data from the backup By setting a retention limit for backed up data Capacity threshold Given the wide variation in client data sizes and compression ratios, the HP SureStore AutoBackup products are licensed based on the capacity of the product rather than the
Capacity, How To Manage Eliminating redundant data HP SureStore AutoBackup uses a number of techniques to eliminate redundant data from its backups: It excludes some files and directories. It only backs up common files once (redundant file elimination). It backs up a baseline version for all new files, and subsequently only backs up those parts of the file that have been modified.
Capacity, How To Manage This shows a client with five files, two have been modified, one is unmodified, one is a new document file that the client has just created and the last is a newly loaded file that is a copy of one which already exists on the network, for example a newly installed common application. The backup excludes file 3, since it is unchanged. It also excludes file 5, since it is identical to a file already on the AutoBackup appliance.
Capacity, How To Manage months. You can change the default value from the Advanced Administrator Console, or allow users to define their own retention limit from the Configure Backup Options tab. Note: Remember, if you do decide to change the default settings, particularly if you allow users to define settings, you may limit the capacity of the appliance so that it supports fewer clients. file:///D|/ADMIN_~1/eng/admin/capacity.
Recovery From Hardware Failures Appliance Management Appliance Failure Recovery If there is a hardware failure, a message will normally be displayed both on the appliance's LCD and on the Status tab page. If there is a software failure, the appliance will always attempt to rebuild the software automatically. If the appliance fails, you can replace it and restore HP SureStore AutoBackup to its default factory settings.
Recovery From Hardware Failures baseline backup will be performed by each client at the next backup. Earlier versions of files backed up to the appliance before the failure will be lost. Due to corruption of the operating system If the software running on the HP SureStore AutoBackup appliance fails for some reason, for example a power failure, the fail-safe BIOS will detect the failure automatically and rebuild the software from a known good copy - without any user intervention.
Recovery From Hardware Failures 4. Use the tape backup cartridge to restore the client account information, application configuration settings, software and data. This will also restore the original appliance's network settings and name. See Appliance Recovery from Tape for step-by-step instructions. If you do not have not a tape backup 1. Replace the faulty unit. 2. On a PC attached to the same network segment as the appliance, insert the Installation CD-ROM and run install.
Protected Computers, Managing Tthe Managing Protected Computers When you click on the Manage Protected Computers entry on the Tasks tab, you see a screen like the following: Each row of the table represents a protected computer (except the Global entry, which represents all protected computers). You can sort by any column by clicking on the column heading. The columns display the following attributes: Computer Name The computer's Microsoft networking name (and operating system type).
Protected Computers, Managing Tthe Account Name The account name provided when the computer was set up. There is only one account for each protected computer. Last Backup The date and time the latest backup for this computer was begun. This information will appear in red if no baseline backup was performed for that account, or the last full backup was more than 2 days ago. Disk Usage The percentage of total available backup space used by this account.
Protected Computers, Managing Tthe Clear Account Password Provides wizard for resetting the password for this account Delete Account Provides wizard for removing this account and all its stored data Global Changes The Global entry under Computer Name allows you to change the backup schedule and user rights for all protected computers. When you select this entry, the only task you will be able to perform is Configure Backup Options. file:///D|/ADMIN_~1/eng/admin/protect.
Protected Computers, Viewing The Status Of Managing Protected Computers Viewing the Status of Protected Computers This topic describes how to: View the overall status of protected computers View the status of individual protected computers Viewing Overall Status of Protected Computers Select the appliance's Status tab to view the status of all protected computers configured for that appliance, as shown below: file:///D|/ADMIN_~1/eng/admin/status.
Protected Computers, Viewing The Status Of The icon to the left of Protected Computers shows the overall status of all protected computers attached to this appliance. Different icons represent different states as explained below: All protected computers have been backed up in the last 2 days (full, not partial) All protected computers have been backed up in the last 7 days, but at least one was not backed up in the last 2 days.
Protected Computers, Viewing The Status Of Note: This is also the screen that is displayed when you select Manage Protected Computers from the Tasks tab. Click on an entry in the Computer Name column to carry out various backup and account management tasks as described in Managing Protected Computers. The rightmost column shows the status for that computer. The status icon combines the information in the Last Backup and the Disk Usage columns.
Protected Computers, Viewing The Status Of This protected computer was backed up in the last 7 days, but not in the last 2 days or uses disk space in the warning range. The disk usage range is 2-4% for PC100 models and 8-12% for PC25 models. This protected computer was not backed up in the last 7 days or uses more than X% disk space, where X=4% for PC100 models and 12% for PC25 models. file:///D|/ADMIN_~1/eng/admin/status.
Backup Logs, How To View Managing Protected Computers Viewing Backup Logs This screen displays information from the backup log for the chosen account and protected computer as shown below. For each backup or recovery job performed for this account, the following information is listed: file:///D|/ADMIN_~1/eng/admin/bulogs.
Backup Logs, How To View Started at Date and time the backup/recovery job started Finished at Date and time the backup/recovery job completed Number of Files A count of all files processed during the backup/recovery job. Note that for backup jobs, not all files listed are necessarily backed up, only those with changes since the previous backup. Amount of Data Number of bytes processed during the backup/recovery job.
Backup Options, How To Set Managing Protected Computers Setting Backup Options From this screen (shown below), an administrator can perform two types of changes to the backup configuration for a protected computer: adjust the backup schedule, and allow/disallow the end user the right to change specific backup properties. When the screen has been changed to reflect all changes to the backup options for this protected computer, click on Accept Changes to update its stored properties.
Backup Options, How To Set to perform the backup (top of the Backup Schedule box), and choosing the time window for performing the backup (the After and Before fields underneath). For each day chosen, the server will perform a backup (either full or partial, depending on how the protected computer's schedule is set) within the specified time window if possible (if not possible, the server will record it in the event log).
Account Passwords, Clearing Managing Protected Computers Clearing Account Passwords Clearing an account password removes the existing password from an account, allowing anyone to obtain access as that account. This can be used, for example, to allow users who have forgotten their password to access their files. Select a protected computer on the Manage Protected Computers screen and press the Clear Account Password button to display the above screen.
Account Passwords, Clearing except for
Computer Accounts, How To Delete Managing Protected Computers Deleting Computer Accounts Deleting an account removes all information about that account from its HP SureStore AutoBackup appliance, including all online copies of backed up files that are unique to that account. A job to perform the deletion will be scheduled for later that day (usually in the evening). Deleting an account allows you to free up space.
Computer Accounts, How To Delete Select a protected computer on the Manage Protected Computers screen and press the Delete Account button to display the above screen. Press the Delete Account and all Associated Data button on this screen (the only button there is, except for
Disaster Recovery CD-ROM, How To Create Creating a Disaster Recovery CD-ROM This topic describes: The purpose of Disaster Recovery Types of Disaster Recovery How to ensure the full backup option has been selected Purpose of Disaster Recovery Use Disaster Recovery if the protected computer has a hardware failure and is repaired or replaced, or if there is unrecoverable corruption of the operating system software.
Disaster Recovery CD-ROM, How To Create with the Disaster Recovery disk. 3. HP SureStore AutoBackup automatically recovers the computer. During the process, the user is prompted to remove the Disaster Recovery disk and (for network recoveries) to enter a logon with access to the required shared resources on the network.
Disaster Recovery CD-ROM, How To Create 1. Expand the Protected Computers node, if necessary. 2. Right-click a protected computer (or a protected computer group) and select Properties. 3. Choose Full Backup in the Schedule tab and click OK. The screen shown below displays the Administrative Console as step 2 is being performed. The backup options may also be modified from the protected computer, depending upon the backup rights you have assigned to users.
Disk Creation Creating a Disaster Recovery CD-ROM Disk Creation This topic describes: Prerequisites for creating a Disaster Recovery CD-ROM set Creation of CD-ROM(s) Determining if a boot floppy is required and creation of a boot floppy Adding SCSI CD-ROM drivers to the boot floppy Prerequisites for Disaster Recovery Disaster recovery is initiated by creating bootable CD-ROM disks, and using them to help recreate the information on the hard disk of the protected computer.
Disk Creation Creation of CD-ROM(s) Go to the Tasks tab page and click on Create Disaster Recovery CD-ROMs. You will see the Create Disaster Recovery CD-ROM Wizard screen shown below: Click on Next> at the bottom of the screen. As the screen notes, you will need at least one piece of CD-R media—perhaps more if you will be saving user files on the CD. You will see the following screen: file:///D|/ADMIN_~1/eng/admin/dr_create.
Disk Creation This screen asks you to decide both the format and content of the Disaster Recovery CD. Choose the protected computer you wish to recover by scrolling to the appropriate choice in the top left selection box. The screen will refresh to obtain the available backup dates for that computer. (Note: this is the computer's Microsoft networking name, not the computer description entered by the user when installing the agent.) Choose a backup date by scrolling the middle selection box.
Disk Creation You must choose whether to password-protect the recovery data. The default, as you can see, is to have password protection. This means the person performing the disaster recovery will need to know the name and password for this account. In this case, simply click on Next>. If you don't want the data to be password protected, you must uncheck the box, enter the password for that protected computer in the Account Password box, then click on Next>. The wizard is now ready to create your CD-ROM.
Disk Creation 7. Verify data on CD Each of these steps generates a screen like the following one for the first step. If multiple pieces of CD-R media are recorded, the last four screens are generated for each CD-ROM. Also, if you use CD-RW media, there will be a step to erase the current contents of the CD-ROM before the disaster recovery data is recorded on the CD-RW media. Note: We do not recommend the use of CD-RW media, as it is incompatible with many types of CD-ROM and DVD-ROM drives.
Disk Creation Click on Finish to return to the Tasks tab page. Your (final) CD-ROM will be ejected from the CD-Writer. Clicking on Tutorial will take you to information about Client Disaster Recovery. If the computer to be recovered cannot boot from a CD, you will also need to create a boot floppy for the client. Determining if a Boot Floppy is Needed To see if your computer can boot from a CD-ROM, you must go to the BIOS setup screen for your computer.
Disk Creation appears on the list, your computer can boot from a CD-ROM. If it does not appear in the list, you may be able to change the value to include CD-ROM. If you cannot make this change, your computer cannot boot from a CD-ROM, and you will need to create a boot floppy. Note: If the user's computer has a SCSI CD-ROM, you will need to include the SCSI drivers on the boot floppy. See separate section for more information.
Disk Creation Choose a destination drive and click on Create. The progress of your floppy disk creation will be shown in this window. When the floppy disk is ready, the following window will appear: Click on OK. Your floppy disk is ready for recovery. However, if the user has a SCSI CD-ROM drive, you must also add the SCSI drivers to the floppy, as described in the next section. Adding SCSI CD-ROM Drivers The Disaster Recovery Boot Floppy provides broad support for EIDE CD-ROM drives.
Disk Creation Floppy is as follows: 1. Create the Disaster Recovery Boot Floppy following the instructions in the previous section. 2. Replace the EIDE CD-ROM driver in the config.sys file in the root directory of the DR boot floppy with the relevant DOS SCSI driver. You need to replace the line device=oakcdrom.sys /D:mscd001 with the necessary lines to install the DOS SCSI CD-ROM drivers. For example: For the Adaptec 2940U/UW controller, the replacement lines would be: DEVICE=A:\ASPI8DOS.
Disk Creation ASPI2DOS.SYS ASPI4DOS.SYS Adaptec AVA-1502P,1502AP Adaptec AVA-1505 Adaptec AVA-1515 Adaptec AHA-1510/1520/1522 Adaptec AHA-1510A/1520A/1522A Adaptec AHA-1510B/1520B/1522B Adaptec AHA-1530P/1532P Adaptec AVA-1502AE/AI,AVA-1505AE/AI,AVA-1505AES Adaptec AIC-6260/6360/6370 based SCSI host adapters Adaptec AVA-2825 host adapter Adaptec AHA-1540B/1542B Adaptec AHA-1540C/1542C Adaptec AHA-1540CF/1542CF Adaptec AHA-1540CP/1542CP EISA ASPIEDOS.SYS ASPI4DOS.SYS ASPI7DOS.
Client Disaster Recovery, Performing A Protected Computer Disaster Recovery This topic describes how to use the Disaster Recovery CD-ROM set to restore a protected computer. Ideally, the recovered computer should match the originally protected computer in the following ways. The hard disk adapter types must match. For example, if the original computer had an IDE hard disk adapter, the recovered computer cannot have a SCSI hard disk adapter. The network adapter card must match.
Replacing A PC Of The Same Specification Protected Computer Disaster Recovery Replacement PC-Same Specification This topic describes how to use the Disaster Recovery CD-ROM to restore a protected computer when the recovered computer matches the originally protected computer. It includes the following sections: Types of restore How to use the client disaster recovery CD-ROM For troubleshooting information, see Problems with Your Disaster Recovery CD-ROM.
Replacing A PC Of The Same Specification Restore the client operating system and configuration, including account details and access rights to HP SureStore AutoBackup, and also restore all the data from CD. This is the normal option if the protected computer is working remotely and only has a dial-up connection to the network. Note 1 - Restoring Individual Data Files: If you include all the data on the CD-ROM set, the user will be able to use the cdviewer.
Replacing A PC Of The Same Specification after a disaster recovery. However, if a laptop uses a hibernation file that is not automatically excluded, then you will need to set up your system to exclude this file. There may also be a small number of cases where the hibernation file is not automatically regenerated. You can regenerate the file manually using the Windows based utility provided by the OEM (usually under Control Panel, Power Management). How to Use the CD-ROM Turn the computer off.
Replacing A PC Of The Same Specification You should see a message about Copying mini OS files at the bottom of the screen as it copies the files containing your system information from the CD to a system folder. Your computer then takes those files and uses them to reinstate Windows on your machine. It then prompts you to remove the Disaster Recovery media and reboots the computer.
Replacing A PC Of The Same Specification Enter your computer account name and /password and click on OK. These values must match your current account name and password on the AutoBackup appliance. At this point, a window like the following will appear, which shows the progress of your disaster recovery. Note: On NT systems with NTFS partitions only, you get an extra window shown before the progress window saying that it is converting the FAT partitions to NTFS.
Replacing A PC Of The Same Specification Recovery using CD-ROM only (full user data) If user data was included in the disaster recovery CD-ROM set and you do not select the network connection within 30 seconds, disaster recovery runs automatically from the CD-ROM. You will probably see a window prompting you to insert DR CDROM #1 and click the Retry button. This is because the last stage of the mini-OS creation prompted you to remove all DR media (floppy and CD-ROM).
Replacing A PC Of The Same Specification recovered. For further information on how to set up your PC to boot from a CD-ROM, click here. file:///D|/ADMIN_~1/eng/admin/samespec.
Replacing A PC Of A Different Specification Protected Computer Disaster Recovery Replacement PC-Different Specification This topic describes how to restore a protected computer when the recovered computer does not match the originally protected computer. It includes the following sections: How to restore over the network How to restore using the Disaster Recovery CD-ROM For troubleshooting information, see Problems with Your Disaster Recovery CD-ROM.
Replacing A PC Of A Different Specification Note: As with any installation of the client agent, you will be asked to perform a backup when you restart your computer. It is best to choose Do not Back up Now, so you do not have to wait for the backup to finish before you recover your files. 2. To recover files manually, open the HP SureStore AutoBackup Options menu and click on Recover Files to display the Recovery Selection Wizard screen shown below: file:///D|/ADMIN_~1/eng/admin/diffspec.
Replacing A PC Of A Different Specification 3. Click on Advanced Selection to display a Windows Explorer interface, showing your saved information under the HP AutoBackup icon in the left pane. You can recover entire volumes (but make sure they only contain data files), by right-clicking on the volume and choosing Recover from HP AutoBackup as shown in the diagram below. file:///D|/ADMIN_~1/eng/admin/diffspec.
Replacing A PC Of A Different Specification 4. You will then see a window asking you to choose a destination for the recovered files.( For volumes, click on the volume name to highlight it, then click on OK.) The recovery of files from the appliance to your new computer will now begin. Caution: Do not restore any operating system files or applications because these may not be compatible with your new PC. If you restore volumes, make sure that these only contain data files. 5.
Replacing A PC Of A Different Specification Note: If you do reboot from the CD-ROM, make sure you cancel from the first stage of AutoBackup recovery (enter 'N'). 2. Insert the first recovery CD into the CD drive. If there is more than one CD-ROM, one of them should be labeled as the first to insert. 3. If you have HP AutoBackup on the new computer, use Windows Explorer to browse the CD-ROM as normal and click on the Browse CD.CDS program to view the backup data on the CD-ROM.
Tape Backup and Restore, Managing Managing Tape Backup and Restore Tape backup and restore allows you to recover your system, should the HP SureStore AutoBackup appliance fail or need replacing. To use this option, you need one of the HP SureStore tape drives listed below and DDS-4 backup cartridge(s).
Tape Backup and Restore, Managing PC100 appliance. You will not be able to back up all the data from the appliance onto a single cartridge and will need to manually load multiple cartridges. HP SureStore Documentation The HP SureStore tape drives must be purchased separately and will be supplied with the standard accessories, including the HP SureStore Tape CD-ROM and documentation. You do not need all these accessories, as the use of the drive with the HP SureStore AutoBackup appliance is very specific.
Tape Backup Schedule Managing Tape Backup & Restore Tape Backup Schedule HP SureStore AutoBackup is not intended for archiving. The tape backup contains a full copy of everything on the appliance. When you restore from tape, you restore the appliance to its state at the time of backup. You cannot select individual items. HP, therefore, recommends a three-tape backup schedule.
Tape Backup Schedule Click on the Next> button in the lower right corner, you will see a screen like the following: file:///D|/ADMIN_~1/eng/admin/tapebu.
Tape Backup Schedule The bottom box shows the current tape backup schedule. The tape backup will start at the time entered under Start Time on each day of the week with a checkbox in it. In the above example, a tape backup will be performed each weekday starting just before 10 PM. If any jobs are currently running when the tape backup is scheduled to begin, the backup waits for these jobs to complete and prevents any new jobs from starting.
Tape Backup Schedule or days of the week) and clicking on Accept Changes at the bottom of the screen. The backup schedule is changed to the newly entered schedule and you are returned to the Tasks tab page. Alternatively, click on Undo Changes to revert back to the original schedule. file:///D|/ADMIN_~1/eng/admin/tapebu.
Tape Backup Logs, How To View Managing Tape Backup & Restore View Tape Backup Logs Select Manage Tape Backup and Recovery from the Tasks tab page. You will be taken to the Manage Tape Backup and Restore Wizard page shown below: file:///D|/ADMIN_~1/eng/admin/taplog.
Tape Backup Logs, How To View Click on the Next> button in the lower right corner, you will see a screen like the following: To view the tape backup log, click on the View Tape Log button. This will bring up a screen containing information about every tape backup and recovery job. Currently running backup jobs are not shown. The screen will look like the one shown below, and the status is shown as OK if the job was successful and FAILED if it was unsuccessful.
Tape Backup Logs, How To View Each row of the table represents a tape backup or recovery job. Jobs are listed in chronological order, earliest job first. Each column shows an attribute of the tape job. There are three attributes shown: Date Date and time the job was begun Status Shows OK if the job was successful and FAILED if it was unsuccessful Message Shows whether the job was a backup or restore and whether it was successful or unsuccessful.
Tape Backup Logs, How To View Click on
Appliance Recovery From Tape Managing Tape Backup & Restore Appliance Recovery From Tape Select Manage Tape Backup and Recovery from the Tasks tab page. You will be taken to the Manage Tape Backup and Restore Wizard page shown below: file:///D|/ADMIN_~1/eng/admin/taprec.
Appliance Recovery From Tape Click on the Next> button in the lower right corner, you will see a screen like the following: Click on Perform Tape Recovery. You will see the following screen, which provides information about recovery of an HP SureStore AutoBackup appliance from a backup tape. file:///D|/ADMIN_~1/eng/admin/taprec.
Appliance Recovery From Tape Insert the backup tape into the tape drive connected to your HP SureStore AutoBackup appliance (see the Tape Backup User's Guide for more information on tape drives) and click on Restore to continue. At this point, a confirmation page giving information on the currently loaded tape (or giving an error message if no tape is loaded) will be displayed.
Appliance Recovery From Tape Notice the message at the bottom of the screen, it shows your progress. In this case, the storage is 72% finished. When the storage portion is finished, and the restoration of your appliance has begun, you will see a screen like the following: The key information is now on the right side of the screen, across from Tape Backup. In this case, the screen says that 1% of the tape restoration has been completed.
Appliance Recovery From Tape The restore job completed successfully. The HP SureStore AutoBackup appliance reboots several times to complete the restore process (as it rebuilds the appliance software). At this point, all protected computer data as of the tape backup date should be restored, as well as system information stored on the appliance. file:///D|/ADMIN_~1/eng/admin/taprec.
Tape Drive, Adding A Managing Tape Backup & Restore Adding a Tape Drive Use: HP SureStore DAT40e HP SureStore DAT40x6e HP SureStore DLT 80e With: The HP SureStore AutoBackup PC25 appliance The HP SureStore AutoBackup PC100 appliance The HP SureStore AutoBackup PC25 and PC100 appliance. With the HP SureStore AutoBackup PC100 you will need to manually span the cartridge. Note: Do not use the HP SureStore DAT40e with the HP SureStore AutoBackup PC100 appliance.
Index of Topics Index of Topics Look up the topic you want in this alphabetical listing. Click on a letter to jump directly to that section.
Index of Topics America Online See Worldwide Online Services appliance See HP SureStore AutoBackup appliance failure hardware See Appliance Failure and Problems with Your Appliance software See Appliance Failure and Problems with Your Appliance archiving See Use For Backup - Not As Archive AutoBackup See HP SureStore AutoBackup autoloader cleaning tape heads See Cleaning the Tape Heads front panel lights See Front Panel Controls and Indicators front panel messages See Front Panel Messages random mode See A
Index of Topics Computers backup log appliance to tape drive See Viewing Backup Log client to appliance See Viewing Backup Log See Viewing Backup Log backup scheduling appliance to tape drive See Tape Backup Schedule protected computers to appliance See Configuring Backup Options baseline backups See Baseline and Incremental Backups BIOS See BIOS Fail-safe boot-up problems See Problems with Your Appliance boot floppy for disaster recovery how to create boot floppy See Disk Creation ABCDEFGHIJKLMNOPQRSTUVW
Index of Topics jammed See Jammed Cartridge labels See Caring for Cartridges life See Caring for Cartridges loading cartridges in a drive See Loading and Unloading a Cartridge loading cartridges in a magazine See Loading a Magazine and Cartridges ordering See Ordering Information storing See Storing Cartridges unloading See Loading and Unloading a Cartridge write-protecting See Write-Protecting Cartridges CD-ROMs for disaster recovery constraints See Creating Disaster Recovery CD-ROM full backup needed See
Index of Topics ABCDEFGHIJKLMNOPQRSTUVWXYZ DAT drive features Choose your drive model from Features and Specifications DAT cartridges about See Choosing Cartridges ordering See Ordering Information data cartridges about See Choosing Cartridges ordering See Ordering Information data compression appliance See Managing Available Capacity available on HP tape drives See Model Comparison date and time See Settings DDS formats supported See Model Comparison tape life See Caring for Cartridges default SCSI ID See
Index of Topics cannot restore See Problems with Your Tape Drive capacity See Features and Specifications does not power up See Problems with Your Tape Drive features Choose your drive model from Features and Specifications lights See Interpreting the Front Panel Lights maintenance See Cleaning the Tape Heads model comparison See Model Comparison models Choose your drive model from Features and Specifications power requirements Choose your drive model from Features and Specifications returning for service
Index of Topics ABCDEFGHIJKLMNOPQRSTUVWXYZ fault condition See Troubleshooting Guide features of DAT drives Choose your drive model from Features and Specifications flashing light appliance See Lightbar and LCD icons autoloader See Interpreting the Front Panel tape drive See Interpreting the Front Panel forcing ejection See Forcing Ejection for a Tape Drive or Forcing Ejection for an Autoloader Form, Customer Service See Customer Service Form formats, tape See Choosing Cartridges frequency of backup applia
Index of Topics hardware management tools See Monitoring System Status head cleaning See Cleaning the Tape Heads HP SureStore AutoBackup advantages of See Why Use HP SureStore AutoBackup? backup vs.
Index of Topics Internet sites See Worldwide Online Services intrusion alert See Monitoring System Status ABCDEFGHIJKLMNOPQRSTUVWXYZ jammed cartridges See Jammed Cartridge ABCDEFGHIJKLMNOPQRSTUVWXYZ labels See Labeling Cartridges and Magazines LCD display See Lightbar and LCD icons LEDs See Interpreting the Front Panel Lights for tape drives or Interpreting the Autoloader Front Panel life of DDS tape See Caring for Cartridges lightbar indicator See Lightbar and LCD icons lights appliance See Lightbar and
Index of Topics backup options See Configuring Backup Options status See Viewing Status of Protected Computers managing tape backup and restore adding tape drive See Adding a Tape Drive backup log See Viewing Backup Log backup schedule See Tape Backup Schedule restore See Recovering Appliance from Tape measurements Choose your drive model from Features and Specifications messages on autoloader See Front Panel Messages model comparison (tape drives) See Model Comparison models DAT drive Choose your drive mo
Index of Topics operating instructions appliance See Appliance Management autoloader See Using Your Autoloader tape driveSee Using Your Tape Drive operating limits Choose your drive model from Features and Specifications ordering parts and accessories See Ordering Information out-of-warranty service See Obtaining Service overwrite protection See Write-Protecting Cartridges ABCDEFGHIJKLMNOPQRSTUVWXYZ part numbers See Ordering Information parts supplied with appliance See Installation Poster password admini
Index of Topics with disaster recovery CDs See Problems with Your Disaster Recovery CDs with network See Problems with Your Network with protected computer See Problems with Your Protected Computers with tape drive See Problems with Your Tape Drive product numbers See Ordering Information protection from overwriting See Write-Protecting Cartridges putting in a cartridge See Loading and Unloading a Cartridge ABCDEFGHIJKLMNOPQRSTUVWXYZ radio interference certifications See the Regulatory Booklet random mode
Index of Topics protected computers to appliance See Setting Backup Options SCSI accessories available See Ordering Information cables See Ordering Information connection loose See termination See Installation Poster SCSI IDs changing See Installation Poster default See Installation Poster self-test, appliance See BIOS Fail-safe self-test, autoloader after installation See Switching on the Autoloader error condition See Operator Attention Required Light problems during See If There Are Problems During the
Index of Topics updates See Settings specifications autoloader and tape drive Choose your drive model from Features and Specifications HP SureStore AutoBackup See Specification stacker mode See Autoloader Modes of Operation status tab See Viewing System Status storage capacity appliance See Capacity autoloader and tape drive See Model Comparison storing cartridges See Storing Cartridges supplies See Ordering Information support telephone numbers See Obtaining Technical Support switching on appliance See Ap
Index of Topics Tape light See Interpreting the Front Panel Lights tapes See cartridges tasks See Creating disaster recovery CD-ROMs See Managing protected computers See Managing tape backup and restore technical support See Technical Support telephone numbers See Obtaining Technical Support temperature limits Choose your drive model from Features and Specifications termination problems with See Problems with Your Tape Drive threshold alert See Monitoring System Status transfer rate Choose your drive model
Index of Topics versioning See Baseline and Incremental Backups vibration limits Choose your drive model from Features and Specifications viewing settings See Settings viewing status See Viewing System Status voltage alert See Monitoring System Status voltage requirements Choose your drive model from Features and Specifications ABCDEFGHIJKLMNOPQRSTUVWXYZ warning signal appliance lightbar See Monitoring System Status autoloader See Interpreting the Autoloader Front Panel Status tab page See Viewing the Sta
Glossary Glossary [A] [B] [C] [D] [E] [F-G] [H] [I] [J-K] [L] [M] [N] [O] [P] [Q] [R] [S] [T] [U] [V] [W] [X-Z] A autoloader account administrator The HP SureStore DAT40x6 autoloader, which is recommended for optional tape backup with the HP SureStore AutoBackup PC100 model .
Glossary backup log A file maintained by the appliance, containing information about every backup performed including date/time, user account, protected computer, and amount of memory used. There is also a backup log for tape backups, which contains status information about previous (and current) backup jobs. Backup profile The settings and permissions that have been defined for a particular client or group of clients.
Glossary clear account password client This task will change the password for a computer account to an empty string, which allows anyone to access the account. This task is available from the Web Administration Interface under Manage Protected Computers. You must choose a specific protected computer to perform this task. A computer whose information is protected by HP SureStore AutoBackup. In other words, a protected computer.
Glossary disaster recovery The process of restoring a (protected) computer from an unusable state to its state as of a specific backup date. This involves the creation of one or more CD-ROMs and possibly a boot floppy by the backup system administrator. There are several ways to perform disaster recovery, depending on the type of computer used and whether it still has network access to its appliance.
Glossary incremental backup integrity check All backups after the initial baseline backup write only the data that has changed to the AutoBackup appliance. This keeps network traffic and storage space requirements low and allows versioning. A task performed by a database server to ensure the data stored within it has not been corrupted.
Glossary partial backup power cable protected computer A partial backup can include any drives, folders, or files, but they do not include the Windows registry or disk partition information. Unlike full backups, disaster recovery is not possible from a partial backup. The cable used to connect the HP SureStore AutoBackup appliance to the mains power supply. A computer whose files and other information is being managed by HP SureStore AutoBackup.
Glossary schedule Once a baseline backup has been performed on a protected computer, AutoBackup can perform incremental updates to the backed up information to reflect changes in the state of the computer. These changes can include creation of new files and changes to existing files, including deletion of the file. These incremental updates (called incremental backups or simply backups) are performed according a schedule specified for that protected computer.
Glossary tape drive The HP SureStore DAT40 tape drive, which is recommended for optional tape backup with the HP SureStore AutoBackup PC25 model . See also DLT. Tasks tab page A page on the Web Administration Interface containing pointers to tasks for managing protected computers, creating disaster recovery CD-ROMs, and managing tape backup and recovery.
Ordering Supplies Ordering Supplies To find the authorized reseller nearest you, please call: US: 1-800-826-4111 Canada: 1-800-387-3867 Latin America: Mexico City: 1-800-900-7200, Miami: 1-305-267-4220 Ordering Information C7444A C7446A Product HP SureStore AutoBackup PC25 HP SureStore AutoBackup PC100 C5687A Accessories HP SureStore DAT40e C5717A HP SureStore DAT40x6e C5741A C5742A C5743A C5738A External SCSI cable (68-pin to 68-pin, LVD/SE Ultra2, 0.
Ordering Supplies file:///D|/ADMIN_~1/eng/admin/order.
Tape Backup Home Page Using This Guide You have now connected to the Tape Drive User's Guide. Click on Return to Administrator's Guide to return to the other administration topics. This User's Guide describes how to use HP SureStore Tape DAT external drives with HP SureStore AutoBackup. It does not describe all the features of the HP SureStore Tape drives - only those aspects of the tape drive that are relevant to its use as a disaster recovery backup mechanism.
Tape Backup Home Page Copyright Copyright 1999-2000 Hewlett-Packard. All rights reserved. Previo client backup software copyright 1998-2000 Stac Software, Inc. All rights reserved. Includes one or more U.S. or foreign patents 4701745, 5016009, 5126739, 5146221, 5414425, 5463390, 5506580, 5532694, 5778395, 5907672, GB2172127, B904359, 3606869. Other patents pending. Windows and Windows NT are U.S. registered trademarks of Microsoft Corp. Revision History Edition 1.
Tape Backup, Features Features and Specifications DAT40 external drive DAT40x6 external autoloader Note: These are the recommended drives. You can also use the HP SureStore DLT 80e. Please refer to the documentation provided with the DLT drive for details about specification and operation. Model Comparison file:///D|/ADMIN_~1/eng/tape/featur.
DAT40e Features and Specifications HP SureStore DAT40e The HP SureStore DAT40e combines capacity and performance with reliability and low cost of ownership, making it the ideal choice for backup.
DAT40e Dimensions: 95 mm H x 116 mm W x 220 mm D (3.7 in x 4.5 in x 8.6 in) Weight: 2.6 kg (5.7 lbs) Power Requirements DAT40e: 0.5A maximum Supply voltage: 100-240V AC, automatically detected, 50-60 Hz Performance Interface: Ultra SCSI-2 Recording Format: DDS-4 Media: DDS-4 (150 meter) Media Recognition System cartridges Capacity: 20 GB on a DDS-4 cartridge Sustained Transfer Rate: Typically 6 MB/s using DDS-4 Burst Transfer Rate: 6.0 MB/s (asynchronous) 40.
DAT40e UL Listed to UL 1950 GS Mark EN60950 (IEC 950) NOM 1 NYCE GOSH Approved FCC Class B Certified VCCI Class 2 C-TICK Approved (AS/NZS 3548) Class 1 LED product (IEC 825-1) CE Declaration of Conformity RRL Approved BCIQ Approved file:///D|/ADMIN_~1/eng/tape/dds4.
DAT40x6e Features and Specifications HP SureStore DAT40x6e The HP SureStore DAT40x6e can store up to 20 GB on a single tape in just over three hours (up to 80 gigabytes of compressed HP SureStore AutoBackup PC100 data assuming a 4:1 compression ratio). One magazine stores up to 6x20 GB of data.
DAT40x6e Localized LCD Physical Specifications Dimensions: 135 mm H x 165 mm W x 269 mm D (5.3 in x 6.5 in x 10.6 in) Weight: 4.8 kg (10.5 lbs) without magazine Power Requirements DAT40x6e: 0.
DAT40x6e Shock Survival: 90 g for 3 ms duration Safety and Electromagnetic Compatibility CSA Certification to C22.2, No. 950 UL Listed to UL 1950 GS Mark EN60950 (IEC 950) NOM 1 NYCE FCC Class B Certified VCCI Class 2 C-TICK Approved (AS/NZS 3548) CE Declaration of Conformity RRL Approved file:///D|/ADMIN_~1/eng/tape/dds4x6.
Model Comparisons Features and Specifications Model Comparisons HP SureStore Model Feature DAT Technology DAT40 drive DDS-4 DAT40x6 autoloader DDS-4 Capacity 20 GB 6x20 GB Read/Write Formats Supported Transfer Rate, Sustained: DDS-4 DDS-4 without data compression with data compression Burst Transfer Rate, Maximum: asynchronous 3 MB/s 6 MB/s 3 MB/s 6 MB/s 6 MB/s 6 MB/s 40 MB/s 40 MB/s Internal Head Cleaner Feed Forward Equalizer Yes Yes Yes Yes Random access to multiple cartridges Automat
Tape Drive, Using Using Your Tape Drive This topic describes how to: Switch on the tape drive Identify problems during self-test Switching on the Drive Switch on the drive using the power switch on the rear panel by pressing the side with the I symbol down, and then switch on the computer. If There Are Problems During the Self-Test file:///D|/ADMIN_~1/eng/tape/using.
Tape Drive, Using If the Tape light goes off but the Media Caution light shows steady amber at the end of the self-test, this indicates a fault condition: If you have just installed the drive, check the installation for loose connections and repeat the self-test. Try the troubleshooting procedures to determine what the problem is. If the fault condition persists, call for service. file:///D|/ADMIN_~1/eng/tape/using.
Front Panel Lights Using the Tape Drive: Interpreting the Front Panel Lights The front panel of your HP SureStore DAT drive has two lights (LEDs), Tape and Clean, as shown below. The Tape light flashing slowly means Cartridge loading or unloading Self-test in progress The Tape light and Clean light flashing alternately means Tape drive in disaster recovery mode, restoring operating system.
Front Panel Lights The Tape light on steadily means Cartridge loaded, drive ready The Tape light flashing rapidly means Cartridge loaded, activity occurring The Clean light on steadily is the Error Condition Signal. HP SureStore DAT drives perform a comprehensive self-test during power-up. If a hard error causes the self-test to fail, the clean light changes to steady amber. If this happens, call for service. The Clean light flashing is the Media Caution Signal.
Loading And Unloading Tapes Using the Tape Drive: Loading and Unloading Use DDS-4 cartridges with your drive. Ensure that only one label is stuck to the label area of the cartridge. Never use non-standard labels, and never stick anything to the cartridge other than in the label area. This topic describes how to: Load a cartridge Unload a cartridge Force ejection Write-protect cartridges Label cartridges and magazines To Load a Cartridge 1.
Loading And Unloading Tapes To Unload a Cartridge 1. Press the Unload button on the front panel. During the unload sequence the Tape light flashes green. The drive completes any task it is currently performing, winds the tape to the beginning and ejects the cartridge. The sequence can take up to 25 seconds for a write-enabled cartridge and 10 seconds for a write-protected cartridge. The sequence may take longer if the tape needs to be rewound first. 2. Remove the cartridge and store it in its plastic case.
Cartridges, Care Of Using the Tape Drive: Care of Cartridges This topic describes how to: Write-protect cartridges Force eject cartridges Write-Protecting Cartridges Use the correct type of cartridge for your drive. Ensure that only one label is stuck to the label area of the cartridge. Never use non-standard labels, and never stick anything to the cartridge other than in the label area. If you want to protect the data on a cartridge from being altered or overwritten, you can write-protect the cartridge.
Cartridges, Care Of Forcing Ejection If you press the Unload button when the drive is busy, the drive may take some time to respond because it will finish the task it is performing first. This ensures that no data is lost. On rare occasions, however, a system or software fault may cause the tape drive not to respond to an Unload request. In this situation, you can force ejection. There are two ways of doing this: Press the Unload button three times within 5 minutes.
Autoloader, Using Your Using the Autoloader This topic describes how to: Switch on the autoloader Identify problems during self-test Power cycle the drive Switching On The Autoloader Switch on the autoloader using the power switch on the rear panel by pressing the side with the I symbol down, and then switch on the computer. Wait for the autoloader to complete its self-test routine, during which the front panel lights flash and the display shows the message Self Test.
Autoloader, Using Your After a successful self-test, the lights stop go out and the autoloader displays the message Insert Mag if there is no magazine loaded. If there is a magazine loaded, the message will say Mag Loaded and the green Magazine Present light (top) will be lit steadily.
Front Panel Lights, Autoloader Using the Autoloader Interpreting the Front Panel Lights This topic describes: Front panel controls and indicators Front panel messages Front Panel Controls and Indicators Front Panel Display Magazine Present Light Tape Activity Light Operator Attention Required Light Select Button Load Cartridge Button file:///D|/ADMIN_~1/eng/tape/lights_a.
Front Panel Lights, Autoloader HP SureStore DAT40x6 and Language Selection Eject Button Front Panel Display The LCD display shows status information about the autoloader in each of its five regions. Note that this exact display can never occur; all sections are showing at the same time so that you can see where they are. 1. The ten-character dot matrix display provides information on the autoloader's operating status and potential error conditions.
Front Panel Lights, Autoloader This green light indicates the state of the magazine: On indicates that a magazine is loaded. Flashing indicates that a magazine is in the process of being loaded, checked, or ejected Off indicates that no magazine is in the autoloader. Tape Activity Light (middle) This green light indicates the activity of the autoloader's internal tape drive: On indicates that a cartridge is present in the drive. Fast flashing indicates that the data is being read or written.
Front Panel Lights, Autoloader On indicates that a serious hardware error has occurred. If you have just installed the drive, check the installation for loose connections and repeat the self-test. If you have just installed the drive, check the installation for loose connections and repeat the self-test. If the fault condition persists, write down the message displayed on the front panel and call for service. Fast flashing (four times per second) indicates that a firmware upgrade is taking place.
Front Panel Lights, Autoloader Load Cartridge Button Press the Load Cartridge button to load the selected cartridge from the magazine into the drive and then put the autoloader into stacker mode. In stacker mode, the loaded cartridge is used first; when it is full, or the host computer sends an UNLOAD command, the autoloader replaces it with the cartridge from the next highest numbered slot in the magazine. See Autoloader Modes of Operation for more information on stacker mode.
Front Panel Lights, Autoloader Press the Eject button to start the unload process. The drive unloads any cartridge that is currently loaded, and the changer mechanism returns the cartridge to the magazine. The magazine is then ejected. You can also use the Eject button to force an ejection in an emergency. See Forcing Ejection for more information on when and why you might do this. Note: The host computer can disable the Eject button by issuing a SCSI PREVENT MEDIA REMOVAL command.
Front Panel Lights, Autoloader autoloader's operation. If a fault has been detected with the mechanism, or loss of data may result, the error message may be accompanied by the Operator Attention Required light being on or flashing. This is indicated in the OAR column in the alphabetical list of messages below. Where possible, actions you can take to recover from the error are also given. Information Messages Information messages are displayed when power is applied to the autoloader.
Front Panel Lights, Autoloader 1019 8018 1021 8019 1022 8020 1023 8021 1024 8022 8023 8024 8025 8026 8027 Messages The following abbreviations are used in the message listing below: OAR (Operator Attention Required) Column Type Column E I Error message Information message S Status message O F OAR light is on OAR light is flashing The following list gives the messages that can be shown on the front panel display in alphabetical order.
Front Panel Lights, Autoloader 8021 Non-MRS Tape 8009 Clean Fail: Check Cleaning Tape A WRITE, WRITE FILEMARK or ERASE command has been attempted on a non-Media Recognition System cartridge. E F Action: Remove the cartridge and replace with a Media Recognition System cartridge. See Choosing Cartridges. Cleaning failed, possibly due to an expired cleaning tape. E F Action: Use a new cleaning cartridge. A high error rate has been detected reading or writing.
Front Panel Lights, Autoloader 8001 Drive Fault E 8004 Eject Fail E F The drive has detected an internal error. An eject command has failed, either after you pressed the Eject button or after a host command. Action: Try forcing ejection. 2010 Eject Mag I 1015 Erase S 8000 Error X E 1023 ForceEject I 1014 Format S FRU 1 Dead E The Eject button has been pressed. The drive is erasing data from the tape. The mechanism has jammed. The number X identifies the reason for the jam.
Front Panel Lights, Autoloader 3003 FW Program S 3005 FW Tape I 3001 FW Upgrade S 8022 FW Upgrade Err E 8025 FW Read Fail E The drive is being upgraded with the new firmware. The tape loaded is a firmware upgrade tape. Firmware upgrade data is being read from a cartridge. F An error occurred upgrading. F A firmware upgrade failed because of an error in reading data from the cartridge. Action: Try again. If it still fails, call for service.
Front Panel Lights, Autoloader 8003 8007 Load Fail: Try New Tape Load Fail: Press Eject E E 1021 Load Lock I 2009 Load Tape I 1003 Loading S 1016 Locate S 1002 Mag Check S 1001 Mag Eject S 1006 Mag Loaded S 8005 Media Removal Prevented E file:///D|/ADMIN_~1/eng/tape/lights_a.htm (12 of 17) [5/3/2000 3:33:43 PM] F F A load command has failed, or a load or change partitions command has failed to read the system area of the tape, which stores information about tape usage.
Front Panel Lights, Autoloader 4002 No Cleaning tape 8016 No EODmark E 4003 No tape in slot 1 I 8021 Non-MRS Tape F The drive is trying to read what appears to be a blank cartridge (one with no DDS-format End of Data pattern). This is probably a result of power failure while writing. There is no tape in slot 1. HP OBDR requires a tape in slot 1 from which it can boot. A WRITE, WRITE FILEMARK or ERASE command has been attempted on a non-Media Recognition System cartridge.
Front Panel Lights, Autoloader Ready xxm S 1013 Rewind S 8020 SCSI Error E A cartridge has been loaded in the DAT drive, and the drive is ready for tape motion commands. "xxm" is the length of the currently loaded cartridge. For example, "Ready 125m" will be displayed when a DDS-3 (125m) cartridge is loaded. If a write-protected cartridge is loaded, the "Ready xxm" message alternates with the "Read Only" message. The drive is rewinding the tape to the beginning of the partition.
Front Panel Lights, Autoloader 2003 8006 Stray Tape: Insert Empty Mag I There is a cartridge in the tape drive, but there is no magazine present to put it in. Tape Fault E Action: Insert an empty magazine to retrieve the cartridge. The cartridge in the drive is faulty, possibly because the tape has snapped, or the cartridge has an invalid pattern of identification holes. F Action: Use a new cartridge and ensure that it is Media Recognition System. See Choosing Cartridges.
Front Panel Lights, Autoloader The cartridge is stuck in the drive. 8008 4002 4001 Tape Stuck No Cleaning tape Unable to boot from tape E The system cannot boot off a cleaning tape. I The system cannot boot off the loaded tape. Unloading S 8015 Worn Media E 8010 Write x.y:1 Write Fail Action: Try forcing ejection. If this fails, call for service. I 1004 1010 F Either the drive is unloading a cartridge, or a cartridge is being ejected from the drive and replaced in the magazine.
Front Panel Lights, Autoloader 8018 Write Protected Tape E F A WRITE, WRITE FILEMARK or ERASE command has been attempted on a write-protected cartridge. Action: Remove the cartridge and change it to write-enabled. file:///D|/ADMIN_~1/eng/tape/lights_a.
Loading And Unloading, Autoloader Using the Autoloader Loading and Unloading This topic describes how to: Load cartridges and magazine Eject the magazine Force ejection Write-protect cartridges Label cartridges and magazines Loading Cartridges and Magazines Use DDS-4 cartridges with your autoloader. In order to maximize drive and media reliability, we recommend that you normally use the autoloader to provide one week's backup per magazine.
Loading And Unloading, Autoloader 1. Insert the magazine through the door in the front of the autoloader. Make sure that the large arrow is uppermost and pointing towards the autoloader, as shown below. 3. Apply steady pressure until the mechanism takes the magazine and pulls it into the autoloader. The autoloader will then check which magazine slots contain cartridges. 4.
Loading And Unloading, Autoloader The drive mechanism threads the tape and checks the tape format (DDS or audio). If the tape is blank, the drive leaves the tape at BOT (Beginning of Tape) and awaits the next command. If the tape is in DDS format and is write-enabled, the drive performs write and read tests. If the error rate is high, the Operator Attention Required light illuminates and an error message may appear on the front panel display.
Loading And Unloading, Autoloader However, if you need to unload a cartridge urgently, even at the risk of losing data, you must force ejection. Caution: You can lose data if you force ejection. The tape may also end up invalidly formatted because an EOD (End of Data) mark might not be written. Force ejection only as a last resort to recover a cartridge. To force ejection: Hold the Eject button down for at least five seconds or press the Eject button three times within one minute.
Care of Cartridge, Autoloader Using the Autoloader Care of Cartridges This topic describes how to: Write-protect cartridges Label cartridges and magazines Force eject cartridges Write-Protecting Cartridges If you want to protect the data on a cartridge from being altered or overwritten, you can write-protect the cartridge. To write-protect a cartridge, slide the tab on the rear of the cartridge so that the recognition hole is open, as shown below.
Care of Cartridge, Autoloader Make sure that the magazine label is stuck firmly in the recessed label area on the side of the magazine. If the label is stuck somewhere other than in the label area, the magazine may jam in the mechanism. Ensure that the corners of cartridge and magazine labels stick firmly to the surface and do not curl at their edges. file:///D|/ADMIN_~1/eng/tape/care_a.
Cartridges Cartridges This topic describes how to: Choose cartridges Caring for cartridges Using cartridges Storing cartridges Maximize tape life Avoid condensation Choosing Cartridges For optimum performance and storage capacity, use tape cartridges that match your drive's format, and normally use only one cartridge per day. HP SureStore DAT40 drives and HP SureStore DAT40x6 drives use DDS-4 cartridges. HP is not only the leader in tape backup but also the leading supplier of DDS cartridges.
Cartridges Do not use cartridges labeled "DAT" because the media is not certified and its integrity cannot be guaranteed for data storage purposes. DAT cartridges have a different mechanical specification that can cause them to jam in the mechanism. The tape drive warranty does not cover damage caused by the use of DAT cartridges. Caring for Cartridges Under optimum environmental conditions, Hewlett-Packard DDS-4 cartridges are currently specified to 2000 passes over any part of the tape.
Cartridges Do not leave cartridges in direct sunlight or in places where magnetic fields are present (for example, under telephones, next to monitors or near transformers). Do not drop cartridges or handle them roughly. Do not stick more than one label onto cartridges; extra labels can cause the cartridges to jam in the tape drive. Do not use cartridges beyond their useful life.
Tape Heads, Cleaning Cleaning the Tape Heads Cleaning the drive's tape heads regularly with a cleaning cartridge is important to maintain the integrity of your backup data. For optimum performance and to prevent the loss of data, HP recommends that you incorporate a cleaning cycle into your backup routine.
Tape Heads, Cleaning Cleaning the Tape Heads on a Drive 1. Insert a cleaning cartridge into the drive. The tape drive automatically loads the cartridge and cleans the heads. At the end of the cleaning cycle, the drive ejects the cartridge. The cleaning cycle takes approximately 30-60 seconds. If the cleaning cartridge ejects in less than 20 seconds, it has probably expired. In this case, discard the old cleaning cartridge and repeat the operation with a new one. 2.
Tape Heads, Cleaning Manual Method 1. Place a cleaning cartridge in any magazine slot and note the slot number. 2. Insert the magazine into the autoloader. 3. Press the Select button until the slot number where the cleaning cartridge is located is displayed. 4. Press the Load Cartridge button to load the cleaning cartridge into the drive. The drive will then automatically perform the cleaning cycle. The LCD display will display the message "Cleaning" while the cartridge is in use. 5.
HP SureStore Data Guardian Administrator's Guide - Managing Offsite Tape Backup and Restore Frequently Asked Questions For further troubleshooting information, refer also to our Customer Support web site: http://www.hp.com/support/dds_troubleshooting How often should I clean the tape drive heads? The drive has been developed to have a minimal cleaning requirement. HP recommends cleaning after approximately 100 hours of tape-pulling activity, which is normally equivalent to once every three months.
HP SureStore Data Guardian Administrator's Guide - Managing Offsite Tape Backup and Restore file:///D|/ADMIN_~1/eng/tape/faq.
Troubleshooting, Home Page Home Page Welcome to the HP SureStore AutoBackup System Troubleshooting home page. These pages are designed to allow administrators to diagnose and solve issues that may occur whilst using the system. How to Use This Guide If you don't know which part of the system is causing the problem, try one of these sections: Diagnosing the Problem : This section asks specific questions to narrow down on the problem or fault, and will suggest corrective actions.
Troubleshooting, Home Page Notice The information contained in this document is subject to change without notice. Hewlett-Packard makes no warranty of any kind with regard to the material, including, but not limited to, the implied warranties of merchantability and fitness for a particular purpose. Hewlett-Packard shall not be liable for errors contained herein or direct, indirect, special, incidental or consequential damages in connection with the furnishing, performance, or use of this document.
Troubleshooting, Diagnosis Diagnosing the Problem If you don't know which part of the system is causing the problem, click here. Exceptions This list contains specific situations in which the appliance does not provide complete protection. This list explains what configuration is affected, and in what way. Please make sure your systems don't match these known cases, before proceeding. For protected computers which boot from SCSI CD-ROM drives, disaster recovery floppy disks must be used first.
Troubleshooting, Diagnosis The protected computer(s) The tape drive The disaster recovery CD-ROMs The network The appliance What were you doing when the problem occurred? Installing a client Backing up a client Restoring a client Installing an appliance Backing up an appliance Restoring an appliance Problems with the Appliance Please examine the lightbar on top of the appliance.
Troubleshooting, Diagnosis Blinking Amber Lightbar Please examine the LCD on the appliance. How does it appear? Lit with the error icon Failed network icon Failed hard disk icon Temperature alert icon Voltage alert icon Lit with the message "Capacity Licence Violation" Lit with the message "CD-ROM drive not detected" Lit with the message "SCSI Interface Card Failure" Lit with the message "Secondary HDD Failure" Unlit Lightbar Please examine the LCD on the appliance.
Troubleshooting, Diagnosis Unlit Lightbar. LCD lit and with other icons Is the appliance running normally in other respects? Yes No - visit the more detailed troubleshooting page for the appliance. Green Lightbar. LCD lit, with three squares. Has the appliance seemed to halt in this state (i.e. more than 20 minutes)? The disk and network icons should be present. Yes No Green Lightbar.
Troubleshooting, Diagnosis This is the rear of the appliance. file:///D|/ADMIN_~1/eng/trouble/diag.
Troubleshooting, Diagnosis Further Information For more details about problems encountered when using the appliance, visit the appliance troubleshooting page. For more general questions about any part of the system, visit the Frequently Asked Questions section. file:///D|/ADMIN_~1/eng/trouble/diag.
Troubleshooting, Appliance Problems with Your AutoBackup Appliance When does the problem occur? When Installing The Appliance During Power On During the Boot Up Sequence In Operation Installing the Appliance The setup and configuration of the appliance before its operational use. Follow the instructions on the Installation poster.
Troubleshooting, Appliance green and begin to boot. If this is not the case, do you see one of the following symptoms? The lightbar is green. The LCD is lit but blank, and the appliance continually beeps. The lightbar is flashing Orange. There is an exclamation mark within a diamond shown on the LCD. The lightbar is not illuminated. The LCD is unlit. The lightbar is solid amber and the LCD is unlit.
Troubleshooting, Appliance Problem with the fourth stage. Triangle above hard disk icon doesn't blink. No Network icon present. The network icon doesn't blink. The network icon has a cross through it. There is a temperature alert. There is a voltage alert. Blinking amber Lightbar and LCD message "Capacity Licence Violation". Blinking amber Lightbar and LCD message "CD-ROM drive not detected". Blinking amber Lightbar and LCD message "SCSI Interface card Failure".
Troubleshooting, Appliance Is there a tape drive issue ? For help on this issue, refer to the tape drive troubleshooting page. Back to top Power On Issues Green lightbar. Blank but lit LCD. Continuous beeping. There is a possible hardware failure. Try resetting the power to the appliance. If this fails contact HP Orange flashing lightbar. Error symbol on LCD There is an error with the primary disk. The operating system cannot boot. Try resetting the power to the appliance.
Troubleshooting, Appliance System in soft-off state. This is the normal state of the appliance after you have pushed the power button and the appliance has powered down, but the power cord is still plugged in. In normal operation, you should never power down the appliance. Green lightbar. Blank but lit LCD. No beeping. There is a possible hardware failure. Try resetting the power to the appliance.
Troubleshooting, Appliance Static disk icon The appliance is not currently accessing the hard disk. This is only a problem if the appliance should be reading or writing, e.g. during boot up, while backing up or whilst restoring data. If the unit has been physically examined, it may not have been properly reconnected. If the icon never blinks, then contact HP. No network icon present. This indicates that the physical connection to the network has not been present since the appliance booted up.
Troubleshooting, Appliance of the key services is corrupted, this will also trigger a reboot followed by the appliance trying to repair itself. This may result in the appliance taking a long time to boot as the rebuild takes about 30 minutes to run. During this time the services are unavailable. Once successfully booted, the OS should be repaired and subsequent boots should proceed normally. If the appliance continually has reboot problems when loading, contact HP. The network icon has a cross through it.
Troubleshooting, Appliance The voltage settings can be changed using the Hardware Management Tools. If this is occurring regularly, make sure the appliance is connected to a reliable power source, or use an Uninterruptible Power Supply (UPS). Blinking amber Lightbar and LCD message "Capacity Licence Violation". The hardware has been incorrectly assembled. Click on the Status tab in the Web admin interface to get more information on the problem and what to do about it.
Troubleshooting, Appliance Check if the problem is with the appliance by browsing a web page on another system. If this page suffers the same problem, or the browser does not respond, then it is likely there is a problem with the appliance's web server. Try rebooting the appliance. If the appliance can be browsed with no problems from the other system, then this is a problem with the computer you are using to browse the Administrator's console, not the appliance. The browser may be configured incorrectly.
Troubleshooting, Appliance problem then contact HP The appliance cannot be accessed over the network. There are five possible causes for this. The first is that there may be a TCP/IP address conflict on the network. This can be checked by examining the LCD of the appliance, which should display the message "Duplicate network settings detected". If this is the case then the LCD will display an error message, and the lightbar will blink amber.
Troubleshooting, Appliance using the Re-install from Existing Backup Account option. The reinstallation process ensures that the correct address is used. The appliance has stopped serving clients and the network icon on the LCD displays no activity. The most obvious cause of this problem is that the connection between the appliance and the network has been broken. Check that the cable connecting the appliance to the network is secure at both ends.
Troubleshooting, Protected Computers Problems with Your Protected Computers When does the problem occur? Installation of client software Backing up client data Restoring client data Installation of Client Software To setup a computer to be protected by the appliance, the user needs to download the client software.
Troubleshooting, Protected Computers Backing up Client Data The automatic backup of the client data is scheduled to occur during a predefined period of time. Clients can also back up data manually by dragging and dropping the icon of the data file onto the backup icon. If there is a problem, what symptoms are there? The appliance is off-line or unreachable. The client was not connected to the network during the scheduled backup time window.
Troubleshooting, Protected Computers The install program displays the message "Insufficient disk space". The installation of the client software is terminated. Use another hard disk or free up space on the current one. Make sure that there is sufficient space available before attempting to install the client again. The download uses about 30 MB of disk space. Insufficient network capability message received.
Troubleshooting, Protected Computers Reinstall the client software on the protected computer, using the existing account details. Perform a rollback with "all data" selected. This will restore the protected computer to its last saved state. Backing Up Client Data The appliance is offline or unreachable. If the appliance is offline or unreachable, the appliance is unable to back up or restore files. Any scheduled operations are canceled.
Troubleshooting, Protected Computers computer then uninstall the backup agent. The client disconnected from the network during backup. If the client and the appliance stop communicating, then the appliance will wait for a small period of time. If communication returns, then the appliance will continue the current task. If the appliance waits for too long, then it assumes that the client has disconnected, and the current task will be canceled.
Troubleshooting, Protected Computers application while the backup was being performed. This link explains the circumstances when this happens. The client cannot backup another non Microsoft partition. The appliance can only backup partitions on the hard disk of the protected computer, if it can read those partitions. For example, if the disk was split into a program partition and a data partition for use within the same Microsoft operating system, then both partitions will be protected.
Troubleshooting, Protected Computers The client disconnected from the network during recovery. Same as answer on previous section. The appliance is offline or unreachable. Same as answer on previous section. The client was unable to restore data due to lack of disk space. Due to the compression used when storing the backed up data, there is a requirement of additional space needed on the disk to which the data is being restored.
Troubleshooting,Disaster Recovery CDs Problems with Your Disaster Recovery CDs When does the problem occur? Creating Disaster Recovery CD-ROMs Using Disaster Recovery CD-ROMs Creating Disaster Recovery floppies Using Disaster Recovery floppy's Creating Disaster Recovery CD-ROMs Once it knows what data needs to be recovered, the appliance starts to generate the disaster recovery CD-ROMs. If not already present, insert writable CD media. The data is then written to disk.
Troubleshooting,Disaster Recovery CDs For Windows 2000, disaster recovery is not possible for systems with a dynamic disk configuration. Any protected computer using the new encrypted file system available with Windows 2000 NTFS version 5 cannot be backed up or restored. If a system is configured with mixed SCSI and EIDE Hard Disk Drives, then disaster recovery is only supported for systems with no more than three disks.
Troubleshooting,Disaster Recovery CDs Using Disaster Recovery Floppies Insert the disaster recovery floppy disk when the machine is booting up. Follow the instructions on screen. If there are problems, what are the symptoms? The installation process begins but crashes. The computer doesn't have a floppy drive. The appliance doesn't have a floppy drive. Back to top Creating Disaster Recovery CD-ROMs The data on the CD-ROM(s) is not complete. This could be due to two reasons.
Troubleshooting,Disaster Recovery CDs The CD tray doesn't open when the button is pressed. Is the drive in operation? If a CD is being written there may be a delay before the tray comes out. If there is no activity, check for signs that it is powered on. If it is, there may be problem and you should contact HP Using Disaster Recovery CD-ROMs The computer doesn't boot from the CD drive. Make sure that the CD in the drive is the first of the set, as this is the bootable one.
Troubleshooting,Disaster Recovery CDs What was the nature of the "disaster" that prompted this recovery? It may be that the same error may still be affecting the system. If there was a hard disk failure, has the hard disk been replaced? The computer doesn't have a CD drive. Disaster recovery is not possible without a CD-ROM drive.
Troubleshooting,Disaster Recovery CDs include the appropriate drivers for the device. The computer doesn't have a floppy drive. The normal procedure is to use CD-ROM disks. If the system doesn't have a floppy or a CD-ROM drive, it cannot be recovered using disaster recovery methods until one is added. The appliance doesn't have a floppy drive. The disaster recovery floppy must be created on the local client that is running the administrator's console.
Troubleshooting, Tape Drive Problems with Your Tape Drive When does the problem occur? Installing The Tape Drive Backing Up The Appliance Restoring The Appliance General Issues & Diagnosis (DDS) Installing the Tape Drive Setting up the drive so that it is ready to work with the appliance. Refer to the installation poster and the online Tape Drive Guide. If there is a problem, what are the symptoms? DDS : At power on, both lights flash, and then the orange light stays on.
Troubleshooting, Tape Drive DLT : Tape write protected message in administrators console. Back to top Restoring the Appliance If the appliance fails, or needs to be restored to a former state, the information stored on the backup tapes is used. DDS : Tape being ejected immediately upon load. Insert next cassette prompt. DDS : Tape write protected message in administrators console. DLT : Tape write protected message in administrators console.
Troubleshooting, Tape Drive Cleaned drive, but the cleaning light comes back on Cleaning cartridge ejects in less than 20 seconds Back to general issues Back to top DDS : Drive making noises. What is the state of the drive? Periodic whirring noise is heard inside the drive Drive was part the way through the backup, then stopped and is making whirring or grinding noises Back to general issues Back to top DDS : Drive not detected/timeouts/no response from drive.
Troubleshooting, Tape Drive External drive has no lights showing Back to general issues Back to top DDS : Problem with tape/media What is the state of the drive? Tape ejected immediately Unable to format media Tape appears "write protected" and cannot be written to Drive won't accept tapes including cleaning tape Tape jammed in drive Stuck tape Stuck magazine Snapped tape Back to general issues Back to top DDS : Problem writing to, or reading media What is the state of the drive? Amber cleaning light i
Troubleshooting, Tape Drive DLT : The system fails to recognize the drive. The appliance may only recognize a SCSI device on the bus that was there when it powered on. Try rebooting the appliance, but turn the tape drive on first. There may be a conflict on the SCSI bus. The tape drive should be the only device attached to the appliance via the SCSI port. It can have any SCSI ID, other than 7. DLT : The drive will not accept a tape cartridge.
Troubleshooting, Tape Drive Insert next cassette prompt. Remove the current cassette and insert the next one in the backup sequence. Other Issues The tape drive's amber light stays on. For DLT products the LED labeled "Use Cleaning Tape" communicates an error condition after a failed self-test. By staying steady amber, it means that a cleaning cartridge is required. When it blinks amber, this indicates that there is possible damage to the tape, and it should be ejected.
Troubleshooting, Tape Drive Use new recommended media. Correct environmental conditions and/or ensure tapes are allowed to adjust to new environment before using. Check that the cleaning cartridge has not expired If this was not successful then call for service Amber cleaning light is flashing First check : Check if drive has been cleaned. Check age, condition and type of the media. Check the environmental (humidity and temperature) conditions for the drive, storage and transportation of the media.
Troubleshooting, Tape Drive Check the white plastic write protect tab at the rear of the tape cartridge is visible Check media is recommended and has the DDS logo . All SureStore drives manufactured since 1993 check the media for a special identification system called MRS. If the media is not MRS (i.e. not data grade) it will be treated as if it was write protected. Then do this : Use new media with the DDS-4 logo.
Troubleshooting, Tape Drive This is a normal function of the drive. The noise comes from the automatic head cleaning mechanism. If this noise is heard constantly, the drive is having trouble reading or writing the tape. If you do hear this noise, try cleaning the drive more often and use a new tape.
Troubleshooting, Tape Drive If this was not successful then call for service External drive has no lights showing First check : Check power connected. Check fuse. Check power cord. Then do this : Ensure power to the drive (check plugged in and switched on, change power cable). Power cycle the drive. If another drive is available to swap in, try this to confirm whether it is a drive or power problem.
Troubleshooting, Tape Drive Then do this : Change to new supported media. If the tape is a cleaning cartridge, use a new cleaning tape and discard the old one. Use new recommended media. Correct environmental conditions and/or ensure tapes are allowed to adjust to new environment before using. The tape in the drive is a cleaning cartridge. If you want to back up or restore, insert a data-grade tape.
Troubleshooting, Tape Drive A high error rate has been detected while writing, suggesting that the tape is nearing the end of its useful life. If this was not successful then call for service Tape appears "write protected" and cannot be written to First check : Check the write-protect tab on the cartridge. Check media is recommended and has the DDS logo Then do this : You are trying to write to a write-protected cartridge. Remove the write-protection or use another tape.
Troubleshooting, Tape Drive Power cycle the drive. Discard the old tape and restart the operation with a different tape. Use new recommended media. Correct environmental conditions and/or ensure tapes are allowed to adjust to new environment before using. If this was not successful then call for service Tape jammed in drive First check : Check whether there is actually a tape in the drive Check power connected. Check fuse. Check power cord.
Troubleshooting, Tape Drive Then do this : Ensure power to the drive (check plugged in and switched on, change power cable). Power cycle the drive. If another drive is available to swap in, try this to confirm drive or power problem. Push the unload button and if the tape doesn't eject hold the unload button for approximately 10 seconds to force eject. If this fails, turn the power off and on again. Power cycle the drive.
Troubleshooting, Tape Drive Snapped tape First check : If there is more than one device, check which drive has a hardware problem. Check if media has been used on another drive to confirm which drive was used when tape snapped. Check age, condition and type of the media. Check the environmental conditions for the drive & the media. Then do this : Discard the old tape and restart the operation with a different tape. Use new recommended media.
Troubleshooting, Tape Drive Drive detected but not responding First check : Check the SCSI IDs of all devices on the bus. Other device with clash of address would disappear as well. Check correct cable is being used. Check cabling. Check SCSI bus terminated properly. Check if the drive is faulty. Then do this : Terminate the SCSI bus correctly. Change to recommended cable. If more than one device present, ensure each device has its own SCSI ID.
Troubleshooting, Tape Drive Check correct cable is being used. Check cabling. Check SCSI bus terminated properly. Check if the drive is faulty. Then do this : Terminate the SCSI bus correctly. Change to recommended cable. Check cable secured properly. If more than one device present, ensure each device has its own SCSI ID. It is recommended that only one device is connected to the appliance on the SCSI bus.
Troubleshooting, Tape Drive Terminate the drive correctly. Clean the drive. Use recommended new media. If this was not successful then call for service Terms and Expressions Power Cycle Using the power switch on the device, turn off the power, wait for 10 seconds, and then turn the power back on. How to check for expired cleaning tape If all of the media is on the right-hand spool, the cleaning cartridge has expired. It is highly recommended that the checkbox label is used to keep a tally of each clean.
Troubleshooting, Tape Drive Resetting the drive To reset an external drive, switch off at the power switch, wait 10 seconds and then reapply power. Termination Termination is critical to the operation of the SCSI bus. Generally speaking, termination should be applied to the last device on the SCSI chain and at the beginning of the SCSI chain (usually the SCSI adapter). Intermediate devices should have their termination disabled.
Troubleshooting, Network Problems with Your Network General Problems Related Issues General Problems Setting up the appliance on the network. Using the appliance on the network. The appliance cannot be found on the network. The backup is taking a long time. The backups are much faster than the download time of the client side agent software? Back to top Related Issues There is no network icon on the appliance. The network icon on the appliance doesn't blink.
Troubleshooting, Network The appliance cannot be accessed over the network. There are three possible causes for this. The first is that there may be a TCP/IP address conflict on the network. This can be checked by examining the LCD of the appliance, which should display the message "Duplicate network settings detected". If this is the case then the LCD will display an error message, and the lightbar will blink amber.
Troubleshooting, Network The backups are much faster than the download time of the client side agent software? Different speeds in a network can be caused by the route the information travels. If the packets are sent directly, then the speed should be high. If the packets are sent via a machine which is busy, then they may be delayed.
Troubleshooting, Frequently Asked Questions Frequently Asked Questions Either select a topic from the following list: The Appliance Protected Computers Disaster Recovery CD-ROMs Tape Drive Network General Question Or click on the image map below: file:///D|/ADMIN_~1/eng/trouble/faq.
Troubleshooting, Frequently Asked Questions The Appliance Q. Q. Q. Q. Q. Q. Q. Q. Q. Q. Q. Q. Q. Q. Q. Q. Q. Q. Q. Q.
Troubleshooting, Frequently Asked Questions details. How does the administrator retrieve a forgotten password? As a security feature, no remote access is provided to inspect the administrator's password. If you cannot recall the password, then there is a method to reset the whole appliance. This involves pressing the power button four times once the appliance has booted and in its "four square" mode.
Troubleshooting, Frequently Asked Questions As shown in the screen above (which you get after pressing the Clear Account Password button on the Manage Protected Computers screen), you just press the Clear Account Password button on this screen (the only button there is, except for
Troubleshooting, Frequently Asked Questions a screen like the following: Each row of the table represents a protected computer (except the Global entry, which represents all protected computers). The columns display the following attributes: User Name The Microsoft Networking name (and OS type) of the computer Account The user account name provided when the computer was set up Last Backup The date and time the latest backup for this computer was begun.
Troubleshooting, Frequently Asked Questions View Backup Log Displays the backup log for the selected account Configure Backup Options Provides interface for changing the backup schedule and/or which files are backed up Clear Account Password Provides wizard for resetting the password for this account Delete Account Provides wizard for removing this account and all its stored data What is the maximum file size that is saved? The maximum file size that should be saved is 2 GB.
Troubleshooting, Frequently Asked Questions Do the files that I am currently using get backed up? Any file that is locked for exclusive use by an application will not get backed up. In practice, there are very few files that fall into this category. For example, office productivity suites (e.g. MS Office) do not lock their files for exclusive access. The main type of files that are locked are email and database files (the software includes an MS Outlook agent - see below).
Troubleshooting, Frequently Asked Questions full? See also How is a backup tape device attached to the appliance? Use: HP SureStore DAT40e HP SureStore DAT40x6e HP SureStore DLT 80e With: The HP SureStore AutoBackup PC25 appliance The HP SureStore AutoBackup PC100 appliance Either the HP SureStore AutoBackup PC25 or the PC100 appliance.
Troubleshooting, Frequently Asked Questions The disaster recovery CD-ROM trouble shooting page gives more information on this problem. Why is the lightbar not green? This means that there is a problem with the appliance. Please refer to this page for an explanation of what the lightbar means, or refer to this page to diagnose the problem. What do the boxes on the appliance LCD mean? The boxes relate to the boot-up sequence of the appliance. Please refer to this page for an explanation of their meaning.
Troubleshooting, Frequently Asked Questions If you can you browse the appliance web administration pages then there is not a problem with the appliance. If not, then examine the LED and LCD of the appliance and go to the Appliance Diagnosis page. Why can't I install the HP AutoBackup Agent on my Windows NT/2000 client PCs? Check using Windows Explorer that there is enough space on the hard disk to install the client. Make sure that you have permission to install programs on the computer.
Troubleshooting, Frequently Asked Questions computationally intensive applications are running on the client machine, then the backup would run slower. Alternatively, the appliance could be receiving many requests and not processing the work as quickly as usual. As the backup software will run in the background, it is recommended that the backup is left to complete in its own time.
Troubleshooting, Frequently Asked Questions Why is the recovery from the disaster recovery disks taking so long? This could be due to a number of factors. If the client is being restored across the network, then a large file set or a busy/slow network will increase the time to recover that information. After recovery I seem to have created a new account. How do I get my old one back? Firstly delete the newly created account from the appliance.
Troubleshooting, Frequently Asked Questions Network Q. Q. Q. Why are my backups much faster than the download time of the client side agent software? How do I reset the network configuration settings for the appliance? Why can I not access the appliance through its name, only its IP address? Why are my backups much faster than the download time of the client side agent software? Different speeds in a network can be caused by the route the information travels.
Troubleshooting, Frequently Asked Questions Why can I not access the appliance through its name, only its IP address? When browsing external web pages, the name of the page is given to a web proxy, which resolves that name into an IP address. For internal networks, the same is not always true and the proxy server may be unable to resolve the name of the appliance, and will not find it on the network. The best way to get around this is to bypass the proxy server for any local (intranet) addresses.
Troubleshooting, Alert Messages Alert Messages Capacity Management Alerts Tape Backup/Restore alerts Networking alerts CD-ROM alerts Software reset/update alerts Backup server status alerts Hardware Environmental alerts Capacity Management Alerts Capacity Warning Capacity Critical Capacity Filled Backups Disabled Critical Disk Failure Capacity License Violation Alert Summary Message Alerts (Web, LCD and Status Light) file:///D|/ADMIN_~1/eng/trouble/alerts.
Troubleshooting, Alert Messages Capacity Warning Web: YES Warning LCD: YES Capacity Critical Status light: Flashing YELLOW When 100% of the backup capacity is used, backup services will stop. It is recommended that you consider purchasing an additional HP SureStore AutoBackup system before this point and transfer some of your protected computers to the new system. Web: YES Critical You have used more than 95% of the available backup capacity on this HP SureStore AutoBackup system.
Troubleshooting, Alert Messages Capacity License Violation Web: YES Critical LCD: YES Set LCD disk icon to failed Your disk configuration violates the capacity license for your HP SureStore AutoBackup product. All backup and restore services are disabled.
Troubleshooting, Alert Messages Failure During Tape Backup Web: YES Critical LCD: YES Status Light: Flashing YELLOW Failure During Tape Backup Web: YES Critical LCD: YES Status Light: Flashing YELLOW Failure During Tape Backup Web: YES Critical LCD: YES Status Light: Flashing YELLOW Failure During Tape Backup Web: YES Critical LCD: YES Status Light: Flashing YELLOW Failure During Tape Backup Web: YES Critical LCD: YES Status Light: Flashing YELLOW file:///D|/ADMIN_~1/eng/trouble/alerts.
Troubleshooting, Alert Messages Failure During Tape Restore Web: YES Critical LCD: YES Status Light: Flashing YELLOW Failure During Tape Restore Web: YES Critical LCD: YES Status Light: Flashing YELLOW Failure During Tape Restore Web: YES Critical LCD: YES Status Light: Flashing YELLOW The Tape Drive Needs Cleaning Web: YES Critical LCD: YES Your appliance recovery from tape has failed! The failure was due to a timeout while waiting for the administrator to insert the next tape in the multiple cartr
Troubleshooting, Alert Messages Expired Cleaning Cartridge Detected Web: YES Critical LCD: YES Status Light: Flashing YELLOW Expired Tape Cartridge Detected Web: YES Critical LCD: YES Your tape backup job was successful but the last cleaning cartridge used in the tape drive was worn out. Discard the worn out cleaning cartridge, and then use a new cleaning cartridge to clean the tape drive again.
Troubleshooting, Alert Messages SCSI Interface Card Failure Web: YES Critical LCD: NO The SCSI interface card used to connect the optional tape drive to your HP SureStore AutoBackup system is not responding. Contact Hewlett-Packard. User-initiated via detailed message page Status Light: Flashing YELLOW Networking Alerts Duplicate network settings detected Network error detected Waiting for network configuration
Troubleshooting, Alert Messages Waiting for network configuration Web: YES Info LCD: YES Run the run the HP SureStore AutoBackup Setup CD-ROM to configure the initial networking settings When HP SureStore AutoBackup Setup Utility used to configure initial networking settings Current system name and IP address, displayed when configured system booted successfully Automatically cleared after 20 seconds If system networking unconfigured, then display this alert after successful boot, showing MAC address
Troubleshooting, Alert Messages Insert Blank CD-R Media Web: YES Info LCD: YES To continue creating a Disaster Recovery CD-ROM set, you need to insert a blank CD-R media into the CD-ROM drive inside your HP SureStore AutoBackup system. User inserts blank CD-R media and clicks Next on DR CD status page, or cancels DR CD wizard The expected CD-Writer drive was not detected. This is possibly due to a cabling problem or a faulty CD-Writer drive.
Troubleshooting, Alert Messages System software Auto-repaired Web: YES Critical LCD: YES Your HP SureStore AutoBackup system software was automatically repaired after an operating system failure, without any loss of backup data. No further action is required. User-initiated via detailed message page Your HP SureStore AutoBackup system software was successfully repaired/updated without any loss of backup data (after a manual software reset or CD-ROM software update). No further action is required.
Troubleshooting, Alert Messages Lost User Settings Web: YES Critical LCD: YES Status Light: Flashing YELLOW Software update failure Web: YES Critical While performing a repair or update of the system software, an error occurred while attempting to restore the original protected computer configuration settings. The users on the protected computers will be automatically prompted to re-register with the HP SureStore AutoBackup system.
Troubleshooting, Alert Messages There are a number of possible detail messages for summary messages marked '*', the link takes you to the first one. Alert Summary Message Backup Service Failure Alerts (Web, LCD and Status Light) Web: YES Critical LCD: YES Status Light: Flashing YELLOW Alert Details Message Your HP SureStore AutoBackup system was unable to initialize correctly, so no backup or restore jobs can be run by any of your protected computers.
Troubleshooting, Alert Messages Retention Job Failed Web: YES Critical LCD: YES Not enough space for the retention job. This may be due to one or more of the protected computers containing a very large file (greater than 2 GBytes) User-initiated via detailed message page Not enough memory to complete retention job User-initiated via detailed message page The retention job failed to run because the tape backup was still running when the retention job was scheduled to start.
Troubleshooting, Alert Messages Integrity Check Failed Web: YES Critical LCD: YES Status Light: Flashing YELLOW Integrity Check Failed Web: YES Critical LCD: YES Status Light: Flashing YELLOW Integrity Check Failed Web: YES Critical LCD: YES Status Light: Flashing YELLOW Integrity Check Failed Web: YES Critical LCD: YES Status Light: Flashing YELLOW file:///D|/ADMIN_~1/eng/trouble/alerts.htm (14 of 23) [5/3/2000 3:34:44 PM] An internal error occurred during the Integrity Check job.
Troubleshooting, Alert Messages The Users Accounts are removed Web:YES Info User accounts that were marked for deletion are removed User-initiated via detailed message page LCD: NO Status Light: GREEN Hardware Environmental Status (generated by Intel s/w) Baseboard temperature Crossed upper noncritical Baseboard temperature Crossed upper critical Baseboard temperature Crossed lower noncritical Baseboard temperature Crossed lower critical Baseboard temperature Back to Normal +12 volts Crossed upper nonc
Troubleshooting, Alert Messages CPU I/O Voltage Crossed lower critical CPU I/O Voltage Back to Normal CPU CORE Voltage Crossed upper noncritical CPU CORE Voltage Crossed upper critical CPU CORE Voltage Crossed lower noncritical CPU CORE Voltage Crossed lower critical CPU CORE Voltage Back to Normal Chassis Intrusion Alert Summary Message Baseboard temperature Crossed upper noncritical Alerts (Web, LCD and Status Light) Baseboard temperature Crossed upper noncritical User-initiated via detailed message
Troubleshooting, Alert Messages Baseboard temperature Web: YES Critical Baseboard temperature Crossed lower noncritical LCD: YES Also display temperature icon Please click on the URL below to get details Crossed lower critical Status Light: Flashing YELLOW Baseboard temperature If temperature falls below 0C, then system performs an automatic shutdown! Help configuring thresholds for Baseboard Temperature Web: YES Warning Baseboard temperature Back to Normal LCD: YES Please click on the URL belo
Troubleshooting, Alert Messages +12 volts Web: YES Critical Crossed lower critical LCD: YES Also display voltage icon +12 volts Crossed lower critical Please click on the URL below to get details If +12V voltage falls below 10.
Troubleshooting, Alert Messages -12 volts Web: YES Critical Crossed lower critical LCD: YES Also display voltage icon -12 volts Crossed lower critical Please click on the URL below to get details If -12V voltage rises above -10.
Troubleshooting, Alert Messages +5 volts Web: YES Critical Crossed lower critical LCD: YES Also display voltage icon +5 volts Crossed lower critical Please click on the URL below to get details If +5V voltage falls below 4.7V, then system performs an automatic shutdown! Help configuring thresholds for +5 volts Status Light: Flashing YELLOW +5 volts Web: YES Warning Back to Normal LCD: YES +3.
Troubleshooting, Alert Messages +3.3 volts Web: YES Critical Crossed lower critical LCD: YES Also display voltage icon +3.3 volts Crossed lower critical Please click on the URL below to get details If +3.3V voltage falls below 3.1V, then system performs an automatic shutdown! Help configuring thresholds for +3.3 volts Status Light: Flashing YELLOW +3.
Troubleshooting, Alert Messages CPU I/O Voltage Web: YES Critical CPU I/O Voltage Crossed lower critical LCD: YES Also display voltage icon Please click on the URL below to get details Crossed lower critical Status Light: Flashing YELLOW CPU I/O Voltage Web: YES Warning Back to Normal LCD: YES CPU CORE Voltage Crossed upper noncritical Help configuring thresholds for CPU I/O Voltage CPU I/O Voltage Back to Normal Help configuring thresholds for CPU I/O Voltage Web: YES Warning CPU CORE Voltag
Troubleshooting, Alert Messages CPU CORE Voltage Web: YES Critical CPU CORE Voltage Crossed lower critical LCD: YES Also display voltage icon Please click on the URL below to get details Crossed lower critical Status Light: Flashing YELLOW CPU CORE Voltage If CPU CORE Voltage falls below 1.
How To Contact HP - Home Page Home Page This topic describes: What to do before calling support How to obtain technical support How to obtain service HP service agreements Worldwide online service Before calling for service or support Check the Installation Instruction Sheet and the troubleshooting advice in this Troubleshooting Guide. Go to HP's support web site for this product to get up to date support information and tools, e-mail support and access to our support forum to ask the experts. http://www.
How To Contact HP - Home Page area, by selecting the region required from the navigational buttons in the left hand pane. Obtain the telephone number from the list of countries supplied. You will be connected to a responsive team waiting to help you. After the warranty period: If you require support after your warranty has expired, you can receive support for a fee through the same telephone numbers. The fee is charged on a per incident basis.
How To Contact HP - Home Page A contact name for details of the failure A contact telephone number Your shipping address The telephone service agent will verify that the unit is faulty and will make sure that a replacement unit is sent to you within 24 hours. When you receive the replacement unit, remove it from the packaging and use the packaging material for returning the faulty unit. All shipment costs are prepaid by HP.
How To Contact HP - Service Support Form, Autoloader Customer Service Form - HP SureStore AutoBackup Please have the following information about your system and the problem you are having before you call the HP Customer Support Center. You can print this form and fill in the necessary information before you call, or you can fax the completed form to the Customer Service Center. Contact Information Company or Organization: Contact Person/Title: (e.g., Mr.
How To Contact HP - Service Support Form, Autoloader Information about the Problem Client Error Message: LCD Display Message/Status: IP Address of HP AutoBackup: Type of Network Connection: Detailed Description of Problem: file:///D|/ADMIN_~1/eng/contact/svc_auto.
How To Contact HP - Service Support Form, Tape Drive Customer Service Form Optional Tape Drive Please complete the following information about your system and the problem you are having before you call the HP Customer Support Center. You can print this form and fill in the necessary information before you call, or you can fax the completed form to the Customer Service Center. Contact Information Company or Organization: Contact Person/Title: (e.g., Mr.
How To Contact HP - Service Support Form, Tape Drive Firmware Revision: Date Purchased: Date of Last Cleaning: How many times has cleaning tape been used? Information about the Problem Light Pattern During Problem: Any Audible Signals: Error Messages/Code Generated: Does the problem occur every time you try the operation? What type of media are you using? (Brand, Capacity, Batch No.
How To Contact HP - America's Before Calling for Service or Support: Go to HP's support web site for this product to get up to date support information and tools, e-mail support and access to our support forum to ask the experts. http://www.hp.com/support/autobackup. North and South America This topic describes how to get assistance in the following languages: English French Spanish Portuguese English Internet E-mail: Send messages to HP SureStore technical support at SureStore_Support@HP-Loveland-om10.
How To Contact HP - America's Fax: Faxes are answered within 48 hours. Fax Number: +1 (970) 667-0997 Mailing Address: HP SureStore Technical Support 815 14th Street SW, Bldg. E Loveland, CO 80537 USA Telephone Support: Hours of Operation: Monday - Friday, 6am - 6pm (Mountain time) Telephone: +1 (970) 635-1000 French Courrier électronique Internet : Envoyez des messages à l'assistance technique HP SureStore à SureStore_Support@HP-Loveland-om10.om.hp.com.
How To Contact HP - America's Assistance téléphonique : Horaires de disponibilité : Lundi - Vendredi, 7 h - 19 h (heure des Rocheuses) Téléphone : +1 (970) 635-1000 Clients canadiens : +1 (905) 206-4663 Spanish Correo electrónico de Internet: Envíe los mensajes al servicio de asistencia técnica de HP SureStore en SureStore_Support@HP-Loveland-om10.om.hp.com. Normalmente, se responde a los mensajes en el plazo de 48 horas.
How To Contact HP - America's Portuguese E-mail Internet: Envie mensagens para o suporte técnico da HP SureStore para SureStore_Support@HP-Loveland-om10.om.hp.com. Mensagens são normalmente respondidas dentro de 48 horas. Serviço QuickFAX Faxback: Utilize este sistema automático para que informações de produtos ou documentos de suporte técnico sejam enviadas por fax para você. Telefone: +1 (800) 368-9673 ou +1 (970) 635-1510 Fax: Faxes são respondidos dentro de 48 horas.
How To Contact HP - America's Before Calling for Service or Support: Go to HP's support web site for this product to get up to date support information and tools, e-mail support and access to our support forum to ask the experts. http://www.hp.com/support/autobackup.
How To Contact HP - America's Czech Republic 02 471 7321 Denmark (English) 3929 4099 Finland (English) 0203 47288 France (French) 01 43 62 34 34 Germany (German) 0180 5 25 81 43 Hungary 01 252 4505 Ireland (English) 01 662 5525 Italy (Italian) 02 2 641 0350 Netherlands (Dutch) 020 606 8751 Norway (English) 22 11 6299 Poland 22 375065 Portugal (English) 01 441 7199 Russia 095 923 5001 Spain (Spanish) 902 321 123 Sweden (English) 08 619 2170 Switzerland (French, German, Italian) 0848 80 11 11 United Kingdom
How To Contact HP - America's Belgique (français) 02 626 88 07 Belgique (hollandais) 02 626 88 06 Danemark (anglais) 3929 4099 Espagne (espagnol) 902 321 123 Finlande (anglais) 0203 47288 France (français) 01 43 62 34 34 Hongrie 01 252 4505 Irlande (anglais) 01 662 5525 Italie (italien) 02 2 641 0350 Norvège (anglais) 22 11 6299 Pays-Bas (hollandais) 020 606 8751 Pologne 22 375065 Portugal (anglais) 01 441 7199 République Tchèque 02 471 7321 Royaume-Uni (anglais) 0171 512 5202 Russie 095 923 5001 Suède (an
How To Contact HP - America's Deutschland (Deutsch) 0180 5 25 81 43 Finnland (Englisch) 0203 47288 Frankreich (Französisch) 01 43 62 34 34 Großbritannien (Englisch) 0171 512 5202 Irland (Englisch) 01 662 5525 Italien (Italienisch) 02 2 641 0350 Niederlande (Niederländisch) 020 606 8751 Norwegen (Englisch) 22 11 6299 Österreich (Deutsch) 0660 6386 Polen 22 375065 Portugal (Englisch) 01 441 7199 Rußland 095 923 5001 Schweden (Englisch) 08 619 2170 Schweiz (Französisch, Deutsch, 0848 80 11 11 Italienisch) Spa
How To Contact HP - America's Belgio (Francese) 02 626 88 07 Repubblica Ceca 02 471 7321 Danimarca (Inglese) 3929 4099 Finlandia (Inglese) 0203 47288 Francia (Francese) 01 43 62 34 34 Germania (Tedesco) 0180 5 25 81 43 Ungheria 01 252 4505 Irlanda (Inglese) 01 662 5525 Italia (Italiano) 02 2 641 0350 Paesi Bassi (Olandese) 020 606 8751 Norvegia (Inglese) 22 11 6299 Polonia 22 375065 Portogallo (Inglese) 01 441 7199 Russia 095 923 5001 Spagna (Spagnolo) 902 321 123 Svezia (Inglese) 08 619 2170 Svizzera (Fra
How To Contact HP - America's Bélgica (Holandés) 02 626 88 06 Bélgica (Francés) 02 626 88 07 Dinamarca (Inglés) 3929 4099 España (Español) 902 321 123 Finlandia (Inglés) 0203 47288 Francia (Francés) 01 43 62 34 34 Hungría 01 252 4505 Irlanda (Inglés) 01 662 5525 Italia (Italiano) 02 2 641 0350 Holanda (Holandés) 020 606 8751 Noruega (Inglés) 22 11 6299 Polonia 22 375065 Portugal (Inglés) 01 441 7199 Reino Unido (Inglés) 0171 512 5202 República Checa 02 471 7321 Rusia 095 923 5001 Suecia (Inglés) 08 619 217
How To Contact HP - America's Áustria (Alemão) 0660 6386 Bélgica (Holandês) 02 626 88 06 Bélgica (Francês) 02 626 88 07 Dinamarca (Inglês) 3929 4099 Espanha (Espanhol) 902 321 123 Finlândia (Inglês) 0203 47288 França (Francês) 04 50 43 98 53 Holanda (Holandês) 020 606 8751 Irlanda (Inglês) 01 662 5525 Itália (Italiano) 02 2 641 0350 Noruega (Inglês) 22 11 6299 Portugal (Inglês) 01 441 7199 Reino Unido (Inglês) 0171 512 5202 Suécia (Inglês) 08 619 2170 Suíça (Francês, Alemão, Italiano) 0848 80 11 11 Outros
How To Contact HP - America's Before Calling for Service or Support: Go to HP's support web site for this product to get up to date support information and tools, e-mail support and access to our support forum to ask the experts. http://www.hp.com/support/autobackup.
How To Contact HP - America's Telephone Support: Hours of Operation: Monday - Friday, 8:30am - 5:30pm (Eastern Standard Time) Telephone: (03) 9272 8000 China (PRC) Bulletin Board: Download software, firmware and support documents, and leave messages for technical support.
How To Contact HP - America's Fax Machine: Faxes are answered within 48 hours. Fax Number: +65 274 2033 (Singapore) Ö§³Öµç»°£º Ӫҵʱ¼ä£ºÐÇÆÚÒ»ÖÁÐÇÆÚÎ壬9:00 - 17:00 µç»°ºÅÂ룺800 96 7729 Telephone Support: Hours of Operation: Monday Friday, 9:00 - 17:00 Telephone Numbers: 800 96 7729 India Bulletin Board: Download software, firmware and support documents, and leave messages for technical support. Telephone: 22 506 2210 Internet E-mail: Send messages to HP SureStore technical support at: csc_india@hp.
How To Contact HP - America's Japan World Wide Web: Information from HP Japan at http://www.jpn.hp.com Bulletin Board: “ú–{ WWW•F Download software, firmware and support documents, and “ú–{‚ÌHP‚©‚ç‚Ì•î•ñ‚Íhttp://www.jpn.hp.com‚Å“üŽè‚Å‚«‚Ü‚·•B leave messages for technical support.
How To Contact HP - America's World Wide Web: Access information from HP Korea at www.hp.co.kr HP First Faxback Service: ¿ùµå ¿ÍÀ̵å À¥: www.hp.co.krÀÇ HP Çѱ¹À¸·ÎºÎÅÍ Á¤º¸ »ç¿ë HP First Faxback ¼-ºñ½º: Á¦Ç° Á¤º¸ ¶Ç´Â ±â¼ú Áö¿ø ¹®¼-¸¦ ¹«·á·Î »ç¿ëÀÚ¿¡°Ô Æѽº·Î Àü¼ÛÇϵµ·Ï ¿äûÇÏ´Â ÀÚµ¿È-µÈ ½Ã½ºÅÛÀÔ´Ï´Ù. ÇÏ·ç 24½Ã°£ »ç¿ë °¡´ÉÇÕ´Ï´Ù. Automated system to request ÀüÈ-: (02) 769-0543 product information or technical support documents to Æѽº: be faxed to you free of charge.
How To Contact HP - America's New Zealand Bulletin Board: Download software, firmware and support documents. Telephone: (09) 356 3660 HP First Faxback Service: Automated system to request product information or technical support documents to be faxed to you free of charge. Available 24 hours a day. Telephone: (09) 356 6642 Fax Machine: Faxes are answered in 24 hours or less.
How To Contact HP - America's Singapore Mailing Address: Hewlett-Packard Far East (Pte) Ltd. 438 Alexandra Road #07-01/04 Alexandra Point Singapore 119958 HP First Faxback Service: Automated system to request product information or technical support documents to be faxed to you free of charge. Available 24 hours a day. Telephone: 275 7251 Fax Machine: Faxes are answered within 48 hours.
How To Contact HP - America's Thailand Fax Machine: Faxes are answered within 48 hours. Fax Number: +65 274 2033 (Singapore) Telephone Support: Hours of Operation: Monday - Friday, 8:30 - 17:30 Telephone: (02) 661-4011 Vietnam Fax Machine: Faxes are answered within 48 hours. Fax Number: +65 274 2033 (Singapore) Telephone Support: Hours of Operation: Monday - Friday, 8:30 - 17:30 Telephone: (08) 823-4530 file:///D|/ADMIN_~1/eng/contact/asia.
HP SureStore Data Guardian Administrator's Guide - Managing Offsite Tape Backup and Restore Warranty The warranty gives you specific legal rights. You may also have other rights which vary according to where you are located.
HP SureStore Data Guardian Administrator's Guide - Managing Offsite Tape Backup and Restore 3. 4. 5. 6. 7. instructions after the date of purchase, for the period specified above, due to defects in material and workmanship when properly installed and used. If HP receives notice of such defects during the warranty period, HP will replace software media which does not execute its programming instructions due to such defects.
HP SureStore Data Guardian Administrator's Guide - Managing Offsite Tape Backup and Restore Warranty - HP SureStore AutoBackup This product carries a one-year, on-site, next day response warranty with free technical CCC support within the warranty period.
HP SureStore Data Guardian Administrator's Guide - Managing Offsite Tape Backup and Restore Warranty - HP SureStore Tape Drives & Autoloaders This product carries a 3 year Express Exchange* Warranty. You must register your product with Hewlett-Packard within 30 days to ensure you benefit from the full three year warranty period. Non-registration will result in the warranty resorting to one year. *Express Exchange is available in most countries.
HP SureStore Data Guardian Administrator's Guide - Managing Offsite Tape Backup and Restore ● ● ● ● ● ● Improper or inadequate maintenance by the customer Customer-supplied software or interfaces Unauthorized modification or misuse Use of unsupported media Operation outside the environmental specifications for the product Improper site preparation and maintenance Limitations Any implied warranty of merchantability or fitness is limited to the three-year duration of this written warranty.