
HP SureStore AutoBackup Administrator's Guide - Not Orderable


Note: If you do reboot from the CD-ROM, make sure you cancel from the first
stage of AutoBackup recovery (enter 'N').
Insert the first recovery CD into the CD drive. If there is more than one CD-ROM,
one of them should be labeled as the first to insert.
2.
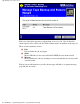
If you have HP AutoBackup on the new computer, use Windows Explorer to
browse the CD-ROM as normal and click on the Browse CD.CDS program to
view the backup data on the CD-ROM. (You cannot directly browse the backup
data on the Disaster Recovery CD-ROM since it is compressed and secured.) You
may be prompted for a username and password. If so, enter the name and
password of the Backup Account that was used when the CD-ROM was created.
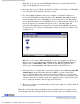
You should now see a screen containing the contents of the data set, similar to the
example below:
Note: If you do not have HP AutoBackup on your new computer, use Windows
Explorer to locate the cdviewer.exe file in the \disk1\agent directory.
Double-click on cdviewer.exe to install the CD Browser program. This
allows you to run the Browse CD.CDS program, as described above.
3.
Select data files or volumes that contain only data files, choose Recover from HP
AutoBackup from the File menu and click on OK to copy the selected files
across to the hard disk. If the volume only contains data files, you can select the
whole volume (it will be restored to the same volume on the new computer). If the
volume contains the operating system and configuration files, double-click on the
icon to expand it and then select the appropriate data files.
4.
The recovery will proceed with the Recovery Progress window on display until all
files are recovered.
5.
Note: If you did not have the AutoBackup Agent, reinstall it when you connect to the
network again from the existing backup account. (Do not create a new backup account.)
Replacing A PC Of A Different Specification
file:///D|/ADMIN_~1/eng/admin/diffspec.htm (5 of 5) [5/3/2000 3:32:41 PM]