HP PageWide Enterprise Color MFP 785 FDSV ORFN $ VKLIW = # 6 ; DOW ' & ) 9 * % + 1 - . / 0 DOW " µ ³ HQWHU VKLIW 785z+ EN Installation Guide www.hp.com/videos/pagewide www.hp.
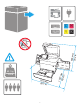
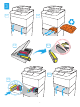
& ) & ) EN Select a sturdy, well-ventilated, dust-free area, away from direct sunlight to position the printer.
NJ OE P P LQ 3 P P LQ PP LQ & 0 < .
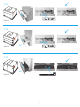
1 8: $ EN 8: $ 8: $ Install the input accessory that you ordered with this model. Follow the instructions on the install guide that came with the input accessory. CAUTION: Do not power on the printer until the input and finishing accessories are attached. HE 1.1 1. 2. 3. EN 1.1 1.1 For dn+ and Z+ models, the paper input orientation is different from what is shown on the input accessory tray.
1.1A 9UW01A 1.1B 9UW02A x3 1.
2 EN 2.1 2.2 2.3 HE Remove all tape, packing material and orange restraints.
3 3.1 3.2 3.3 3.4 3.6 3.
4 5 5.1 5.2 5.3 5.4 EN CAUTION: Use Letter/A4 paper in Tray 2 to initialize the printer. The printer will not initialize correctly with Tabloid/A3 paper loaded in Tray 2. HE EN CAUTION: Do not extend more than one paper tray at a time. Do not use paper tray as a step. Keep hands out of paper trays when closing. All trays must be closed when moving the printer. Remove paper from the finisher accessory before moving it.
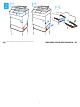
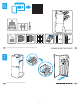
6 9UW04A 2 EN 4 Unbox the finisher accessory that you ordered with this model. HE Remove all tape and packing material.
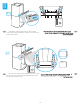
8 8.1 EN 8.1 8.1 Install the two metal brackets in the slots on the finisher chassis plate, and then install the two smaller screws to fasten the brackets to the finisher. HE 8.2 EN 8.2 Place the lower output bin on the brackets, press down to align the four screw holes in the bin with the holes in the brackets, and then install the four larger screws. 8.
8.3 EN 8.3 To install the top output bin, align the four tabs on the edge of 8.3 the bin, with the four slots in the finisher. Insert the tabs with the far end of the bin lifted up, and then once the tabs are inserted, carefully lower the far end of the bin into position.
9 9.1 9.2 EN 9.1 9.2 9.1 Use the handle to open the finisher rear door, and then 9.2 remove the shipping screw. Discard shipping screw and label. HE 10 10.1 10.2 10.3 EN 10.4 10.1 10.1 Turn the green wheel left to roll the stapler carriage away from you until the carriage spins. 10.2 Turn the green wheel right to roll the stapler carriage TOWARD you until it reaches its closest position. 10.
EN If you are connecting to a network, connect the network cable now. CAUTION: Do not connect the USB cable now. NOTE: The cables are not included with the printer. 11 HE 11.1 11.2 X 11.3 EN 11.4 11.1 Connect the finisher cable to the printer. 11.2 Attach the finisher accessory to the printer. 11.3 Connect the power cable between the printer and a grounded AC outlet. 11.4 Turn on the printer, and then wait for it to initialize.
12 EN Adjust foot casters up or down to properly line up the finishing accessory with the printer. After following the instructions in Step 14, ensure that the accessory is fully docked, leaving no gap that could cause paper jams. EN Windows: Do not connect the USB cable until prompted during the software installation in the next step. If the network cable was connected previously, proceed to the next section. Mac: Connect the USB cable now. NOTE: The cables are not included with the printer.
EN For information on firmware updates, advanced configuration using the Embedded Web Server, and remote and mobile printing using HP ePrint go to www.hp.com/support/pwcolor785MFP Select the Help button on the printer control panel to access Help topics. HE www.hp.
www.hp.com © Copyright 2020 HP Development Company, L.P. Reproduction, adaptation or translation without prior written permission is prohibited, except as allowed under the copyright laws. The information contained herein is subject to change without notice. The only warranties for HP products and services are set forth in the express warranty statements accompanying such products and services. Nothing herein should be construed as constituting an additional warranty.