
HP Jetdirect 2700w USB Print Server - Setup Guide
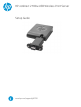


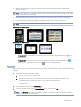
Table Of Contents
- Introduction
- Specifications
- Supported HP software solutions
- Troubleshooting
- Regulatory statements
- Regulatory model identification numbers
- European Union & United Kingdom Regulatory Notice
- FCC regulations
- Canada - Industry Canada ICES-003 Compliance Statement
- Wireless statements
- FCC compliance statement—United States
- Notice to users in Argentina
- Brazil: (Português)
- Canadian statements
- Exposure to Radio Frequency Radiation (Canada)
- China CMIIT Wireless Statement
- European Regulatory Notice
- Notice to users in Indonesia
- Notice to users in Korea
- Mexico statement
- Notice to users in Singapore
- Notice to users in South Africa
- Notice to users in the Ukraine
- RFID/NFC Statement
- Environmental product stewardship program
- Service and support
- Glossary for Network printing terms and concepts
- Glossary for Wireless LAN terms and concepts
- Index

Figure 1-1 FutureSmart 3 control panels
Figure 1-2 FutureSmart 4 control panels
● FutureSmart 3: From the Home screen on the printer control panel, select the Wireless icon , and
then select Print.
● FutureSmart 4: From the Home screen on the printer control panel, touch the Information icon ,
select Ethernet, and then touch the Print icon to print a Conguration page.
NOTE: If a USB error is displayed on the control panel, then make sure that the latest printer rmware is
installed.
6. Check the printed Conguration page to verify that the HP Jetdirect is connected successfully.
NOTE: If the HP Jetdirect is connected, it will be listed on the Conguration page in the Installed
Personalities and Options section.
● If an HP Jetdirect 2700w entry is listed and a wireless network icon is displayed on the printer’s control
panel, the HP Jetdirect is installed correctly.
● If an HP Jetdirect 2700w entry is not listed, or a wireless network icon is not displayed on the printer’s
control panel, check that the power cable and USB cable are securely connected to the HP Jetdirect
print server and to the printer.
Step three: Enable wireless printing
Use the Embedded Web Server (EWS) or the printer control panel to enable wireless printing on the printer and
the HP Jetdirect print server.
NOTE: After connecting the HP Jetdirect wireless print server, the printer defaults to "Wireless Conguration"
mode and displays the following message on the control panel "Wireless Conguration".
IMPORTANT: For initial conguration, use the Embedded Web Server method to enable wireless printing. After
completing the conguration, reboot the printer to exit the "Wireless Conguration" mode. Any additional
conguration can be performed from the printer control panel.
Method one: Enable wireless printing in the Embedded Web Server (EWS)
Use this method to enable wireless printing using the EWS and ensure that the following requirements are met to
congure the EWS wireless settings.
Requirements before you begin:
4
Chapter 1 Introduction