HP Jetdirect pn1050 Network Projector Manager Setup Guide
© Copyright 2005 Hewlett-Packard Development Company, L.P. Reproduction, adaptation, or translation without prior written permission is prohibited, except as allowed under the copyright laws. The information contained in this document is subject to change without notice. The only warranties for HP products and services are set forth in the express warranty statements accompanying such products and services. Nothing herein should be construed as constituting an additional warranty.
Table of Contents 1. Introducing the HP Jetdirect Network Projector Manager System Overview ................................................................................. 4 2. Installing the HP Jetdirect Module What’s in the Box?............................................................................... 5 Setting Up the Module ......................................................................... 6 Connecting the Module ....................................................................
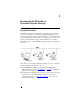
1 Introducing the HP Jetdirect Network Projector Manager System Overview The Jetdirect network projector manager is a network server module that connects to the USB port of a Jetdirect-compatible HP digital projector to provide network access to that projector. This enables a system administrator to monitor and manage this and any other connected projectors from a remote location.
2 Installing the HP Jetdirect Module What’s in the Box? Before setting up the module and projector, make sure your shipping box includes the following items. If any of these items were not in the box, contact HP — see the support guide on the Documentation CD.
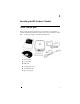
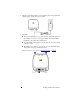
Setting Up the Module Connecting the Module 1. Make sure the projector is set up and operating normally. 2. Plug a LAN cable into the server module. The LAN cable must be connected to a 10Base-T or 100Base-TX Ethernet local area network. 3. Plug the USB cable into the server module and the projector. The wide connector plugs into the module, and the narrow connector plugs into the projector. Note Do not connect the USB cable to any USB hub, converter, or extender.
4. Plug the power cable from the power module into the server module, then plug the power module into a power outlet. 5. Check the indicator lights on the server module: ■ The power/status light (2) on top of the server module should light solid green within 15 seconds to show proper startup. Then it may flicker irregularly to show network communication. ■ One of the LAN connector lights (3) should turn on to show the network connection speed.
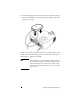
Mounting the Module (Optional) You can mount the server module on the projector or on any nearby smooth, clean surface. The attachment strips separate to allow you to remove the module temporarily. 1. Decide where to mount the server module on the projector or other surface: ■ Make sure the mounting surface is flat, smooth, and clean. ■ Do not block any vents, controls, or access panels on the projector.
6. Peel the backing paper from the exposed sides of the two attachment strips. 7. Press the module firmly onto the mounting surface so that the attachment strips adhere properly. To remove the module, gently pull it away from its mounting surface so that the halves of the attachment strips separate. To reattach the module, press it back into place so that the strips reattach.
Finding the Network Address Use the HP projector’s on-screen menu to find the network address assigned to the server module and projector: 1. Turn on the projector. 2. Open the on-screen menu by pressing the enter or menu button on the projector or its remote control. 3. Go to the Help screen and find the IP address, which consists of four numbers separated by dots, such as 10.2.3.4.
3 Managing HP Projectors Configuring the Module and Projector You can use the server module to configure and monitor the projector from a remote location on the network. Using your computer, you can perform tasks such as these: ● Configure the server module’s network settings. ● Receive email notifications when certain conditions or events occur on the projector. ● Set security options to require passwords, encrypt data, and control access. ● Upgrade the firmware on the projector and server module.
3. Go to the location in the Web interface that contains the information you need or the setting you want to change. 4. Make any necessary changes, then click Apply. For more information about the embedded Web server, click Help in the Web interface. See the Administrator's Guide on the Documentation CD for complete details.
4 Fixing Problems Troubleshooting If you have trouble with your server module or network connection, check the information in this chapter. Note If you have trouble with projector operation, see the projector user manual. 1. Make sure the projector is connected to power and is operating properly. See the projector user manual if the projector has any problems. 2. Make sure the server module is connected to power, to a local-area network (LAN), and to the projector. 3.
5. On a networked computer, open an internet browser, enter the projector’s IP address in the URL bar, and press the Enter key. ■ If the projector information page appears, the network connection is working. ■ If the projector information page does not appear, network communication is bad. Check the LAN cable. Check the network with a different device. Connect the module to a different LAN outlet. For further assistance, see the Administrator's Guide.
USB/Projector Light Off Module is starting up (up to 15 seconds after applying power), or a USB problem is detected. ● Make sure a USB cable connects to a projector, and the projector is connected to power. ● Try a different USB cable. ● Unplug, then reconnect power. If the condition persists, the module or projector is faulty. If possible, repeat with a different module or projector. On steady (green) Normal: USB is ready. Blinking (green) USB device is not compatible with the server module.
Resetting to Factory Defaults The server module retains its configuration settings in memory, even while power is removed. You can reset all configuration settings to the default factory settings as follows. 1. Unplug the power module from the server module. 2. Press and hold the Reset button next to the LAN port on the back of the server module. 3. While holding the Reset button, plug the power module into the server — continue holding the Reset button for at least 5 seconds, then release it.
5 Reference Information Specifications Because HP continually improves its products, the following specifications are subject to change. For the latest specifications, visit the HP website at www.hp.com. Size 120 × 131 × 35 mm (4.08 × 5.25 × 1.40 in) Weight 159 g (5.6 oz) USB interface USB type A connector USB 2.0 compatible Network interface RJ-45 connector for IEEE 802.3i 10Base-T (Ethernet) and IEEE 802.
Regulatory Information This section presents information that shows how the network projector manager complies with regulations in certain regions. Any modifications to the device not expressly approved by HP could void the authority to operate the device in these regions. U.S.A. This device has been tested and found to comply with the limits for a Class B digital device, pursuant to Part 15 of the FCC Rules.
Australia This equipment complies with Australian EMC requirements. Canada This equipment complies with Canadian ICES-003 Class B requirements.
China Reference Information 20
International For regulatory identification purposes, your product is assigned a regulatory model number. The regulatory model number for your product is listed below. This regulatory number is different from the marketing name and product number. DECLARATION OF CONFORMITY according to ISO/IEC Guide 22 and EN45014 Manufacturer's Name: Manufacturer's Address: Hewlett-Packard Company 8000 Foothills Blvd. Roseville, CA 95747-5677 U.S.A.