HP Deskjet 2540 All-in-One series
Table of contents 1 HP Deskjet 2540 series Help ............................................................................................................................ 1 2 Get to know the HP Deskjet 2540 series .......................................................................................................... 3 Printer parts .......................................................................................................................................... 4 Control panel features ........
Replace ink cartridges ........................................................................................................................ 41 Use single-cartridge mode ................................................................................................................. 43 Cartridge warranty information ........................................................................................................... 44 Tips for working with cartridges ...............................................
1 HP Deskjet 2540 series Help Learn how to use your HP Deskjet 2540 series ENWW ● Printer parts on page 4 ● Control panel features on page 5 ● Load media on page 24 ● Copy documents on page 30 ● Scan to a computer on page 32 ● Print on page 11 ● Replace ink cartridges on page 41 ● Clear paper jam on page 62 ● Check estimated ink levels on page 38 1
2 Chapter 1 HP Deskjet 2540 series Help ENWW
2 ENWW Get to know the HP Deskjet 2540 series ● Printer parts ● Control panel features ● Wireless settings ● Status lights ● Auto-Off 3
Printer parts 4 1 Input tray 2 Input tray guard 3 Cartridges 4 Lid 5 Lid-backing 6 Paper-width guide for the input tray 7 Control panel 8 Cartridge access door 9 Output tray 10 Output tray extender (also referred to as the tray extender) 11 Scanner glass 12 Rear USB port 13 Power connection.
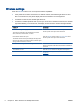
Control panel features ENWW Feature Description 1 On button: Turns the printer on or off. When the printer is off, a minimal amount of power is still used. To completely remove power, turn off the printer, then unplug the power cord. 2 Cancel button: Stops the current operation. 3 Wireless status light and button: Blue light indicates a wireless connection. Press the button to turn on or off the printer wireless capabilities.
Wireless settings Press the Wireless button to turn on the printer wireless capabilities. ● If the printer has an active connection to a wireless network, the wireless light will be on solid blue. In the mean time, the printer display will show the wireless icon and signal bar. ● If wireless is turned off, the wireless light will be off. ● If wireless is enabled (wireless radio on) and you do not have a wireless connection, the wireless light will be blinking.
Status lights When the printert is turned on, the On button light will be lit. When the printer is processing a job, the On button light will be blinking. Additional blinking lights signal errors that you can resolve. See below to learn about blinking lights and what to do. Light behavior Cause and Solution Attention light is blinking. ● Output tray closed when printing is attempted. Open the output tray. ● Scanner is not working. Turn off and turn on the printer. If the problem persists, contact HP.
Light behavior Cause and Solution One cartridge light is blinking. Blinking cartridge light indicates that corresponding cartridge has a problem. Cartridge may be improperly installed, incompatible, or very low on ink. The media error indicator and Attention light are blinking. ● If you see a message on your computer screen, refer to the message for more information about the problem. ● If there is no message on your computer screen, try removing and reinserting the ink cartridge.
Light behavior Cause and Solution cartridge. For more information, see Replace ink cartridges on page 41. On button light, Wireless status light, Wireless Direct status light, letter “E”, the media error indicator, the wireless strength indicator, Attention light, and both cartridge lights are blinking. ◦ Determine if the ink cartridge is defective. For more information, see Identify a defective cartridge on page 69.
Auto-Off Auto-Off is automatically enabled by default when you turn on the printer. When Auto-Off is enabled, the printer will automatically turn off after 2 hours of inactivity to help reduce energy use. Auto-Off turns the printer off completely, so you must use the On button to turn the printer back on. For printer models with wireless or Ethernet network capability, Auto-Off is automatically disabled when the printer establishes a wireless or Ethernet network connection.
3 Print This section contains the following topics: ENWW ● Print documents ● Print photos ● Print envelopes ● Print with HP wireless direct ● Print using the maximum dpi ● Tips for print success 11
Print documents Load paper 1. Make sure the output tray is open. 2. Make sure you have paper loaded in the input tray. To print a document 1. From your software, click the Print button. 2. Make sure your printer is selected. 3. Click the button that opens the Properties dialog box. Depending on your software application, this button might be called Properties, Options, Printer Setup, Printer Properties, Printer, or Preferences. 4. Select the appropriate options.
ENWW ● On the Layout tab, select Portrait or Landscape orientation. ● On the Paper/Quality tab, select the appropriate paper type and print quality from the Media drop-down list. ● Click Advanced to select the appropriate paper size from the Paper Size drop-down list. 5. On the Layout tab, select an appropriate option from the Print on Both Sides Manually dropdown list. 6. Click OK to print. 7.
Print photos Load photo paper 1. Make sure the output tray is open. 2. Remove all paper from the input tray, and then load the photo paper with side to be printed on facing up. To print a photo on photo paper 1. On the File menu in your software, click Print. 2. Make sure your printer is selected. 3. Click the button that opens the Properties dialog box.
Print envelopes You can load one or more envelopes into the input tray of the HP Deskjet 2540 series. Do not use shiny or embossed envelopes or envelopes that have clasps or windows. NOTE: For specific details on how to format text for printing on envelopes, consult the help files in your word application. Load envelopes 1. Make sure the output tray is open. 2. Slide the paper-width guide all the way to the left. 3. Place the envelopes in the right side of the tray.
Print with HP wireless direct With HP wireless direct, you can print wirelessly from a computer, smart phone, tablet, or other wireless-capable device—without connecting to an existing wireless network. When using HP wireless direct, note the following guidelines: ● Make sure your computer or mobile device has the necessary software: If you are using a computer, make sure you have installed the printer software provided with the printer.
of wireless networks shown such as HP-Print-**-Deskjet 2540 series (where ** are the unique characters to identify your printer). If HP wireless direct is turned on with security, enter the password when prompted. 4. Print your document. Print from a wireless-capable computer 1. Make sure you have turned on HP wireless direct on the printer. For more information, see Connect wirelessly to the printer without a router on page 53 for more information. 2. Turn on the computer's Wi-Fi connection.
Print using the maximum dpi Use maximum dots per inch (dpi) to print high-quality, sharp images on the photo paper. Printing in maximum dpi takes longer than printing with other settings and requires a large amount of disk space. To print in Maximum dpi mode 1. On the File menu in your software, click Print. 2. Make sure your printer is selected. 3. Click the button that opens the Properties dialog box.
Tips for print success To print successfully, the HP ink cartridges should be functioning properly with sufficient ink, the paper should be loaded correctly, and the print should have the appropriate settings. Print settings do not apply to copying or scanning. Ink tips ● Use original HP ink cartridges. ● Install both the black and tri-color cartridges correctly. For more information, see Replace ink cartridges on page 41.
Notes ● Original HP ink cartridges are designed and tested with HP printers and papers to help you easily produce great results, time after time. NOTE: HP cannot guarantee the quality or reliability of non-HP supplies. Product service or repairs required as a result of using a non-HP supply will not be covered under warranty. If you believe the purchased original HP ink cartridges, go to: www.hp.com/go/anticounterfeit ● Ink level warnings and indicators provide estimates for planning purposes only.
4 Paper basics You can load many different types and sizes of paper in the HP Printer, including letter or A4 paper, photo paper, transparencies, and envelopes.
Recommended papers for printing If you want the best print quality, HP recommends using HP papers that are specifically designed for the type of project you are printing. Depending on your country/region, some of these papers might not be available. ColorLok ● HP recommends plain papers with the ColorLok logo for printing and copying of everyday documents.
These papers are glossy-coated or matte-coated on both sides for two-sided use. They are the perfect choice for near-photographic reproductions and business graphics for report covers, special presentations, brochures, mailers, and calendars. Everyday printing ● HP Bright White Inkjet Paper HP Bright White Inkjet Paper delivers high-contrast colors and sharp text. It is opaque enough for two-sided color usage with no show-through, which makes it ideal for newsletters, reports, and flyers.
Load media Select a paper size to continue. Load full-size paper 24 1. Raise the input tray. 2. Lower the output tray and pull out the output tray extender. 3. Slide the paper-width guide to the left. 4. Insert a stack of paper into the input tray with the short edge forward and the print side up, and slide the stack of paper down until it stops.
5. Slide the paper-width guide to the right until it stops at the edge of paper. Load small-size paper ENWW 1. Raise the input tray. 2. Lower the output tray and pull out the output tray extender. 3. Slide the paper-width guide to the left.
4. Insert a stack of photo paper with the short edge down and the print side up, and slide the stack of paper forward until it stops. 5. Slide the paper-width guide to the right until it stops at the edge of paper. Load envelopes 26 1. Raise the input tray. 2. Lower the output tray and pull out the output tray extender. 3.
4. Insert one or more envelopes into far-right side of the input tray and slide the stack of envelopes down until it stops. The side to be printed on should face up. The flap should be on the left side and facing down. 5. ENWW Slide the paper-width guide to the right against the stack of envelopes until it stops.
28 Chapter 4 Paper basics ENWW
5 ENWW Copy and scan ● Copy documents ● Scan to a computer ● Tips for copy success ● Tips for scan success 29
Copy documents NOTE: All documents are copied in normal quality print mode. You cannot change the print mode quality when copying. 1-sided original to 1-sided copy 30 1. Load either small photo paper or full-size paper in the input tray. 2. Load original. a. Lift the lid of the printer. b. Load original print side down on the right front corner of the scanner glass.
c. 3. Start copy. ▲ ENWW Close the lid. Press either Start Copy Black or Start Copy Color. Increase the number of copies by pressing the button multiple times.
Scan to a computer NOTE: To scan to a computer, the HP Deskjet 2540 series and computer must be connected and turned on. Single page scan 1. 2. Load original. a. Lift the lid of the printer. b. Load original print side down on the right front corner of the scanner glass. c. Close the lid. Start scan. a. 32 Start the scan job using the printer software.
b. ENWW ● Windows 8: On the Start screen, right-click an empty area on the screen, click All Apps on the app bar, and then click the icon with the printer's name. ● Windows 7, Windows Vista, and Windows XP: From the computer desktop, click Start, select All Programs, click HP, click HP Deskjet 2540 series, and then click HP Deskjet 2540 series. In the printer software, select the Print & Scan tab, and then select Scan a Document or Photo under Scan.
Tips for copy success ● Load your original print side down on the right front corner of the scanner glass. ● To resize the copy, scan the original to the computer, resize it using an application on the computer, and then print the resized document. ● Clean the scanner glass and make sure that there are no foreign materials adhering to it. Click here to go online for more information.
Tips for scan success ● Load your original print side down on the right front corner of the scanner glass. ● Clean the scanner glass and make sure that there are no foreign materials adhering to it. Click here to go online for more information.
36 Chapter 5 Copy and scan ENWW
6 Work with ink cartridges This section contains the following topics: ENWW ● Check estimated ink levels ● Order ink supplies ● Choose right ink cartridges ● Replace ink cartridges ● Use single-cartridge mode ● Cartridge warranty information ● Tips for working with cartridges 37
Check estimated ink levels You can easily check the ink supply level to determine how soon you might need to replace an ink cartridge. The ink supply level shows an estimate of the amount of ink remaining in the ink cartridges. To check the ink levels 1. 2. Depending on your operating system, do one of the following to open the printer software: ● Windows 8: On the Start screen, right-click an empty area on the screen, click All Apps on the app bar, and then click the icon with the printer's name.
Order ink supplies Before ordering cartridges, locate the correct cartridge number. Locate the cartridge number on the printer ● The cartridge number is located inside the cartridge access door. Locate the cartridge number in the printer software 1. 2. Depending on your operating system, do one of the following to open the printer software: ● Windows 8: On the Start screen, right-click an empty area on the screen, click All Apps on the app bar, and then click the icon with the printer's name.
Choose right ink cartridges HP recommends that you use original HP cartridges. Original HP cartridges are designed and tested with HP printers to help you easily produce great results, time after time.
Replace ink cartridges To replace the ink cartridges 1. Check that power is on. 2. Load paper. 3. Remove the ink cartridge. 4. a. Open the cartridge access door and wait for the print carriage to move to the center of the printer. b. Press down to release the ink cartridge, then remove it from the slot. Insert one new ink cartridge. a. ENWW Remove the ink cartridge from the packaging.
b. Remove the plastic tape using the pink pull tab. c. Slide the ink cartridge into slot until it clicks into place. d. Close the cartridge access door. NOTE: The HP printer software prompts you to align the ink cartridges when you print a document after installing the new ink cartridge.
Use single-cartridge mode Use the single-cartridge mode to operate the HP Deskjet 2540 series with only one ink cartridge. The single-cartridge mode is initiated when an ink cartridge is removed from the ink cartridge carriage. During single-cartridge mode, the printer can copy documents, copy photos, and print jobs from the computer. NOTE: When the HP Deskjet 2540 series operates in single-cartridge mode, a message is displayed on screen.
Cartridge warranty information The HP cartridge warranty is applicable when the cartridge is used in its designated HP printing device. This warranty does not cover HP ink cartridges that have been refilled, remanufactured, refurbished, misused, or tampered with. During the warranty period, the cartridge is covered as long as the HP ink is not depleted and the end of warranty date has not been reached.
Tips for working with cartridges Use the following tips to work with cartridges: ENWW ● To protect the cartridges from drying out, always turn the printer off using the On button, and wait until the On button light goes out. ● Do not open or untape cartridges until you are ready to install them. Leaving tape on the cartridges reduces ink evaporation. ● Insert the cartridges into the correct slots. Match the color and icon of each cartridge to the color and icon for each slot.
46 Chapter 6 Work with ink cartridges ENWW
7 ENWW Connectivity ● Wi-Fi Protected Setup (WPS – requires WPS router) ● Traditional wireless connection (requires router) ● USB connection (non-network connection) ● Change from a USB connection to a wireless network ● Connect wirelessly to the printer without a router ● Tips for setting up and using a networked printer ● Advanced printer management tools (for networked printers) 47
Wi-Fi Protected Setup (WPS – requires WPS router) These instructions are for customers who have already set up and installed the printer software. For the first time installation refer to the setup instructions that came with the printer. To connect the HP Deskjet 2540 series to a wireless network using WPS, you will need the following: ● A wireless 802.11b/g/n network that includes a WPS-enabled wireless router or access point. NOTE: The HP Deskjet 2540 series only supports connections using 2.4GHz.
Traditional wireless connection (requires router) To connect the HP Deskjet 2540 series to an integrated wireless WLAN 802.11 network, you will need the following: ● A wireless 802.11b/g/n network that includes a wireless router or access point. NOTE: The HP Deskjet 2540 series only supports connections using 2.4GHz. ● A desktop computer or laptop with either wireless networking support, or a network interface card (NIC).
Change network settings This method is available if you have already installed the printer software. NOTE: 1. 50 This method requires a USB cable. Do not connect the USB cable until prompted to do so. Depending on your operating system, do one of the following: ● Windows 8: On the Start screen, right-click an empty area on the screen, click All Apps on the app bar.
USB connection (non-network connection) The HP Deskjet 2540 series supports a rear USB 2.0 High Speed port for connection to a computer. To connect the printer with the USB cable 1. Insert the printer software CD in the computer CD-ROM drive. NOTE: Do not connect the USB cable to the printer until you are prompted to do so. 2. Follow the on-screen instructions. When you are prompted, connect the printer to the computer by selecting USB on the Connection Options screen. 3.
Change from a USB connection to a wireless network If you first set up your printer and installed the software with a USB cable, directly connecting the printer to your computer, you can easily change to a wireless network connection. You will need a wireless 802.11b/g/n network that includes a wireless router or access point. NOTE: The HP Deskjet 2540 series only supports connections using 2.4GHz.
Connect wirelessly to the printer without a router HP wireless direct allows your wireless devices such as computers, smart phones, tablet, and other wireless, to connect to your printer directly through the wireless network, using the process you currently use to connect your wireless device to new wireless networks and hotspots. With HP wireless direct, you can print directly to the printer wirelessly, without a wireless router, from your wireless enabled devices.
Tips for setting up and using a networked printer Use the following tips to set up and use a networked printer: 54 ● When setting up the wireless networked printer, make sure your wireless router or access point is powered on. The printer searches for wireless routers, then lists the detected network names on the computer. ● If your computer is connected to a Virtual Private Network (VPN), you need to disconnect from the VPN before you can access any other device on your network, including the printer.
Advanced printer management tools (for networked printers) When the printer is connected to a network, you can use the EWS to view status information, change settings, and manage the printer from your computer. NOTE: To view or change some settings, you might need a password. You can open and use the EWS without being connected to the Internet. However, some features are not available.
selected so that the next time you access the EWS, the pages are displayed in that language. Though some cookies are cleared at the end of each session (such as the cookie that stores the selected language), others (such as the cookie that stores customer-specific preferences) are stored on the computer until you clear them manually.
8 Solve a problem This section contains the following topics: ENWW ● Improve print quality ● Clear paper jam ● Unable to print ● Clear print carriage ● Identify a defective cartridge ● Prepare trays ● Resolve copy and scan issues ● Printer failure ● Ink cartridge problem ● Older generation cartridges ● Networking ● HP support 57
Improve print quality NOTE: To protect the cartridges from drying out, always turn the printer off using the On button, and wait until the On button light goes out. To improve print quality 1. Make sure you are using original HP ink cartridges. 2. Check the printer software to make sure you have selected the appropriate paper type and print quality from the Media drop-down list. In the printer software, click Print & Scan and then click Set Preferences to access the print properties. 3.
5. e. Load the cartridge alignment sheet print side down on the right front corner of the scanner glass. f. Press the Start Copy Black button. The printer aligns the ink cartridges. Recycle or discard the cartridge alignment sheet. Print a diagnostics page if the ink cartridges are not low on ink. To print a diagnostics page ENWW a. Load letter or A4 unused plain white paper into the input tray. b.
e. 6. Review the blue, magenta, yellow, and black boxes on the diagnostics page. Clean the ink cartridges automatically, if the diagnostic page shows steaks or missing portions of the color and black boxes. To clean the ink cartridges automatically 60 a. Load letter or A4 unused plain white paper into the input tray. b.
If the above solutions do not resolve the problem, click here for more online troubleshooting.
Clear paper jam Use the following steps to clear a paper jam. Clear a paper jam from the input tray 1. Press the Cancel button to try to clear the jam automatically. If this does not work, the paper jam will need to be cleared manually. 2. Pull the paper gently out of the input tray. 3. Press the Start Copy Black or Start Copy Color button on the control panel to continue the current job. Clear a paper jam from the output tray 1. Press the Cancel button to try to clear the jam automatically.
2. Open the cartridge access door and slide the print carriage to the right to access the paper jam. 3. Press the Start Copy Black or Start Copy Color button on the control panel to continue the current job. Clear a paper jam inside of the printer ENWW 1. Press the Cancel button to try to clear the jam automatically. If this does not work, the paper jam will need to be cleared manually. 2. Open the cleanout door located on the bottom of the printer. Press tabs on both sides of the cleanout door.
4. Close the cleanout door. Gently push the door towards the printer until both latches snap into place. 5. Press the Start Copy Black or Start Copy Color button on the control panel to continue the current job. If the above solutions do not resolve the problem, click here for more online troubleshooting. Prevent paper jams ● Do not overfill the input tray. ● Remove printed papers from the output tray frequently.
Unable to print If you are having trouble printing, you can download the HP Print and Scan Doctor, which can troubleshoot this issue for you automatically. To get the tool, click the appropriate link: NOTE: The HP Print and Scan Doctor may not be available in all languages. Take me to the HP Print and Scan Doctor download page. Resolve print issues Make sure that the printer is turned on and that there is paper in the input tray. If you are still unable to print, try the following in order: 1.
b. ● Windows Vista: From the Windows Start menu, click Control Panel, and then click Printers. ● Windows XP: From the Windows Start menu, click Control Panel, and then click Printers and Faxes. Make sure the correct printer is set as the default printer. The default printer has a check mark in a black or green circle next to it. 5. c. If the wrong printer is set as the default printer, right-click the correct printer and select Set as Default Printer. d. Try using your printer again.
iv. On the General tab, next to Startup type, make sure that Automatic is selected. v. If the service is not already running, under Service status, click Start, and then click OK. i. From the Windows Start menu, right click My Computer. ii. Click Manage, and then click Services and Applications. iii. Double-click Services, and then select Print Spooler. iv. Right-click Print Spooler, and click Restart to restart the service. Windows XP b.
Clear print carriage Remove any objects, such as paper, which are blocking the print carriage. See Clear paper jam on page 62 for more information. NOTE: Do not use any tools or other devices to remove jammed paper. Always use caution when removing jammed paper from inside the printer. Click here to go online for more information.
Identify a defective cartridge If both the tri-color and black ink cartridge lights are blinking, and the On button light is on, both cartridges may still have tape on, be very low on ink, or are missing. First make sure that the pink tape has been removed from both cartridges, and that both ink cartridges are installed. If both ink cartridge lights are still blinking, then one or both cartridges may be defective. To determine if one cartridge is defective, do the following: ENWW 1.
Prepare trays Open output tray ▲ Output tray must be open to begin printing. Close cartridge access door ▲ Cartridge door must be closed to begin printing. Click here to go online for more information.
Resolve copy and scan issues HP provides an HP Print and Scan Doctor (Windows only) that can help solve many common “Unable to scan” issues. NOTE: The HP Print and Scan Doctor may not be available in all languages. Take me to the HP Print and Scan Doctor download page. Learn more about how to solve scan issues. Click here to go online for more information. Learn how to solve copy issues. Click here to go online for more information.
Printer failure Resolve printer failure ▲ Turn the printer off, then on. If that does not resolve the problem, contact HP. Please contact HP support for help .
Ink cartridge problem First try removing and reinserting the ink cartridges. If this does not work, clean the cartridge contacts. If your problem is still not resolved, replace the ink cartridges. For more information, see Replace ink cartridges on page 41. Clean the ink cartridge contacts CAUTION: The cleaning procedure should take only a few minutes. Make sure that the ink cartridges are reinstalled in the printer as soon as possible.
6. On the inside of the printer, locate the contacts for the cartridge. The printer contacts are the set of gold-colored bumps positioned to meet the contacts on the ink cartridge. 7. Use a dry swab or lint-free cloth to wipe the contacts. 8. Reinstall the ink cartridge. 9. Close the cartridge access door, and check if the error message has gone away. 10. If you still receive the error message, turn the printer off, and then on again.
Older generation cartridges You will need to use a newer version of this cartridge. In most cases you can identify a newer version of the cartridge by looking at the exterior of the cartridge package and finding the Warranty Ends date. If it says ‘v1’ several spaces to the right of the date, then the cartridge is the updated newer version. If it is an older generation cartridge, contact HP support for help or replacement. Click here to go online for more information.
Networking 76 ● Learn how to find your network security settings. Click here to go online for more information. ● Learn about other troubleshooting tips. Click here to go online for more information. ● Learn about the HP Print and Scan Doctor. Click here to go online for more information. ● Learn how to change from a USB to wireless connection. Click here to go online for more information. ● Learn how to work with your firewall and antivirus programs during printer setup.
HP support ● Register printer ● Support process ● HP support by phone ● Additional warranty options Register printer By taking just a few quick minutes to register, you can enjoy quicker service, more efficient support, and product support alerts. If you did not register your printer while installing the software, you can register now at http://www.register.hp.com. Support process If you have a problem, follow these steps: 1. Check the documentation that came with the printer. 2.
Phone support period One year of phone support is available in North America, Asia Pacific, and Latin America (including Mexico). To determine the duration of phone support in Europe, the Middle East, and Africa, go to www.hp.com/support. Standard phone company charges apply. Placing a call Call HP support while you are in front of the computer and the printer.
A Technical information The technical specifications and international regulatory information for the HP Deskjet 2540 series are provided in this section. For additional specifications, see the printed documentation that came with the HP Deskjet 2540 series.
Hewlett-Packard Company notices The information contained herein is subject to change without notice. All rights reserved. Reproduction, adaptation, or translation of this material is prohibited without prior written permission of Hewlett-Packard, except as allowed under the copyright laws. The only warranties for HP products and services are set forth in the express warranty statements accompanying such products and services. Nothing herein should be construed as constituting an additional warranty.
Specifications Technical specifications for the HP Deskjet 2540 series are provided in this section. For more product specifications, see the Product Data Sheet at www.hp.com/support.
Index cards: Up to 20 Photo paper sheets: Up to 20 Output tray capacity Plain paper sheets (80 g/m2 [20lb]): Up to 30 Envelopes: Up to 5 Index cards: Up to 10 Photo paper sheets: Up to 10 Paper size For a complete list of supported media sizes, see the printer software.
Print resolution Draft mode ● Color Input/Black Render: 300x300dpi ● Output (Black/Color): Automatic Normal mode ● Color Input/Black Render: 600x300dpi ● Output (Black/Color): Automatic Plain-Best mode ● Color Input/Black Render: 600x600dpi ● Output (Black/Color): Automatic Photo-Best mode ● Color Input/Black Render: 600x600dpi ● Output (Black/Color): Automatic Max DPI mode ● Color Input/Black Render: 1200x1200dpi ● Output: Automatic (Black), 4800x1200 optimized dpi (Color) Power specifi
Environmental product stewardship program Hewlett-Packard is committed to providing quality products in an environmentally sound manner. Design for recycling has been incorporated into this product. The number of materials has been kept to a minimum while ensuring proper functionality and reliability. Dissimilar materials have been designed to separate easily. Fasteners and other connections are easy to locate, access, and remove using common tools.
Material safety data sheets Material safety data sheets (MSDS) can be obtained from the HP website at: www.hp.com/go/msds Recycling program HP offers an increasing number of product return and recycling programs in many countries/regions, and partners with some of the largest electronic recycling centers throughout the world. HP conserves resources by reselling some of its most popular products. For more information regarding recycling of HP products, please visit: www.hp.
Disposal of waste equipment by users This symbol means do not dispose of your product with your other household waste. Instead, you should protect human health and the environment by handing over your waste equipment to a designated collection point for the recycling of waste electrical and electronic equipment. For more information, please contact your household waste disposal service, or go to http://www.hp.com/recycle.
Restriction of hazardous substance (India) ENWW Environmental product stewardship program 87
Regulatory notices The HP Deskjet 2540 series meets product requirements from regulatory agencies in your country/ region.
FCC statement Notice to users in Korea VCCI (Class B) compliance statement for users in Japan Notice to users in Japan about the power cord ENWW Regulatory notices 89
European Union Regulatory Notice Products bearing the CE marking comply with the following EU Directives: ● Low Voltage Directive 2006/95/EC ● EMC Directive 2004/108/EC ● Ecodesign Directive 2009/125/EC, where applicable CE compliance of this product is valid only if powered with the correct CE-marked AC adapter provided by HP.
Products with wireless LAN devices ● Some countries may have specific obligations or special requirements about the operation of Wireless LAN networks such as indoor use only or restrictions of the channels available. Please make sure that the country settings of the wireless network are correct. ● For 2.4-GHz Wireless LAN operation of this product, certain restrictions apply: This product may be used indoors for the entire 2400-MHz to 2483.5-MHz frequency band (channels 1 to 13).
Declaration of conformity Regulatory wireless statements This section contains the following regulatory information pertaining to wireless products: 92 ● Exposure to radio frequency radiation ● Notice to users in Brazil ● Notice to users in Canada ● Notice to users in Mexico ● Notice to users in Taiwan Appendix A Technical information ENWW
● Wireless notice to users in Japan Exposure to radio frequency radiation Notice to users in Brazil ENWW Regulatory notices 93
Notice to users in Canada Notice to users in Mexico 94 Appendix A Technical information ENWW
Notice to users in Taiwan Wireless notice to users in Japan ENWW Regulatory notices 95
96 Appendix A Technical information ENWW
Index A after the support period B buttons, control panel 78 5 C control panel buttons 5 features 5 copy specifications 82 customer support warranty 78 E environment Environmental product stewardship program 84 environmental specifications 81 I interface card 48, 49 N network interface card 48, 49 P paper recommended types 22 phone support 77 phone support period period for support 78 print specifications 82 R recycle ink cartridges 85 regulatory notices 88 regulatory model identification number 88 wi