443562-001.book Page i Thursday, March 15, 2007 8:47 PM Getting Started HP Business Notebook PC Document Part Number: 443562-001 June 2007 This guide explains how to set up your hardware and software, and begin using the computer in Windows®.
443562-001.book Page ii Thursday, March 15, 2007 8:47 PM © Copyright 2007 Hewlett-Packard Development Company, L.P. Windows is a U.S. registered trademark of Microsoft Corporation. Bluetooth is a trademark owned by its proprietor and used by Hewlett-Packard Company under license. The information contained herein is subject to change without notice. The only warranties for HP products and services are set forth in the express warranty statements accompanying such products and services.
443562-001.book Page iii Thursday, March 15, 2007 8:47 PM Contents 1 First-time setup Identifying required hardware . . . . . . . . . . . Setting up the computer. . . . . . . . . . . . . . . . Step 1: Insert the battery . . . . . . . . . . . . Step 2: Connect the computer to external power . . . . . . . . . . . . . . . . . . . . . . . . . Step 3: Turn on the computer . . . . . . . . . Step 4: Set up the software. . . . . . . . . . . Step 5: Create recovery discs (recommended). . . . . . . . . . . . . . . .
43562-001.book Page iv Thursday, March 15, 2007 8:47 PM Contents Connecting to a computer network . . . . . . . . . . Installing additional hardware and software . . . Identifying and installing hardware . . . . . . . Locating and installing software . . . . . . . . . Updating the software installed on the computer. Finding the user guides . . . . . . . . . . . . . . . . . . Turning off the computer correctly . . . . . . . . . . . . . . . . . . . . . . . . .
443562-001.book Page v Thursday, March 15, 2007 8:47 PM Contents B Specifications Operating environment . . . . . . . . . . . . . . . . . . . . B–1 Rated input power . . . . . . . . . . . . . . . . . . . . . . .
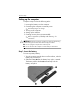
443562-001.book Page 1 Thursday, March 15, 2007 8:47 PM 1 First-time setup Identifying required hardware To set up the computer for the first time, you will need the computer, the AC adapter, the power cord, and the primary battery. Components included with the computer may vary by region or ✎ country and by model.
443562-001.book Page 2 Thursday, March 15, 2007 8:47 PM First-time setup Setting up the computer Computer setup involves the following tasks: 1. Inserting the battery into the computer 2. Connecting the computer to external power ✎ The battery begins to charge. 3. Turning on the computer 4. Setting up the software 5. Creating recovery discs (recommended) Refer to Appendix A,”Backup and recovery,” for ✎ instructions.
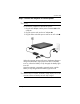
443562-001.book Page 3 Thursday, March 15, 2007 8:47 PM First-time setup Step 2: Connect the computer to external power Power cords and AC outlets vary in appearance by region and ✎ country. To connect the computer to external AC power: 1. Plug the AC adapter into the power connector 1 on the computer. 2. Plug the power cord into the AC adapter 2. 3. Plug the other end of the power cord into an AC outlet 3.
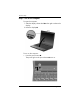
443562-001.book Page 4 Thursday, March 15, 2007 8:47 PM First-time setup Step 3: Turn on the computer To open the computer: 1. Slide the display release latch 1 to the right to release the display. 2. Raise the display 2. To turn on the computer: » Press the power button 1. The power light on the power button 2 turns on.
443562-001.book Page 5 Thursday, March 15, 2007 8:47 PM First-time setup Step 4: Set up the software After the computer is turned on, it will go through software setup. Follow the on-screen instructions to set up the software. Note the following points: ■ After you respond to the setup prompt, you must complete the entire setup process without interruption. Setup time varies. ■ During software setup, the computer may pause periodically for several minutes.
443562-001.book Page 1 Thursday, March 15, 2007 8:47 PM 2 Quick tour Identifying required hardware Components included with the computer may vary by region and ✎ model. The illustrations in this chapter identify the standard features included on most computer models.
443562-001.
443562-001.
443562-001.book Page 4 Thursday, March 15, 2007 8:47 PM Quick tour Right-side components Computer features vary depending on model. Refer to one of the following illustrations.
443562-001.
443562-001.
443562-001.
443562-001.book Page 8 Thursday, March 15, 2007 8:47 PM Quick tour Wireless antennae Two antennae send and receive wireless signals to communicate with wireless local area networks (WLANs) and wireless wide area networks (WWANs). The antennae are not visible from the outside of the computer. To see wireless regulatory notices, refer to the section of the Regulatory, Safety and Environmental Notices that applies to your country or region. These notices are located in Help and Support.
443562-001.book Page 1 Thursday, March 15, 2007 8:47 PM 3 Next steps Protecting the computer The information in this section explains how your computer can be protected from damage caused by a virus, a security breach, a power surge, unsafe operation, or system failure.
443562-001.book Page 2 Thursday, March 15, 2007 8:47 PM Next steps Protecting your system files The HP Backup & Recovery Manager provides several ways to back up the system and to recover optimal system functionality. Refer to Appendix A, “Backup and recovery,” for additional information. Protecting your privacy When you use the computer for e-mail, network, or Internet access, it is possible for unauthorized persons to obtain information about you or the computer.
443562-001.book Page 3 Thursday, March 15, 2007 8:47 PM Next steps Using the computer safely Å WARNING: To reduce the risk of electric shock or damage to your equipment, observe these practices: ■ Plug the power cord into an AC outlet that is easily accessible at all times. ■ Disconnect power from the computer by unplugging the power cord from the AC outlet (not by unplugging the power cord from the computer).
443562-001.book Page 4 Thursday, March 15, 2007 8:47 PM Next steps Connecting to a computer network The computer may have the following networking capabilities: ■ Local area network (LAN) ■ Wireless local area network (WLAN) ■ Wireless wide area network (WWAN) ■ Bluetooth® If you plan to connect the computer to a home office LAN or WLAN, refer to Help and Support for information on networking. If you need assistance to connect to a company LAN or WLAN, contact your network administrator.
443562-001.book Page 5 Thursday, March 15, 2007 8:47 PM Next steps Installing additional hardware and software Identifying and installing hardware To see a list of hardware installed on the computer, follow these steps: 1. Select Start > Computer > System properties. 2. In the left pane, click Device Manager. Windows includes the User Account Control feature to improve the ✎ security of your computer.
443562-001.book Page 6 Thursday, March 15, 2007 8:47 PM Next steps ■ Preloaded software. This is software provided on the hard drive but not ready to use. To locate or install preloaded software or drivers, follow these steps: a. Select Start > All Programs > Software Setup. b. Follow the on-screen instructions and select the check box next to the software program or driver you want to install.
443562-001.book Page 7 Thursday, March 15, 2007 8:47 PM Next steps Turning off the computer correctly Whenever possible, turn off the computer by using the standard shutdown procedure: 1. Save your work and close all open applications. 2. Shut down the computer through the operating system by clicking Start, clicking the arrow next to the Lock button, and then clicking Shut Down.
443562-001.book Page 1 Thursday, March 15, 2007 8:47 PM 4 Troubleshooting Troubleshooting resources If you experience computer problems, perform these troubleshooting steps in the order provided until the problem is resolved: ■ Refer to “Quick troubleshooting,” the next section in this chapter. ■ Access additional information about the computer and Web site links through Help and Support. Select Start > Help and Support.
443562-001.book Page 2 Thursday, March 15, 2007 8:47 PM Troubleshooting The following suggestions may help you determine why the computer will not start up: ■ If the computer is plugged into an AC outlet, be sure that the AC outlet is providing adequate power by plugging another electrical device into the outlet. ■ If the power light on the front of the computer is blinking rapidly, replace the AC adapter with one having a higher power rating, and then plug the adapter into an AC outlet.
443562-001.book Page 3 Thursday, March 15, 2007 8:47 PM Troubleshooting The computer screen is blank If the computer is on but the screen is blank: the computer may be in the Sleep state or in Hibernation; the computer may not be set to display the image on the computer screen; or the display switch may not be functioning properly. Try the following suggestions to resolve the issue: ■ To exit Sleep or Hibernation, briefly press the power button.
443562-001.book Page 4 Thursday, March 15, 2007 8:47 PM Troubleshooting Software is functioning abnormally Follow these suggestions if the software becomes unresponsive or responds abnormally: ■ Restart the computer by clicking Start, clicking the arrow next to the Lock button, and then clicking Restart. If you cannot restart the computer using this procedure, refer to the next section, “The computer is turned on but not responding.” Run a virus scan.
443562-001.book Page 5 Thursday, March 15, 2007 8:47 PM Troubleshooting The computer is unusually warm It is normal for the computer to feel warm to the touch while it is in use. But if the computer feels unusually warm, it may be overheating because a vent is blocked. If you suspect that the computer is overheating, allow the computer to cool to room temperature. Then be sure to keep all vents free from obstructions while you are using the computer.
443562-001.book Page 6 Thursday, March 15, 2007 8:47 PM Troubleshooting The WLAN connection is not working If a WLAN connection is not working as expected, follow these suggestions: ■ Be sure that the wireless light on the computer is on. If the light is off, press the wireless button to turn it on. ■ Be sure that the computer wireless antennae are free from obstructions. ■ Be sure that the cable or DSL modem and its power cord are properly connected, and the lights are on.
443562-001.book Page 7 Thursday, March 15, 2007 8:47 PM Troubleshooting ■ Checkups for computer functionality ■ Automated and interactive troubleshooting, repair solutions, and system recovery procedures ■ Links to community forums of IT experts Contacting technical support If the computer is connected to the Internet, select Start > Help and Support > Contact support to get online help or to access the technical support telephone numbers.
443562-001.book Page 1 Thursday, March 15, 2007 8:47 PM A Backup and recovery Creating recovery discs After setting up the computer for the first time, be sure to create a set of recovery discs of the full factory image. The recovery discs are used to start up (boot) the computer and recover the operating system and software to factory settings in case of system instability or failure.
443562-001.book Page 2 Thursday, March 15, 2007 8:47 PM Backup and recovery To create a set of recovery discs, 1. Select Start > All Programs > HP Backup & Recovery > Backup & Recovery Manager. 2. Click Next. 3. Click Create a set of recovery discs (Recommended), and then click Next. 4. Follow the on-screen instructions. Backing up your information You can only recover files that you have previously backed up.
443562-001.book Page 3 Thursday, March 15, 2007 8:47 PM Backup and recovery Back up suggestions ■ Create a set of recovery discs using HP Backup & Recovery Manager. ■ Create system recovery points using HP Backup & Recovery Manager, and periodically copy them to disc. ■ Store personal files in the Documents folder and back up these folders periodically. ■ Back up templates stored in their associated programs.
443562-001.book Page 4 Thursday, March 15, 2007 8:47 PM Backup and recovery To back up specific files or folders: 1. Select Start > All Programs > HP Backup & Recovery > Backup & Recovery Manager. 2. Click Next. 3. Click Create or manage backups, and then click Next. 4. Click Back up user created files and folders and then click Next. 5. Follow the on-screen instructions.
443562-001.book Page 5 Thursday, March 15, 2007 8:47 PM Backup and recovery Creating recovery points When you back up modifications since your last backup, you are creating system recovery points. This allows you to save a snapshot of your hard drive at a specific point in time. You can then recover back to that point if you want to reverse subsequent changes made to your system.
443562-001.book Page 6 Thursday, March 15, 2007 8:47 PM Backup and recovery To schedule backups: 1. Select Start > All Programs > HP Backup & Recovery > HP Backup Scheduler. 2. Follow the on-screen instructions. Performing a recovery You can only recover files that you have previously backed up. HP ✎ recommends that you use HP Backup & Recovery Manager to create an entire drive backup as soon as you set up your computer.
443562-001.book Page 7 Thursday, March 15, 2007 8:47 PM Backup and recovery Performing a recovery from the hard drive There are 2 ways to initiate a recovery from the hard drive: ■ From within Windows ■ From the recovery partition Initiating a recovery in Windows To initiate a recovery in Windows, follow these steps: 1. Back up all personal files. 2. Select Start > All Programs > HP Backup & Recovery > HP Backup and Recovery Manager. 3. Click Next. 4. Click Perform a recovery, and then click Next. 5.
443562-001.book Page 1 Thursday, March 15, 2007 8:47 PM B Specifications Operating environment The operating environment information in the following table may be helpful if you plan to use or transport the computer in extreme environments. Factor Metric U.S.
443562-001.book Page 2 Thursday, March 15, 2007 8:47 PM Specifications Rated input power The power information in this section may be helpful if you plan to travel internationally with the computer. The computer operates on DC power, which can be supplied by an AC or a DC power source. Although the computer can be powered from a standalone DC power source, it should be powered only with an AC adapter or a DC power source supplied and approved by HP for use with this computer.
443562-001.
443562-001.
3562-001.
443562-001.