www.hp.
Setup and Support Guide English
Copyright and license © 2006 Copyright Hewlett-Packard Development Company, L.P. Reproduction, adaptation or translation without prior written permission is prohibited, except as allowed under the copyright laws. The information contained herein is subject to change without notice. The only warranties for HP products and services are set forth in the express warranty statements accompanying such products and services. Nothing herein should be construed as constituting an additional warranty.
Contents 2 3 4 5 6 Get started ............................................................................................................4 Step 1. Check the box contents .............................................................................4 Step 2. Install the software ....................................................................................5 Step 3. Connect the TMA cable .............................................................................5 Step 4.
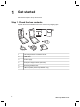
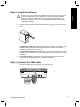
1 Get started Follow these steps to set up the scanner: Step 1. Check the box contents Unpack the scanner hardware. Be sure to remove any shipping tape.
Step 2. Install the software 1. 2. English Caution If you are installing the software onto a Windows computer, do not connect the USB cable to the computer yet. Install the scanning software before connecting the USB cable. If you are installing the software into a Macintosh computer, you can connect the USB cable either before or after installing the software. Insert the HP Photosmart CD that came with the scanner into the computer CD drive.
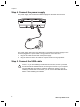
Chapter 1 Step 4. Connect the power supply The power supply has an attached cable that plugs into the back of the scanner. The power supply also has an AC cable that is connected to the power supply on one end and plugged into a power outlet or surge protector on the other end. 1. 2. Plug the AC cable into the back of the power supply. Plug the other end of the AC cable into a power outlet or a surge protector. Step 5.
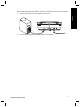
Use the USB cable that came with the scanner to connect the scanner to the computer. Connect the square end of the cable to the scanner. 2. Connect the rectangular end of the cable to the computer. English 1.
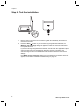
Chapter 1 Step 6. Test the installation 1 1. 2. 8 2 Place a photo or document on the scanner glass as indicated by the reference mark on the scanner. Press the Scan ( ) button. If you are scanning using Windows software, the What are you scanning? dialog box appears. Follow the onscreen instructions to complete the scan. If you are scanning using Macintosh software, the HP Scan Pro application opens and a preview of the scan is displayed.
2 How to use the scanner English This section presents an overview of the scanner and how to use it. Where to get additional information More information about the scanner and software can be found in the scanner Help file. If you have installed the HP Photosmart software that came with the scanner, double-click the HP Solution Center icon on your desktop, and then click Help and Support. Under the Documentation section, click Product Help.
Chapter 2 HP Photosmart Macintosh software When you install the HP scanning software on a Macintosh, two software programs are available in the Dock: HP Device Manager and HP Photosmart Studio. These programs are used for scanning and editing your scans. HP Device Manager is the program that gets you started scanning pictures and documents.
information about how to find the user guide, see Where to get additional information on page 9.
3 Scanner installation troubleshooting This section contains solutions for installation and setup problems. Uninstall and reinstall the software An incomplete software installation could cause the scanner not to be recognized or the software not to launch correctly. Try uninstalling and then reinstalling the HP Scanning software. To reinstall the HP Scanning software, you must have the HP Photosmart software CD. Windows environment: 1. 2. 3. 4. 5. 6. 7. 8.
Check the cables Action Power cable The power cable is connected between the scanner and a power outlet. ● ● ● USB cable English Cable type Ensure that the power cable is securely connected between the scanner and a live electrical outlet or surge protector. If the power cable is connected to a surge protector, ensure that the surge protector is plugged into an outlet and turned on. Turn off the scanner power switch and turn off the computer.
4 Regulatory information and product specifications This section contains regulatory information and product specifications for the HP Scanjet G4000 series Photo Scanner and accessories. Scanner specifications Name Description Scanner type Flatbed with transparent materials adapter (TMA) Size G4010: 303 mm x 5088 mm x 98 mm (11.93 x 20.00 x 3.86 inches) G4050: 303 mm x 5088 mm x 108 mm (11.93 x 20.00 x 4.25 inches) Weight G4010: 4.4 kg (9.6 lbs) G4050: 5.3 kg (11.
Name Description English ENERGY STAR is a U.S. registered service mark of the U.S. EPA. As an ENERGY STAR partner, HP has determined that this product meets ENERGY STAR guidelines for energy efficiency. For more information on ENERGY STAR guidelines, go to the following Web site: www.energystar.
Chapter 4 products. For more information regarding recycling of HP products, please visit: www.hp.com/hpinfo/globalcitizenship/environment/recycle/ Product restricted material This HP product contains the following material that might require special handling at end-of-life: Mercury in the scanner fluorescent lamp and transparent materials adapter (< 5 mg). For recycling information, contact www.hp.com/go/recycle, your local authorities, or the Electronic Industries Alliance at www.eiae.org.
5 Product support English This section describes the options for product support. Accessibility The following accessibility options are available on this scanner: Windows environment: ● ● To prevent buttons from being accidentally pushed, you can use the Button Disable Utility to disable the buttons. You can use the same utility to re-enable the buttons. For more information about the Button Disable Utility, see the scanner User Guide.
Chapter 5 Getting assistance In order to get the best from your HP product, please consult the following standard HP support offerings: 1. 2. 3. 4. 5. 6. 18 Please consult the product documentation that came with the product. – Review the troubleshooting section or electronic Help of this manual/CD. – Review the electronic Help section within the software. Visit the HP online support at www.hp.com/support or contact your point of purchase. HP online support is available to all HP customers.
6 English Hewlett-Packard limited warranty statement The following information outlines the warranty information for this product. Product Duration of limited warranty HP Scanjet G4000 series scanner 1 year A. Extent of limited warranty 1. Hewlett-Packard (HP) warrants to the end-user customer (Customer) that each HP product specified above (Product) shall be free from defects in material and workmanship for the period specified above. The warranty period begins on the date of purchase by Customer. 2.
Chapter 6 KIND, WHETHER EXPRESS OR IMPLIED, WITH RESPECT TO A PRODUCT, AND SPECIFICALLY DISCLAIM THE IMPLIED WARRANTIES OR CONDITIONS OF MERCHANTABILITY, SATISFACTORY QUALITY, AND FITNESS FOR A PARTICULAR PURPOSE. C. Limitations of Liability 1. To the extent allowed by local law, the remedies provided in this Limited Warranty Statement (LWS) are Customer’s sole and exclusive remedies. 2.
设置和支持指南 简体中文
版权与许可 © 2006 版权所有 Hewlett-Packard Development Company, L.P.
目录 1 2 4 5 6 设置和支持指南 3 简体中文 3 使用入门 .....................................................................................................4 步骤 1. 检查盒内物品 .................................................................................4 步骤 2. 安装软件 .........................................................................................5 步骤 3. 连接 TMA 电缆 ...............................................................................5 步骤 4. 连接电源 ...........................................................
1 使用入门 按照以下步骤来安装扫描仪: 步骤 1.
步骤 2. 安装软件 小心 如果您是在 Windows 计算机上安装软件,请先不要将 USB 电缆 连接到计算机上。在连接 USB 电缆之前,请先安装扫描软件。如果您是 在 Macintosh 计算机上安装软件,则可以在安装软件之前或之后连接 USB 电缆。 1. 将扫描仪随附的 HP Photosmart CD 插入计算机的 CD 驱动器。 简体中文 Windows 安装: 等待安装对话框出现。稍后如果仍未出现安装对话框, 请参阅位于第 11 页的“排除扫描仪安装故障”。 Macintosh 安装: 双击桌面上的 CD 图标,然后双击 HP Scanjet 扫描仪 安装图标开始安装。 2. 单击“安装软件”以安装扫描软件。按照屏幕说明完成扫描软件安装。 步骤 3.
第1章 步骤 4. 连接电源 电源有一根附属电缆,可插入扫描仪的后部。 电源还配有一条交流电缆,一端与电源相连,另一端插入电源插座或电涌保护 器。 1. 将交流电缆插入电源后部。 2. 将交流电缆的另一端插入电源插座或电涌保护器。 步骤 5. 连接 USB 电缆 小心 如果在 Windows 环境下进行安装,请确保先安装 HP Photosmart 软件,然后再用 USB 电缆将扫描仪连接至计算机。请参阅 位于第 5 页的“步骤 2.
使用扫描仪附带的 USB 电缆将扫描仪与计算机相连。 1. 将电缆的方形一端连接至扫描仪。 2.
第1章 步骤 6. 测试安装 1 2 1. 按扫描仪上的参考标记所示,将照片或文档放在扫描仪玻璃板上。 2.
2 如何使用扫描仪 本节提供扫描仪概述及有关如何使用扫描仪的信息。 从哪里获得其它信息 在扫描仪帮助文件中可以找到更多有关扫描仪和软件的信息。如果您已安装了 扫描仪随附的 HP Photosmart 软件,请双击桌面上的 “HP 解决方案中心”图 标,然后单击“帮助和支持”。在“文档”部分下单击“产品帮助”。 要访问联机版本的扫描仪用户指南,请单击“开始”,指向“程序”或“所有 程序”,依次指向 “HP”、“Scanjet”、“G4000 系列”,然后单击“用户 指南”。 HP Photosmart Windows 软件 安装 HP Photosmart Windows 软件时,将在桌面上添加两个图标。这些图标 可以打开相应程序,以便扫描和编辑扫描件。 有关如何使用 “HP 解决方案中心”和 “HP Photosmart” 软件的信息,请参 阅扫描仪帮助文件。双击桌面上的 “HP 解决方案中心”图标,然后单击“帮 助和支持”。在“文档”部分下单击“产品帮助”。 您可以从 HP 解决方案中心程序开始扫描图片和文档。使 用 HP 解决方案中心可完成以下所有操作: ● ● ● ● 执行扫描和复印功能 访问帮
第2章 HP Photosmart Macintosh 软件 在 Macintosh 上安装 HP 扫描软件时,Dock 中有两个可用软件程序:HP 设备 管理器和 HP Photosmart Studio。这些程序可用于扫描和编辑扫描件。 您可以从 HP 设备管理器程序开始扫描图片和文档。使用设 备管理器可完成以下所有操作: ● ● ● ● 执行扫描和复印功能 访问帮助和故障排除信息 访问 HP Photosmart Studio 以编辑扫描件 修改设置和首选项 HP Photosmart Studio 是在图像扫描后用于处理、打印、 归档和共享图像的程序。您可以从 Dock 或从 HP 设备管理 器“应用程序”菜单打开 HP Photosmart Studio。 前面板和附件概述 本部分概述了扫描仪前面板和透明材料适配器 (TMA)。 前面板按钮 图标 功能名称 说明 扫描按钮 扫描图片、图形、文档或物体。 扫描胶片按钮 扫描透明正片(例如 35 毫米幻灯片)和底片。 扫描胶片需要使用扫描仪盖板下的透明材料适配 器 (TMA)。 复印按钮 扫描项目并将其发送到打印机以制作副本。
3 排除扫描仪安装故障 本节包含安装和设置问题的解决方法。 卸载和重新安装软件 如果软件安装不完整,可能导致无法识别扫描仪或不能正确启动软件。尝试卸 载并重新安装 HP 扫描软件。要重新安装 HP 扫描软件,您必须有 HP Photosmart 软件 CD。 Windows 环境: Macintosh 环境: 1. 转至应用程序/Hewlett-Packard 并打开 “HP 卸载程序”。 注意 您必须具有管理权限才能卸载软件。 2. 显示提示时,键入您的用户名和密码。“HP 卸载程序”窗口将打开,并显 示可卸载的产品。 3. 选择 G4000 系列产品并单击“下一步”。 4. 按照屏幕说明完成卸载程序。 5. 使用扫描仪随附的 HP 软件 CD 重新安装软件。插入 CD 后,单击桌面上 的 CD 图标开始安装。 设置和支持指南 11 简体中文 1. 依次单击“开始”、“设置”和“控制面板”(在 Windows XP 中,单 击“开始”,然后单击“控制面板”)。 2.
第3章 检查电缆 电缆类型 操作 电源线 电源线连接扫描仪与电源插座。 ● ● ● USB 电缆 请确保连接扫描仪和带电插座或电涌保护器的电源线 连接牢固。 如果将电源线连接到电涌保护器,请确保电涌保护器 插入插座并已接通。 关闭扫描仪电源开关并关闭计算机。60 秒后,再依 次打开扫描仪电源和计算机电源。 USB 电缆连接扫描仪与计算机。 ● ● ● 请使用随扫描仪提供的电缆。其它 USB 电缆可能与 扫描仪不兼容。 请确保扫描仪和计算机之间的 USB 电缆连接牢固。 如果 USB 电缆连接至计算机前端的 USB 端口,请将 其重新连接至计算机后部的 USB 端口。 有关其它的 USB 故障排除信息,请访 问 www.hp.
4 法规信息和产品技术规格 本部分介绍 HP Scanjet G4000 系列照片扫描仪及其附件的法规信息和产品技 术规格。 扫描仪技术规格 名称 说明 扫描仪类型 带透明材料适配器 (TMA) 的平板扫描仪 尺寸 G4010: 303 x 508 x 98 毫米(11.93 x 20.00 x 3.86 英 寸) 简体中文 G4050: 303 x 508 x 108 毫米(11.93 x 20.00 x 4.25 英 寸) 重量 G4010: 4.4 千克(9.6 磅) G4050: 5.3 千克(11.6 磅) 扫描元件 电荷耦合器 接口 USB 2.
第4章 透明材料适配器 (TMA) 技术规格 名称 说明 介质类型 G4010: 最多 5 张 35 毫米幻灯片或 6 张 35 毫米 底片条 G4050: 最多 16 张 35 毫米幻灯片、30 张 35 毫 米底片条,最多 2 张中幅面胶片条(120 卷装胶 片),或 1 张大幅面胶片条(220 卷装胶片)。 电源要求 最大 12 V/400 mA 功耗和法规信息 有关功耗数据、电源信息及法规信息,请参阅 HP Photosmart 软件 CD 上的 regulatory_supplement.
有关回收方面的信息,您可以访问 www.hp.com/go/recycle,或与当地主管 部门联系,或者访问电子工业协会的网站 www.eiae.
5 产品支持 本部分介绍产品支持选项。 辅助功能 本扫描仪提供了以下辅助功能选项: Windows 环境: ● ● 为避免无意中按下按钮,您可以使用“按钮禁用实用程序”以禁用按钮。 您可以使用相同的实用程序重新启用按钮。 有关“按钮禁用实用程序”的详细信息,请参阅扫描仪《用户指南》。 另外,还提供了帮助格式的扫描仪《用户指南》,可通过大多数屏幕阅读 器进行查看。要找到此文件,请双击桌面上的 “HP 解决方案中心”图 标,然后单击“帮助和支持”。在“文档”部分下单击“产品帮助”。 Macintosh 环境: ● ● 要避免无意中按下按钮,请使用“按钮禁用实用程序”禁用按钮。您可以 使用相同的实用程序重新启用按钮。 有关“按钮禁用实用程序”的详细信息,请参阅 HP Scanjet 扫描仪帮助。 HP Scanjet 扫描仪帮助的格式极其常见,可通过大多数屏幕阅读器进行查 看。要找到此文件,请打开 “HP 设备管理器”,然后单击对话框底部的 问号。 伤残人士可以通过访 问 www.hp.
获得帮助 要最大限度地发挥 HP 产品的性能,请了解以下标准的 HP 支持内容: 设置和支持指南 17 简体中文 1. 请参阅产品附带的产品文档。 – 查看本手册的故障排除部分或 CD 中的电子版“帮助”。 – 查看软件中的电子版“帮助”部分。 2. 访问 HP 在线支持 ( www.hp.com/support) 或联系出售产品的商家。 HP 在线支持适用于所有 HP 客户。它是获取最新产品信息和专家帮助的快 速通道,包括以下功能: – 通过电子邮件向资深在线支持专家进行快速咨询 – 更新产品软件和驱动程序 – 重要的产品技术问题和故障排除信息 – 产品及时更新、支持通知和 HP 简讯(当您注册产品后即可获得) 3. 通过电话联系 HP 支持 – 支持选项和费用会因产品、所在国家/地区以及语言的不同而有所差 异。 – 费用及相关政策如有变更,恕不另行通知。请登录网 站 www.hp.com/support,了解最新信息。 4. 保修期过后 过了有限保修期之后,客户可以通过以下网站获得在线帮 助: www.hp.com/support。 5.
6 Hewlett-Packard 有限保修声明 以下信息列出了有关本产品的保修信息。 产品 有限保修期限 HP Scanjet G4000 系列扫描仪 1年 A. 有限保修范围 1. Hewlett-Packard (HP) 向最终用户(客户)保证:上述每个 HP 产品(产 品)在以上指定的保修期内无任何材料和工艺上的缺陷,保修期自客户购 买产品之日算起。 2. 对于每个软件产品,HP 的有限保修仅适用于执行程序指令时出现的故障。 HP 不保证每个产品的运行都不会中断或没有故障。 3. HP 的有限保修仅适用于因正常使用 HP 产品而出现的那些故障,不适用于 其它任何问题,包括因下述情况而出现的故障: a. 不正确的使用、维护、存储、处理或修改; b. 不是由 HP 提供或支持的软件、介质、部件、附件、耗材或电源适配器 或其它来源;或者, c. 在产品规格外的其它条件下操作。 4. 在保修期内,如果 HP 收到任何产品缺陷通知,将由 HP 决定是更换还是 维修有缺陷的产品。 5.
C. 有限责任 1. 在当地法律允许的范围内,本有限保修声明 (LWS) 中所提供的补救方法是 客户唯一的专有补偿。 2. 在当地法律允许的范围内,除本有限保修声明 (LWS) 专门所述之义务外, HP 或其第三方供应商不对任何直接、间接、特殊、意外性或随发性损失负 责,不论它是基于合约、侵权还是任何其它法律理论,也不论是否建议过 此类损失的可能性。 D. 当地法律 根据采购协议,您可能还可以从经销商处获得其它法定权利。这些权利不会受 本 HP 有限保修的影响。 您可以在本书封面内侧找到在您所在国家/地区提供 HP 有限保修的 HP 实体责 任人的名称和地址。 设置和支持指南 19 简体中文 1. 本有限保修声明赋予客户特定的法律权利。客户在美国不同的州、加拿大 不同的省和世界上不同的国家/地区,还可能有其它的权利。 2. 如果本有限保修声明与当地法律不一致,应将本保修声明修改为与当地法 律一致。根据当地法律,本有限保修声明的某些免责声明和限制可能不适 用于客户。例如,美国联邦政府、美国的某些州以及美国以外的某些政府 (包括加拿大的省)可能: a. 授予客户附加保修权利; b.