HP Enterprise, HP Managed - HP Universal Scan Solution User Guide SUMMARY Learn how to install, set up, and use the HP Scan application (app).
Copyright and License © Copyright 2021 HP Development Company, L.P. Reproduction, adaptation, or translation without prior written permission is prohibited, except as allowed under the copyright laws. The information contained herein is subject to change without notice. The only warranties for HP products and services are set forth in the express warranty statements accompanying such products and services. Nothing herein should be construed as constituting an additional warranty.
Table of contents 1 Introduction .................................................................................................................................................................................................1 Requirements .........................................................................................................................................................................................1 Supported file types................................................................
7 Manage Shortcuts.................................................................................................................................................................................... 63 Rename a Scan Shortcut.................................................................................................................................................................... 63 Restore a Scan Shortcut to default settings ............................................................................
1 Introduction Use this guide to learn how to install, use, and manage the HP Scan application with HP Enterprise and HP Managed printers and scanners. Users can also use this guide to learn about application features including basic and advanced scanning options such as how to email or save a scanned document as PDF/JPEG, and how to enable Everyday scan or Scan as Editable Text (OCR) settings. Requirements Learn about prerequisites for installing and using the HP Scan app.
Supported file types Learn about file types supported by the HP Scan app. File Type indicates the file format of the scanned image. Both image file formats (JPEG, BMP, TIFF, PNG or PDF) and document file formats (Text, Rich text, Word, Excel, CSV, and Searchable PDF) are supported. The following file types are supported in HP Scan: NOTE: The supported file types vary depending on the shortcut selected. Shortcut Supported file types Save as PDF PDF, Searchable PDF, PDF/A(.
2 Install the HP Scan app This chapter provides information on how to install the HP Scan app. Install the HP Scan app Use the steps in this chapter to set up and install HP Scan. There are three methods that can be used to set up and install HP Scan. ● Install the Full software including the basic driver and recommended plug-ins using the install wizard ● Install the Basic driver .exe and recommended plug-ins separately one by one ● Install the Basic driver .
4. Click Let HP detect your product, or type the model name of the scanner, select the scanner, and then click Submit. 5. Wait for your product to be detected and for the drivers and software to display. 6. Expand the Basic Drivers or Driver-Product Installation Software section, depending on the installation method that you want to use. 7. Click Download. 8. Click Save to automatically download the web pack to the Downloads folder.
Install the software using the install wizard Follow these steps to install the HP Scan software, drivers, and plug-ins using the set up wizard. NOTE: Installation using the basic web pack is similar to the full web pack except the basic web pack does not install the plug-ins. The plug-ins will need to be installed separately. Launch the set up wizard Launch the install wizard to start the set up process. Do NOT connect the USB cable to the product until prompted. 1. Double click .
3. Select Next to install the full software and plug ins, or select Customize Software Selections to remove any options that you do not want to install. NOTE: For basic web pack installations, only the basic driver will be listed. The wizard will help in installing basic drivers and plug-ins. 4. 6 Read the End User License Agreement and Data collection settings, select the check boxes to accept the terms, and then select Next.
5. Wait for the wizard to prepare and install the software. Connect using a USB cable Finish installing the software using a USB cable. Do NOT connect the USB cable to the product until prompted. 1. Select the connection option. ● Automatic Setup – Make sure the USB is connected and then select this option to automatically detect the connection type. NOTE: If the USB cable is not connected from the device to the computer, then the installer will check for Wired/Wireless connection options.
● 8 Manual Setup – Select this option to manually select the preferred connectivity set up. a. Select USB and select Next. b. When prompted, connect the USB cable to the scanner and wait for the scanner to be detected.
2. Wait for the connection and set up process to complete. 3. When prompted, select the device country and language, and then click Next.
4. Select Finish to complete the installation. A shortcut to HP Scan is created on the desktop and in the Start menu, and the software redirects to the registration screen. 5. Register the product (optional). Connect using a wired network Install the software with a wired network connection.
1. Select the connection option. ● Automatic Setup – Select this option to automatically detect the connection type. NOTE: If the device is connected to the computer using USB cable, then the installation will continue with USB connectivity. If USB connectivity is not detected, it will check for Wired/Wireless options. ● Manual Setup – Select this option to manually select the preferred connectivity set up. a. Make sure the network cable is connected. b. Select Wired Network and select Next.
c. 12 Wait for the scanner to be detected, select the device, and then select Next. 2. Wait for the connection and set up process to complete. 3. When prompted, select the device country and language, and then click Next.
4. Select Finish to complete the installation. A shortcut to HP Scan is created on the desktop and in the Start menu, and the software redirects to the registration screen. 5. Register the product (optional). Connect wirelessly Install the software with a wireless connection.
1. Select the connection option. ● Automatic Setup – Select this option to automatically detect the connection type. NOTE: If the device is connected to the computer using USB cable, then the installation will continue with USB connectivity. If USB connectivity is not detected, it will check for Wired/Wireless options. ● 14 Manual Setup – Select this option to manually select the preferred connectivity set up. a. Select Wireless and then select Next. b.
2. Wait for the connection and set up process to complete. 3. When prompted, select the device country and language, and then click Next. 4. Select Finish to complete the installation. A shortcut to HP Scan is created on the desktop and in the Start menu, and the software redirects to the registration screen.
5. Register the product (optional). Install the plug-ins for the basic web pack Follow these steps to install the plug-ins needed to complete the basic web pack installation. Installation using the basic web pack is similar to the full web pack except the basic web pack does not install the plug-ins. The plug-ins must be installed separately. Plug-ins are needed to provide support for specific features or functionalities. After installing the basic driver, follow these steps to install the plug-ins.
3. On the General tab, take note of the device name and the path location. 4. Open a command prompt window as an administrator. 5. Type the following command replacing path with the location you noted previously and replacing devicename with the name you noted previously: msiexec.exe /i "path\devicename.
6. Wait for the installation to complete. 7. After running the command to install the software, go to devicesetuplauncher to provide the connection type. Add a printer or scanner to the app To add a device to the HP Scan app, follow these steps. 18 1. Open the HP Scan app. 2. Open Settings by clicking the gear icon from the Homescreen. 3. Select the plus icon and select a device. 4. Select Add to confirm.
3 App overview Use the steps in this chapter to get acquainted with the HP Scan app. HP Scanner Assistant tabs Learn about the different features and tabs in the HP Scan app. The HP Scan app has several tabs: Scan, Help, and Tools. Scan tab The Scan tab is used to launch the scan interface. It also includes the following options: NOTE: When the device is connected through USB, Manage Scan to Computer and Scanner Home Page (EWS) options are not visible.
● Readiris Pro for HP - use to open the third-party app to scan documents into editable text using optical character recognition (OCR) technology via Readiris Pro. Help tab The Help tab includes the following options: ● Online Product Support - use to view online help resources. ● Register Your Product Online - use to register the scanner.
● Maintain Your Scanner - Use to change settings, defaults, and perform scanner maintenance tasks. ● Device Setup & Software - Use to view the scanner status and toolbox, etc. ● Update IP Address - Use to change the IP address for the scanner. ● Data Collection Settings - Use to allow HP to collection information to improve scanner design.
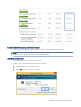
Left pane of the home screen The left pane of the home screen provides a list of tasks called Scan Shortcuts. Scan Shortcuts enable the user to quickly select the desired scan output and destination in one step.
This left pane can also be used to create a new Scan Shortcut with a custom scan output and destination using the Create New Scan Shortcut option, or to enable job storage and assign the scan a PIN using the Job Reservation option. Right pane of the home screen The right pane of the home screen displays the options that can be used to modify the scan settings prior to selecting the Scan button.
The following Scan Shortcuts are a pre-defined list created by HP based on common outputs and destinations: NOTE: Because these shortcuts are pre-defined, they cannot be renamed or deleted. However, custom Scan Shortcuts can be created for specific outputs and destination depending on the user needs and preferences. For more information, see the section Create a new scan shortcut. ● Save as PDF - Save the scan as a PDF output to a local or network folder destination.
You can adjust the the following basic scan, image, and destination options in the right pane before scanning: NOTE: These cannot be changed after selecting the Scan button. For ADF scanning, these options are limited to Item Type, Page Sides, Page Size, and Auto Orient. ● Scan – Item Type: Document, Photo, or Auto Detect – Page Sides: 1-sided (front), 1-sided (back), 2-sided (book), or 2-sided (tablet) NOTE: Book and Tablet refers to the binding point of the scanned page.
– Color Mode - Use to adjust the image color to match the color type of the scanned image. NOTE: When Auto Detect Color is selected, the app will automatically detect the output color for the final scan. – ● Multi-Streaming - Use to enable or disable multi-streaming. Destination - Section includes the the file type and the actual destination. – File type - Use to change the file type. – Send To - Use to change the Send-to destination. NOTE: The default depends on the scan shortcut selected.
Scan preview window After selecting the Scan button, the Scan preview window displays: Left pane of the scan preview window The left pane of the scan preview window has two primary views: Document view and Thumbnail view. NOTE: Regardless of view, the size of each image is displayed below the corresponding thumbnail when the page is selected. Values are shown in inches or centimeters based on the region installed.
images is remembered from session to session. To adjust the size of the individual thumbnails, move the slider bar to increase or decrease thumbnail size. The grid will readjust to display all images at the chosen size. 28 ● Thumbnail view - Displays a set of scanned documents as an array of thumbnails, one for each of the pages scanned. This is the default view.
Right pane of the scan preview window The right pane of the scan preview window provides a basic adjustments area used to edit the scanned pages before saving them. When adjustment settings are changed, they apply only to the selected pages. Overview of the editing tools The Adjustments pane in the Scan Preview window is used to make basic edits to the scanned pages using either the thumbnail and/or the document view.
Select to crop the selected page in the zoom scan preview window. This option is only available in the zoom view. Select to undo a crop operation in the zoom scan preview window. This option is only available in the zoom view. Select to scan and add more pages from the ADF or flatbed. Selecting this icon will revert to the scan settings panel view. Select to mark a scanned page for deletion in the scan preview window.
The Detailed Adjustments view includes the following tabs: NOTE: The detailed scan settings available on these tabs will vary depending on the scan shortcut selected in the left pane. NOTE: If a setting is enabled, then a short description of the applied setting is listed below the name of the tab. If a setting is not enabled, no summary information will display on that tab.
● Scan tab - Use to adjust scan settings such as type of scan, page sides, page size, page orientation, and more. These settings cannot be modified after clicking the Scan button. ● Image tab - Use to adjust the appearance of a single image by changing the exposure, dither, or threshold settings, or to select a specific color from the scanned page using the Multi-color dropout option. These settings can be adjusted after clicking the Scan button.
4 Use the HP Scan app Use the steps in this chapter to learn how to use the HP Scan app. Open the HP Scan app Use one of two methods to open the HP Scan app and the scan interface. Follow these steps to open the HP Scan app and the scan interface. 1. To open the app, using either the Start menu or the desktop shortcut: ● Double-click the HP Scan Universal Desktop Control (UDC) icon on the desktop.
The scan interface home screen displays. Scan a document or photo and use scan preview to edit pages Learn how to scan a document or photo using EveryDay Scan, how to adjust the Shortcut settings before a scan, and how to use the scan preview window to edit scanned pages and/or settings after scanning. 1. Open the HP Scan app. 2. On the Scan tab, select Scan a Document or Photo. The scan interface opens. 3. 34 Place a set of documents in the document feeder or on the scanner flatbed.
4. On the scan interface home screen under Scan Shortcuts in the left pane, select EveryDay Scan. 5. Make any desired changes to the basic Scan Shortcut changes in the right pane prior to scanning. 6. Select the Show Viewer after scan check box. 7. Select Scan. 8. After scanning, edit the pages using the basic Adjustments settings in the right pane of the scan preview window. NOTE: Any changes applied in the basic Adjustments settings will apply to all thumbnails listed in the left pane.
9. If desired, apply more advanced edits to the pages by clicking the More toggle and using the Detailed Adjustments settings, or by right-clicking the image and selecting Open in a Zoom window. NOTE: Edits in the Detailed Adjustments or full screen zoom windows are applied one page at a time. 10. When finished, select Save. Scan to .jpg or .pdf format and save to local destination To save a scan as a .jpg or .pdf format and save it to a local or network folder destination, follow these steps.
1. Open the HP Scan app. 2. On the Scan tab, select Scan a Document or Photo. The scan interface opens. 3. Place a set of documents in the document feeder or on the scanner flatbed. 4. On the scan interface home screen under Scan Shortcuts in the left pane, select either the Save as PDF or Save as JPEG. 5. Make any desired changes to the basic Scan Shortcut changes in the right pane prior to scanning. 6. Select Scan. 7. If prompted, type a name for the .jpeg or .pdf output. Scan as .jpg or .
4. On the scan interface home screen under Scan Shortcuts in the left pane, select either the Email as PDF or Email as JPEG. 5. Make any desired changes to the basic Scan Shortcut changes in the right pane prior to scanning. 6. Select Scan. 7. If prompted, type or select an email recipient. Scan documents into editable text Use either the Scan Shortcut or the Readiris Pro for HP feature in the HP Scan app to scan a document into editable text.
Scan into editable text using the Scan ShortCut Use the Save as Editable Text (OCR) Scan Shortcut in the HP Scan app to scan a document into editable text. NOTE: When scanning using the editable text option, the resolution will automatically default to 300 dpi. This is the minimum resolution required for OCR file types. 1. Open the HP Scan app. 2. On the Scan tab, select Scan a Document or Photo. The scan interface opens. 3. Place a set of documents in the document feeder or on the scanner flatbed.
4. On the scan interface home screen under Scan Shortcuts, select Save as Editable Text (OCR). 5. Make any desired changes to the basic Scan Shortcut changes in the right pane prior to scanning. 6. Select Scan. Scan a business card(s) Use the Cardiris for HP feature in the HP Scan app to scan business cards. Cardiris Pro is a third-party application which is used to scan mostly business cards. 1. Open the HP Scan app. 2. On the Scan tab, select Cardiris for HP. The Cardiris for HP app opens.
4. From the Home screen in the left pane under the list Scan Shortcuts, click the plus sign to expand the Job Reservation option. 5. Select the Enable Reservation check box to enable the feature.
42 6. To assign a PIN for security purpose, select the Use PIN check box, type a numeric PIN (up to four digits). This step is optional. 7. When finished, select OK. A Job Name is automatically assigned and notification displays. 8. Adjust the Scan Shortcut settings in the right pane and when finished, select Scan. 9. To release the reserved job scan from the front panel of the scanner, select the Job Name, and then type the PIN (if you created one).
5 Use the scan preview window to edit scanned pages The scan preview window can be used to preview and edit scanned pages after scanning. View scanned pages in a thumbnail grid in the scan preview window The thumbnail grid view enables basic adjustments page by page using the right pane of the scan preview window. NOTE: The size of selected images is shown below the corresponding thumbnail. Values are shown in inches or centimeters based on the installed locale. 1. Open the HP Scan app. 2.
View scanned pages in a document list in the scan preview window The document list view enables basic adjustments page by page using the right pane of the scan preview window. 1. Open the HP Scan app. 2. Place a set of documents in the document feeder or on the scanner flatbed. 3. Select the Show Viewer after scan check box. 4. Click the Document/Thumbnail icon to toggle to the document view. A list of document document thumbnails is displayed in the Document view of the scan preview window.
5. To view a document in the single image view, double-click the image to open it. Click the 'X' in the upper right corner of the window to close it and return to the list preview. View a scanned page using zoom mode in the scan preview window The zoom option enables basic adjustments using a full screen view in the scan preview window. The zoom feature allows the user to enlarge or reduce the image for editing purposes only. 1. Open the HP Scan app. 2.
The image opens in a full screen view. 6. In the full screen view, use the slider bar to zoom in (enlarge) or zoom out (reduce) the image size for editing purposes. NOTE: Document separators and the “new image” thumbnail are not displayed in the zoom preview window.
7. Use the zoom window tool icons to make any desired changes. NOTE: The changes on each page must be saved separately. If you make any changes and attempt to scroll without saving, a dialog prompt is displayed. If prompted, select Yes to save any changes made in the current page preview before scrolling. Select to rotate the page 90° to the left. This cannot be undone. Select to rotate the page 90° to the right. This cannot be undone. Select to crop the selected page in the zoom scan preview window.
The image opens in a full screen view. 6. In the full screen view, use the slider bar to zoom in (enlarge) or zoom out (reduce) the image size for editing purposes. NOTE: Document separators and the “new image” thumbnail are not displayed in the zoom preview window.
7. To crop an area of interest, use the mouse to select the area and then release the mouse. After releasing the mouse, the crop option becomes available. 8. From the tools icons at the bottom of the screen, select the Crop icon to crop to the selected area. To undo and start again, select the Undo icon. Select to crop the selected page in the zoom scan preview window. Select to undo a crop operation in the zoom scan preview window. 9.
After scanning pages, the preview window has an icons that enable the user to remove pages, or options to mark them for deletion. 1. Open the HP Scan app. 2. Place a set of documents in the document feeder or on the scanner flatbed. 3. Select the Show Viewer after scan check box. 4. Select Scan. 5. In the preview window, use the icon in the lower left of the window to mark an image or page for delete. Pages marked for delete are indicated by an 'X' and will not be included in the final processing.
Use the scan preview window to change page order After scanning pages, the preview window can be used to re-order pages. After scanning pages, the preview window can be used to change the order of pages. 1. Open the HP Scan app. 2. Place a set of documents in the document feeder or on the scanner flatbed. 3. Select the Show Viewer after scan check box. 4. Select Scan. 5. Right-click the thumbnail image for the page you want to move. The selected image is outlined with a blue border. 6.
a. Select a thumbnail image, right-click, and then The image opens in a full screen view. b. In the full screen view, use the slider bar to zoom in (enlarge) or zoom out (reduce) the image size for editing purposes. NOTE: Document separators and the “new image” thumbnail are not displayed in the zoom preview window.
c. Use the zoom window tool icons to rotate the page orientation. NOTE: This change cannot be undone. Select to rotate the page 90° to the left. Select to rotate the page 90° to the right. d. Use the previous or next page icons to scroll and make any additional changes to other pages. NOTE: The changes on each page must be saved separately. If you make any changes and attempt to scroll without saving, a dialog prompt is displayed.
7. Select Add Separator. NOTE: If this option is greyed out or unavailable, make sure to enable the Separate documents feature for this job. To do this, click More, select the Document tab, and then select the Separate pages into multiple documents check box and/or turn Blank Page Separation On. The separator is inserted before or after the selected thumbnail (depending on your placement setting). 8. When finished making adjustments, click Save.
6. Adjust any settings as needed and select Scan.
56 Chapter 5 Use the scan preview window to edit scanned pages
6 Configure the HP Scan app Use the steps in this chapter to set up and configure the HP Scan app. Create a custom Scan Shortcut To add a new custom Scan Shortcut to the left pane of the home screen, follow these steps. A custom Scan Shortcut can be created including the shortcut name, an associated icon, and a set of scan settings. The shortcut will be associated with the specific scanner.
5. Select Create. A new shortcut is created with a default icon and displays at the top of the Scan Shortcuts list in the left pane. The new shortcut is assigned an icon based on the Item Type and Destination chosen for the shortcut. Enable the Scan to computer feature To start a scan from the device to the computer, enable the Scan to Computer feature. 1. Open the HP Scan app. 2. On the Scan tab, select Manage Scan to Computer.
Enable the Scan to USB feature Enable the Scan to USB feature on the scanner control panel option using the HP Scan app. Scan To USB is an option that can be enabled on the scanner control panel. To enable this feature, use the HP Scan app. NOTE: The Scan To USB feature is used from the scanner control panel during a scan-to-usb operation from the scanner control panel to update scan settings by sending them to the hardware via an LEDM protocol. 1. Open the HP Scan app. 2. Select Maintain Your Scanner.
60 3. Enable the Scan to USB feature. 4. Select the Scan to USB tab. 5. Select the Scan to USB settings and click Apply.
Change the scanner IP address Update the device IP address using the HP Scan app. 1. Open the HP Scan app. 2. Select the Tools tab. 3. Select Update IP Address. 4. Change or update the IP address as needed and click Apply. 5. Close the HP Scan app, and then reopen it to apply the change.
62 Chapter 6 Configure the HP Scan app
7 Manage Shortcuts Learn how to rename, delete, or restore modified shortcuts to default settings in the HP Scan app. NOTE: Shortcuts included with the app cannot be renamed or deleted. Only custom created shortcuts can be renamed or deleted. Rename a Scan Shortcut To change the name of a custom Scan Shortcut you created in the HP Scan app, follow these steps. 1. Open the HP Scan app. 2. On the Scan tab, select Scan a Document or Photo. The scan interface opens. 3.
4. Select Yes to confirm. This cannot be undone. The Scan Shortcut settings are resets to the factory default values. Delete a Scan Shortcut To delete a custom Scan Shortcut you created in the HP Scan app, follow these steps. NOTE: Factory default Scan Shortcuts cannot be deleted. 1. Open the HP Scan app. 2. On the Scan tab, select Scan a Document or Photo. The scan interface opens. 64 3. In the left pane of the home screen, right-click the shortcut and select Delete . 4.
8 Manage and maintain the scanner Use the steps in this chapter to manage and maintain the scanner on a device using the HP Scan app. Open the Embedded Web Server (EWS) Learn how to open the device Embedded Web Server (EWS) using the HP Scan app to view and configure scan information. 1. Open the HP Scan app. 2. On the Scan tab, select Scanner Home Page (EWS). The EWS opens. Change or assign the device connection type To assign or change the device connection type, use the Tools tab.
2. Select the Tools tab. 3. Select Device Setup & Software. You will be redirected to the installation set up process to change the connection. Change the scanner settings To change the scanner settings using the HP Scan app, use the Scanner Tools Utility (STU). 1. 66 Open the HP Scan app.
2. Select the Tools tab. 3. Select Maintain Your Scanner. The Scanner Tools Utility opens.
Maintain the scanner To maintain the scanner using the HP Scan app, use the Scanner Tools Utility (STU). 1. Open the HP Scan app. 2. Select the Tools tab. 3. Select Maintain Your Scanner. The Scanner Tools Utility opens.
View device, firmware, or network information To view device, firmware, or network information, use the HP Scan app to open the Embedded Web Server (EWS). 1. Open the HP Scan app. 2. On the Scan tab, select Scanner Home Page (EWS). The EWS opens.
3. 70 Select the Information tab.
9 Uninstall the HP Scan app or remove a device from the app To remove a device from the app and/or uninstall the app, follow these steps. Remove a device from the app Remove a device from the HP Scan application. 1. Open the HP Scan app. 2. Open Settings by clicking the gear icon from the Homescreen.
3. Select a device and then click Delete. 4. Select Delete to confirm. Uninstall the HP Scan app Learn how to uninstall the HP Scan application. 72 1. From the Start menu, select Control Panel. 2. Select Programs and Features. 3. Select HP Scan+ Basic Device Software, right-click the option, and then select Uninstall. 4. Select OK to confirm. 5. Under Devices and Printers, make sure the device has been removed.
Revision history View a list of document revisions. The information contained herein is subject to change without notice. HP shall not be liable for technical or editorial errors or omissions contained herein. Table Revision history Revision number Revision date Revision notes 1.0 03/2021 New release User Guide for the HP Scan app.
74 Chapter 1 Revision history
Index A add device 18 divider 53 page break 53 scanner 18 separator 53 add pages blank 50 scan preview window 54 adjust page settings after scan 34 scanned pages after scan 34 ShortCut settings before scan 34 Adjustments area 29 Adjustments window 26 app, overview, menus 19 assign connection type 65 assign PIN 40 B business cards 40 buttons user interface 29 C Cardiris for HP 40 change connection type 65 default settings 66 ip address 61 scanner settings 66 change page order 51 change page orientation 51 c
More link 30 O open app 33 Embedded Web Server 65 home screen 33 Open in a Zoom window 45, 47, 51 overview home screen 21 scan shortcuts 23 Scan Shortcuts 21 settings 23 tabs 19 P password protect 40 perform maintainenance 68 preview scan 43 preview window 49-51 R re-order pages 51 Readiris Pro for HP 38 remove pages 49, 50 remove scanner 71 rename scan shortcuts 63 restore defaults scan shortcuts 63 revision history 73 S Save as Editable Text (OCR) 38, 39 save scan jpeg 36, 37 local folder 36 network folde