
HP Enterprise, HP Managed - HP Universal Scan Solution User Guide
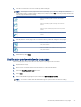

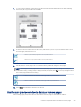
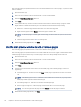
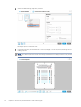
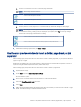
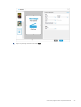

Table Of Contents
- Introduction
- Install the HP Scan app
- App overview
- Use the HP Scan app
- Use the scan preview window to edit scanned pages
- View scanned pages in a thumbnail grid in the scan preview window
- View scanned pages in a document list in the scan preview window
- View a scanned page using zoom mode in the scan preview window
- Use the scan preview window to crop pages
- Use the scan preview window to delete or remove pages
- Use the scan preview window to add or remove pages
- Use the scan preview window to change page order
- Use the scan preview window to change page orientation
- Use the scan preview window to insert a divider, page break, or job separator
- Scan more pages in the scan preview window
- Configure the HP Scan app
- Manage Shortcuts
- Manage and maintain the scanner
- Uninstall the HP Scan app or remove a device from the app
- Index

7. Select Add Separator.
NOTE: If this option is greyed out or unavailable, make sure to enable the Separate documents feature for
this job. To do this, click More, select the Document tab, and then select the Separate pages into multiple
documents check box and/or turn Blank Page Separation On.
The separator is inserted before or after the selected thumbnail (depending on your placement setting).
8. When nished making adjustments, click Save.
NOTE: To delete a page separator, select it, right-click, and then select Delete from the drop-down menu.
Scan more pages in the scan preview window
After scanning pages, the preview window can be used to scan and add more pages to the job.
1. Open the HP Scan app.
2. Place a set of documents in the document feeder or on the scanner atbed.
3. Select the Show Viewer after scan check box.
4. Select Scan.
5. In the scan preview window, select the Add Scan icon. A 'New Image' thumbnail placeholder is added to the
display.
NOTE: To move this placeholder, drag-and-drop the image to a new location in the set of documents.
54
Chapter 5 Use the scan preview window to edit scanned pages