
HP Enterprise, HP Managed - HP Universal Scan Solution User Guide
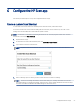

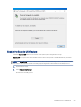
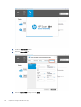


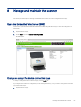
Table Of Contents
- Introduction
- Install the HP Scan app
- App overview
- Use the HP Scan app
- Use the scan preview window to edit scanned pages
- View scanned pages in a thumbnail grid in the scan preview window
- View scanned pages in a document list in the scan preview window
- View a scanned page using zoom mode in the scan preview window
- Use the scan preview window to crop pages
- Use the scan preview window to delete or remove pages
- Use the scan preview window to add or remove pages
- Use the scan preview window to change page order
- Use the scan preview window to change page orientation
- Use the scan preview window to insert a divider, page break, or job separator
- Scan more pages in the scan preview window
- Configure the HP Scan app
- Manage Shortcuts
- Manage and maintain the scanner
- Uninstall the HP Scan app or remove a device from the app
- Index

5. Select Create.
A new shortcut is created with a default icon and displays at the top of the Scan Shortcuts list in the left pane.
The new shortcut is assigned an icon based on the Item Type and Destination chosen for the shortcut.
Enable the Scan to computer feature
To start a scan from the device to the computer, enable the Scan to Computer feature.
1. Open the HP Scan app.
2. On the Scan tab, select Manage Scan to Computer.
NOTE: The Manage Scan to Computer option is only available when the scanner is connected to a wired or
wireless network.
3. Enable the Scan to Computer option.
After enabled, a conrmation message displays.
58 Chapter 6 Congure the HP Scan app