Technical white paper Advanced Host Controller Interface (AHCI) and Redundant Array of Independent Disks (RAID) on HP EliteDesk and EliteOne 705 Business PCs Using AMD Array Management Software (RAIDXpert2) Table of contents Introduction 2 Basics of AHCI and RAID Technology 2 Definitions Important RAID Configuration information Basic RAID Types RAID 0 with two hard drives (Striped) RAID 1 with two hard drives (Mirror) Recommended configurations Other supported configurations Unsupported configurations
Introduction A Redundant Array of Independent Disks (RAID) is a data storage scheme that uses two or more drives accessed in combination to improve fault tolerance. Initially used with servers, desktop PCs are increasingly using RAID controllers and extra ATA or SCSI disks. Newer system boards often have RAID controllers. The HP EliteDesk and EliteOne 705 Business PCs take advantage of Serial Advanced Technology Attachment (SATA) and the integration of RAID into AMD D4 chipsets.
PnP Plug and Play, automated hardware discovery and configuration. POST Power-On Self Test, a BIOS-initiated routine that executes when a system is powered on. System hardware is configured, component integrity is checked, and the system is booted. RAID Redundant Array of Independent Disks, storage technology that combines multiple hard drives into a single logical unit. Described in more detail in this document. ROM Read Only Memory, non-volatile memory that is resistant to modification.
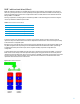
Table 3: RAID 0 with two hard drives (Striped) First disk Second disk Data Segment 1 Data Segment 2 Data Segment 3 Data Segment 4 Data Segment 5 Data Segment 6 Data Segment 7 Data Segment 8 Data Segment 9 Data Segment 10 Data Segment 11 Data Segment 12 Data Segment 13 Data Segment 14 Data Segment 15 Data Segment 16 In the previous table, each “Data Segment n” represents a group of data, known as a stripe. In this case, each row represents a stripe.
RAID 1 with two hard drives (Mirror) RAID 1 has redundancy and hence is a true RAID, which greatly increases reliability. The probability of one hard drive failure on a given day is the square root of the probability of both physical hard drives in the RAID 1 volume failing on a given day. Hypothetically, if the chance for a single hard drive failure is 1:2000, then the chance that both hard drives failing in RAID 1 is 1:4,000,000. Mirroring, segmentation, and striping have no real meaning in RAID 1.
Recommended configurations for HP EliteDesk and EliteOne 705 Business PCs For best reliability, HP recommends factory configurations of the preinstalled RAID1. • The preinstalled RAID1 offering is a RAID 1 volume of two identical SATA hard drives or solid-state drives. You can select from a number of different SATA drive sizes. NOTE: HP EliteDesk and EliteOne 705 Business PCs support Microsoft Windows operating systems.
Enabling RAID through F10 System BIOS 1. 2. Turn on or restart the computer by clicking Start > Shut Down > Restart the Computer. Press F10 as soon as the monitor light turns green. 3. Note: If you do not press F10 at the appropriate time, you must restart the computer, and then press F10 again to access the utility. Use the arrow keys to select the Storage menu. 4. 5. 6. Use the down arrow key to select Storage Options, and then press Enter.
WARNING: Before configuring RAID, be sure to back up all data. Once a RAID configuration is executed and saved, data on the selected disks will no longer be retrievable. 1. From the Main Menu, select Initialize Disks, and then press Enter to access the list of disks to configure. The Drives section of the screen displays a detailed description of available physical drives, including channel, size, and status. 2. Use the A key or Ins key to select the disks to include in the RAID configuration.
4. Select Create Array, and then press Enter. 5. Use the A key or Ins key to select the disks to include in the RAID configuration. Press Enter when you have selected all disks you want to configure. Several options will display successively under User Input. Make the following selections, and then press Enter: 6. - The type of RAID array to create. NOTE: RAID 5 is not supported.
7. Press C to create the array. 8. Press Esc to exit. At system prompt, press Y to reboot or any other key to go back. Select boot order To set up your system to boot from the OS media, you may need to change the boot order in the F10 setup menu. 1. 2. Turn on or restart the computer by clicking Start > Shut Down > Restart the Computer. Press F10 as soon as the monitor light turns green.
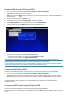
3. When the load driver error window appears (below), insert the RAID driver flash drive and click Browse. 4. Navigate to the directory where the .inf file is located, select it, and click Next. 5. At the license screen check the “I accept…” box and click Next.
6. Select the partition for the OS to be installed and click Next. The OS will install. Failure to install and enumerate the RAID driver after enabling the RAID controller (with or without creating a volume) will result in a Windows boot failure (blue screen) for inaccessible boot device. WARNING: The PCI Device ID of the mass storage controller changes after changing the BIOS “SATA Emulation” Computer Setup option.
4. Click Submit. Recommended Initial Settings These recommended settings are most effective if you accept the initial recommended settings now. You can change them later as necessary. Administrator’s Settings To change the default password: NOTE: Usernames and passwords are case sensitive. 1. 2. 3. From the Options menu, select Password. Type the user name in the Username box. Type the new password into the Password box. Use between 4 and 20 letters and numbers but no spaces or other characters.
4. Type the same password into the Confirm New Password box. With the Notification option, you can manage event log and email notifications of events. To set up Event Notification: 1. 14 From the Options menu, select Notification.
2. 3. 4. Specify the Outgoing Mail Server (SMTP) and To Email Address, to which email messages are sent when an event occurs. If the SMTP server requires a login, check the Server Required Login box and enter a valid Username and Password for the server. Specify a user address as the sender of the email notifications in From Email Address. NOTE: By default, the system on which RAIDXpert2 is installed is used.