
HP ProBook 440 Notebook PC and HP ProBook 445 G2 Notebook PC - Maintenance and Service Guide
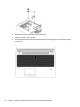
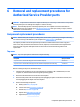


Remove the top cover:
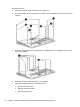
1. Position the computer upside-down with the front toward you.
2. Remove the 6 rubber screw covers (1) and 8 Torx T8M2.5×6.0 screws (2) that secure the top cover to the
computer.
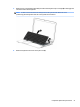
3. Remove the 7 Phillips PM2.5×3.0 screws (1) and the 3 Phillips PM2.0×2.5 screws (2) that secure the top
cover to the computer.
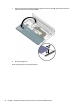
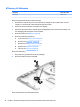
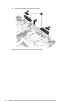
4. Position the computer upright and open it as far as possible.
5. Disconnect the following cables from the system board:
●
(1): Card reader board cable
●
(2): Power button board cable
●
(3): Function board cable
54 Chapter 6 Removal and replacement procedures for Authorized Service Provider parts