
HP ProBook 440 Notebook PC and HP ProBook 445 G2 Notebook PC - Maintenance and Service Guide


Description Spare part number
Intel i5-4210U processor; 1-GB discrete graphics memory 768069-xxx
Intel i3-4030U processor; 1-GB discrete graphics memory 768068-xxx
Intel i5-4210U processor; UMA graphics memory; WWAN models 768064-xxx
Intel i7-4510U processor; UMA graphics memory 768060-xxx
Intel i5-4310U processor; UMA graphics memory 768059-xxx
Intel i5-4210U processor; UMA graphics memory; Non-WWAN models 768058-xxx
Intel i3-4030U processor; UMA graphics memory; WWAN models 768063-xxx
Intel i3-4030U processor; UMA graphics memory; Non-WWAN models 768057-xxx
Intel i3-4005U processor; UMA graphics memory 783994-xxx
Intel Celeron 2957U processor; UMA graphics memory 768056-xxx
AMD A10-7300 processor; 2 GB discrete graphics memory 767468-xxx
AMD A8-7100 processor; 2 GB discrete graphics memory 767467-xxx
AMD A6-7050B processor; 2 GB discrete graphics memory 767466-xxx
AMD A10-7300 processor; 1 GB discrete graphics memory 767464-xxx
AMD A8-7100 processor; 1 GB discrete graphics memory 767463-xxx
AMD A6-7050B processor; 1 GB discrete graphics memory 767462-xxx
AMD A10-7300 processor; UMA graphics memory 767460-xxx
AMD A8-7100 processor; UMA graphics memory 767459-xxx
AMD A6-7050B processor; UMA graphics memory 767458-xxx
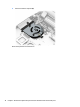
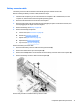
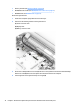
Before removing the system board, follow these steps:
1. Shut down the computer. If you are unsure whether the computer is o or in Hibernation, turn the
computer on, and then shut it down through the operating system.
2. Disconnect all external devices connected to the computer.
3. Disconnect the power from the computer by rst unplugging the power cord from the AC outlet, and
then unplugging the AC adapter from the computer.
4. Remove the battery (see Battery on page 36).
5. Remove the following components:
a. Service doors (see Service door on page 37).
b. Hard drive (see Hard drive on page 39)
c. Optical drive (see Optical drive on page 43)
d. Keyboard (see Keyboard on page 49)
e. Top cover (see Top cover on page 53)
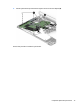
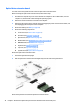
When replacing the system board, be sure to remove the following components from the defective system
board and install on the replacement system board:
Component replacement procedures 73