
User Guide


144 Chapter 5 - Removal and replacement EN
Fuser assembly
1 Separate the scanner from the printer (see pages 113 through
118) and remove the left side door, back cover, and printer top
cover (pages 129, 130, and 132).
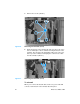
2 Remove two screws (callout 1) from the right fuser support plate.
3 Remove a third screw (callout 2) from behind the large gear on
the right fuser plate and remove it.
Note You can access the third screw through the holes in the 69T gear.
If you need to realign the 69T gear, you must first remove the
pressure roller gear. Release the tab (callout 3) and remove the
pressure roller gear.
Figure 62. Removing the fuser assembly (1 of 4)
2
2
1
2
2
3