
User Guide


160 Chapter 5 - Removal and replacement EN
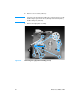
To reinstall
Be sure to align the clutch on the pickup roller shaft with the follower
(large plastic tab) on the paper lift-plate.
Right plate assembly
1 Separate the scanner from the printer (see pages 113 through
118) and remove the left side door and back cover (pages 129
and 130).
2 Remove the front cover, print cartridge door, and front guide
assembly (see pages 133 through 138).
3 Remove the solenoid (see page 151).
4 Remove the fan assembly (see page 153).
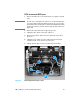
5 Press the small white tab to release the clutch (see inset—you
may need to use a small screwdriver), and slide the clutch to the
left (toward the pickup roller).
Note Make sure that the two halves of the clutch stay together. If they
separate, you might lose the clutch spring.
Figure 81. Removing the right plate assembly (1 of 2)